
This article was initially published on webinuse.com
Whenever we build some app there is a chance we are going to need stackable toasts. Toasts are basically notifications that inform users of some action that they can’t control. E.g. network connection lost, data saved, there is an error. Sometimes we need to show multiple notifications at once, that is where stackable toasts are coming in handy.
The first thing we are going to do is create a basic HTML template.
<!DOCTYPE html>
<html lang="en">
<head>
    <meta charset="UTF-8">
    <meta http-equiv="X-UA-Compatible" content="IE=edge">
    <meta name="viewport" content="width=device-width, initial-scale=1.0">
    <title>Document</title>
</head>
<body>

</body>
</html>
We can use VSCode and Emmet. When we type in html:5in an empty .html file, and then we press TAB, Emmet will create the same boilerplate as above.
Add some JavaScript
Now we need to add some JavaScript to our app.
function createToast(heading = "No heading", message = "No message") {
  //Create empty variable for toasts container
  let container;
  //If container doesn't already exist create one
  if (!document.querySelector("#toast-holder")) {
    container = document.createElement("div")
    container.setAttribute("id", "toast-holder");
    document.body.appendChild(container);
  } else {
    // If container exists asign it to a variable
    container = document.querySelector("#toast-holder");
  }

  //Create our toast HTML and pass the variables heading and message
  let toast = `<div class="single-toast fade-in">
                  <div class="toast-header">
                    <span class="toast-heading">${heading}</span>
                    <a href="#" class="close-toast">X</a>
                  </div>
                  <div class="toast-content">
                    ${message}
                  </div>
               </div>`;

  // Once our toast is created add it to the container
  // along with other toasts
  container.innerHTML += toast;

}


createToast();
createToast("This is heading", "This is the message");
Let’s analyze our code snippet. We created a function createToast(). This function accepts two parameters: heading and message. These two will be passed to our toast as toast heading and toast content. If we omit those two parameters then for heading the value will be 'No heading' and for the message value will be 'No message'.
After that, we have created an empty container variable. To this variable, we will assign #toast-container. Why did we do this? Why not creating div in HTML? Because we are creating stackable toast dynamically and we want to have full control over the page. We don’t want this container to mess with our layout. Also, this means less CSS code and less HTML code. It is not much, but baby steps.
Then, we created HTML for our toast, and we passed our variables from the beginning heading and message. After this HTML is created, we add a toast to our container. As we can see we called function two times. The first time we passed no parameters, and the second time we passed both parameters. This is what we got.
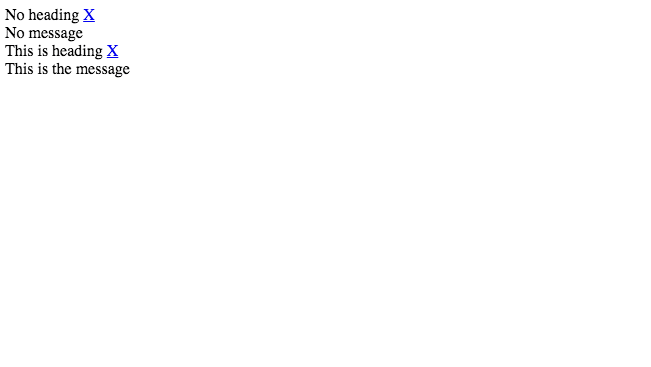
Screenshot of the result
Let’s beautify our stackable toasts
Since we have no CSS, everything is just “standing” there waiting for us. So let’s add some CSS.
* {
  margin: 0;
  padding: 0;
  box-sizing: border-box;
  font-family: sans-serif;
}
#toast-holder {
  position: fixed;
  right: 20px;
  top: 20px;
  width: 200px;
  display: flex;
  flex-direction: column;
}

.single-toast {
  width: 200px;
  border-radius: 5px;
  background-color: white;
  color: #5b5b5b;
  margin-bottom: 20px;
  box-shadow: 0 5px 10px rgba(0,0,0,.5);
  transition: .3s;
  max-height: 100px;
  display: flex;
  flex-direction: column;
}

.toast-header {
  display: flex;
  justify-content: space-between;
  padding: 5px 10px;
  border-bottom: 1px solid #ccc;
}
.close-toast {
  color: inherit;
  text-decoration: none;
  font-weight: bold;
}
.toast-content {
  padding: 10px 10px 5px;
}

.fade-in {
  animation: fadeIn linear .5s;
}

.fade-out {
  animation: fadeOut linear .5s;
}

@keyframes fadeIn {
  0% {
    opacity: 0;
    max-height: 0px;
  }

  100% {
    opacity: 1;
    max-height: 100px;
  }
}

@keyframes fadeOut {
  0% {
    opacity: 1;
    max-height: 100px;
  }
  100% {
    opacity: 0;
    max-height: 0;
  }
}
The first thing we did is we made sure that nothing had margin or padding and that box-sizing is set to border-box. This part of the code makes sure that we do not have weird overflows. After that, we set position:fixed on our container so it doesn’t mess with the page layout. Also, we made sure that it is on the right side of the screen because that is normally where a user would expect it. Apart from this, we set display: flex; flex-direction: column;, because we need toasts to be stacked on top of each other, not side by side.
Then, we added some styling for our stackable toasts. The only thing that, probably, needs explaining is max-height. In CSS we can’t animate height, but we can max-height. That is the reason why we used this property. Also, we created two animations fadeIn and fadeOut. So we can animate the entrance and exit, later. This is what we got now.

Screenshot of the result
As we can see, the layout has changed and also the styling of our toasts is changed. Now, we need to create a function for removing our stackable toasts. We don’t want them there forever.
function removeToast(e) {
  //First we need to prevent default
  // to evade any unexpected behaviour
  e.preventDefault();

  //After that we add a class to our toast (.single-toast)
  e.target.parentNode.parentNode.classList.add("fade-out");

  //After CSS animation is finished, remove the element
  setTimeout(function() {
    e.target.parentNode.parentNode.parentNode.removeChild(e.target.parentNode.parentNode)
  }, 500);
}
We created removeToast() function and we passed an event parameter to it. Since we are clicking on the a tag, we want to prevent any unwanted behavior, hence e.preventDefault(). After that, we assigned a new class .fade-out to our .single-toast so we have nice exit animation. After that animation is finished, we remove toast entirely from the DOM.
Now, we need to pass this function to our createToast function and create eventListener. Let’s see our revised createToast() function.
function createToast(heading = "No heading", message = "No message") {
  //Create empty variable for toasts container
  let container;
  //If container doesn't already exist create one
  if (!document.querySelector("#toast-holder")) {
    container = document.createElement("div")
    container.setAttribute("id", "toast-holder");
    document.body.appendChild(container);
  } else {
    // If container exists asign it to a variable
    container = document.querySelector("#toast-holder");
  }

  //Create our toast HTML and pass the variables heading and message
  let toast = `<div class="single-toast fade-in">
                  <div class="toast-header">
                    <span class="toast-heading">${heading}</span>
                    <a href="#" class="close-toast">X</a>
                  </div>
                  <div class="toast-content">
                    ${message}
                  </div>
               </div>`;

  // Once our toast is created add it to the container
  // along with other toasts
  container.innerHTML += toast;


  /**
   * THIS PART WE HAVE ADDED
   * */

    //Save all those close buttons in one variable
    let toastsClose = container.querySelectorAll(".close-toast");

  //Loop thorugh that variable
  for(let i = 0; i < toastsClose.length; i++) {
      //Add event listener
    toastsClose[i].addEventListener("click", removeToast,false);
  }

}


function removeToast(e) {
  //First we need to prevent default
  // to evade any unexpected behaviour
  e.preventDefault();

  //After that we add a class to our toast (.single-toast)
  e.target.parentNode.parentNode.classList.add("fade-out");

  //After CSS animation is finished, remove the element
  setTimeout(function() {
    e.target.parentNode.parentNode.parentNode.removeChild(e.target.parentNode.parentNode)
  }, 500);
}


createToast();
createToast("This is heading", "This is the message");
The only thing that is left is to remove container if it is empty.
function isEmpty(selector) {
    return document.querySelector(selector).innerHTML.trim().length == 0;
}
What we did here is we checked if innerHTML is empty. But before that, we made sure that we trimmed empty spaces. This way we prevented empty spaces to be “counted” as text by JavaScript. This function needs to be added to our removeToast() function. Why there? Because we want to make sure that this is checked after the stackable toast is removed. Let’s check our improved removeToast() function.
function removeToast(e) {
  //First we need to prevent default
  // to evade any unexpected behaviour
  e.preventDefault();

  //After that we add a class to our toast (.single-toast)
  e.target.parentNode.parentNode.classList.add("fade-out");

  //After CSS animation is finished, remove the element
  setTimeout(function() {
    e.target.parentNode.parentNode.parentNode.removeChild(e.target.parentNode.parentNode);

    /**
     * WE HAVE ADDED THIS PART
     * */

    if (isEmpty("#toast-holder")) {
        console.log(isEmpty("#toast-holder"));
        document.querySelector("#toast-holder").parentNode.removeChild(document.querySelector("#toast-holder"));
    }
  }, 500);
}
function isEmpty(selector) {
    return document.querySelector(selector).innerHTML.trim().length == 0;
}
We can checkout live example of our stackable toast on CodePen.
If you have any questions or anything you can find me on my Twitter, or you can read some of my other articles like How to easily add a WordPress menu to a custom theme.


Top comments (0)