A Testing Guide For Node.js, Express.js, and Mongoose Apps with Jest and SuperTest
The benefits of testing isn’t obvious at first.
Testing is responsible for verifying the correctness of our code. When writing any software, it is important to have confidence in the quality of your code. Tests can help you confirm that your code is working as expected.
In this article, you’ll learn how writing tests will make your coding life easier. I’ll provide a good overview of what testing is, and show you how to write tests for your Node.js/Express.js and MongoDB/Mongoose applications with testing libraries Jest and Supertest.
Let’s get started
Ever wondered how you could test your API without using Postman or ThunderClient? While these tools are helpful, if you’re like me and work in the backend a lot, working with these tools can get time-consuming and tedious. Instead of manually making calls to your API, testing the backend can be automated with unit testing. There are many other benefits to testing but here are a few:
- Helps you keep your codebase in good shape.
- Improves development efficiency.
- Expands how you think about your code.
- Strengthens the reliability of your code.
- Quicker debugging.
- Helps you ensure your application is bug-free.
Testing can even make your development faster. You pay a fee upfront by investing time in creating the test case, but once their complete, you can rerun it at little to no cost. The investment can pay dividends even during the initial development.
Reading tests written by another developer can help you understand their code much faster and can be a guide for how to refactor. Not only is testing useful for the codebase it also provides a benefit to team workflow. Understanding how the code will be tested informs developers on how code should best be composed and modularized.
When writing any software, it is essential to have confidence in the quality of the code. Tests can help you verify that your code is working as expected. Although testing is not required to build healthy apps, it is generally a good development practice to have unit tests.
Unit testing principles
There are many different ways software can be tested. Unit testing is just one of many ways to classify testing.
The single-responsibility principle plays a significant role in developing tests. In JavaScript, if you have a particular function that is supposed to take some arguments, process them, then fire a callback, you might write something known as unit tests that target that specific function as opposed to testing the entire class. Each unit test should only be checking the completion of a single act or responsibility. Unit tests are responsible for verifying the correctness of your code in isolated chunks.
A unit test is a way of testing the smallest piece of code (unit or component). A unit might be an individual function, method, procedure, module, or object. This will drive the code to be written in a way that adheres to the same principle. Unit tests are typically run as you code. When using tests to guide your development work, you can use failing test messages to determine how to move forward and make the test pass.
Tools for Testing
In JavaScript land, there are many testing frameworks out there. To name a few:
- Mocha
- Jest
- Jasmine
- Protractor
- Karma
- Selenium
In this article, we’re only focusing on one in particular: Jest.
Jest is a popular JavaScript testing framework whose strength is its compatibility with many project-types and its lightweight setup.
Jest comes with many built-in features that are key ingredients needed for testing:
- An assertion library — an API of functions for validating a program’s functionality
- A test runner — a tool that executes tests and provides outputted test summaries
This article will also make use of a framework known as Supertest.
What is Supertest?
Supertest is a library that simulates HTTP requests. I’ll be covering how to add testing to a backend Node.js/Express.js app later in this article. Very shortly, you will see how Supertest can be used alongside Jest. Supertest will be implemented to test some Express routes/controllers.
Now you’re ready to start testing your app.
Building your First Test
I’ve already set up a demo Express.js app but this tutorial can be used for your app as well.
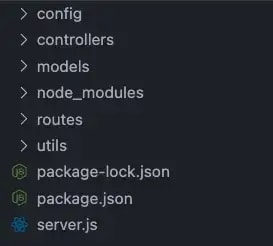
This is an example folder hierarchy:
Let’s say you’ve built a backend REST API for a social network application.
This app should:
- Get all the users
- Get a user by id
- Add user(s) to the database
- Delete user(s) from the database
- Update user information
In order to begin adding tests to your project, you need a few things.
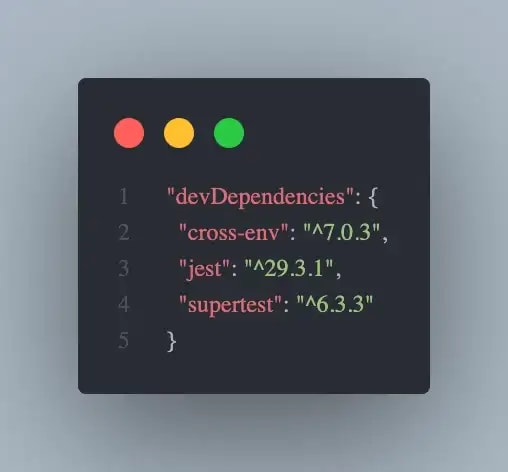
First, you need some packages installed
You will need to install: jest, supertest, and cross-env. Use the code sample below to install them as your project's devDependenciestogether:
npm i jest supertest cross-env --save-dev
We’re using cross-env because it allows you to run scripts that set and use environment variables across platforms.
Next, you need to add some test scripts to package.json
You will need to utilize cross-env to set environment variables, jest to execute test suites, and have testTimeout set to 5000 because certain requests might take a while to finish.
Open up the package.json and under the "scripts" key add the following test scripts:
"scripts": {
    "test": "cross-env NODE_ENV=test jest --testTimeout=5000",
    "start": "node server.js",
    "dev": "nodemon server.js"
},
Once you write your tests, you can run the tests in the terminal with the following command:
npm run test
Next, you need to create a test folder
Jest searches for the folder tests at the project's root when you run npm run test. Let’s create a new file with the same name as the file that you’ll be testing, but add .test.js . Every test file using Jest will need to have .test.js at the end of the name in order for it to be detected as a test case and you must place your test files in the tests folder. Within that directory create a file called user.test.js.
Below is an example file structure:
├── config
├── controllers
│ └── user.controller.js
├── models
│ └── user.model.js
├── node_modules
├── routes
│ └── user.route.js
├── tests
│ └── user.test.js
├── utils
├── package-lock.json
├── package.json
├── .env
└── server.js
Next, you need to import supertest and mongoose in your test file.
MongoDB/Mongoose is the database of choice for this tutorial. You’ll need it to create your unit test. In user.test.js add the following:
const mongoose = require("mongoose");
const request = require("supertest");
Next, you need to import dotenv to load environment variables
In user.test.js add the following:
const mongoose = require("mongoose");
const request = require("supertest");

require("dotenv").config();
Let’s import server.js because this is the location where your application starts.
In user.test.js add the following:
const mongoose = require("mongoose");
const request = require("supertest");
const server = require("../server");

require("dotenv").config();
Next, you’ll need to connect and disconnect the database before and after each test (because you won’t need the database once testing is complete).
In user.test.js add the following:
beforeEach(async () => {
    /* Runs before each test */
    await mongoose.connect(process.env.MONGO_URL, {
        useNewUrlParser: true,
        useUnifiedTopology: true,
    });
  });

  /* Closing database connection after each test. */
  afterEach(async () => {
        /* Runs after each test */
    await mongoose.connection.close();
    await server.close();
  });
Below is a simple test for the /user endpoint to verify that the get request does what’s expected. The describe keyword is used to describe the unit test which you will find to be useful to identify tests in test results. The it keyword is used to write the actual test code. This is where you specify what needs to be performed, in the first argument, and then in the second argument, write a callback function that contains the “arrange, act, and assert” test structure. "Arrange, Act, Assert" is a useful pattern for reading and structuring tests. In the callback function, the request is sent to the endpoint first (arrange and act), and the expected and actual responses are then compared (assertion).
describe("GET /api/user", () => {
    it("should return all users", async () => {
      const res = await request(server).get("/user");
      expect(res.statusCode).toBe(200);
      expect(res.body.length).toBeGreaterThan(0);
    });
  });
Give it a try, write tests for all your endpoints
Below is another simple test for our /user endpoint to verify that our post request does what’s expected.
describe("POST /api/user", () => {
    it("should create a user", async () => {
    const res = await request(server).post("/user").send({
        userName: "pear",
        firstName: "frank",
        lastName: "sonata",
        password: "password",
        email: "franky@mail.com"
    });
    expect(res.statusCode).toBe(201);
    expect(res.body.userName).toBe("pear");
    });
});
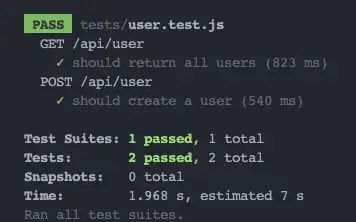
Finally, you can run tests
In the command line, run the following command:
npm run test
Other Testing Tooling
You can install the Jest Extension for VS Code to see the tests using the Beaker icon in the editor. After installing the extension type command-shift-p and select Jest start all runners.
Congratulations! You did it! 😄
Now you know everything you need to know to create new tests for your Express/Mongoose applications.
Summary
Testing your codebase is a very important stage of the Software Development Life Cycle (SDLC) because it strengthens the integrity and quality of the code. The intention of testing is to identify and find solutions for bugs and errors in the product before being shipped off.
Citation
Learn React Testing: Jest Cheatsheet | Codecademy
https://saucelabs.com/resources/articles/test-automation-tutorial
If you have any questions, feel free to message me on Twitter.


Top comments (0)