
Learn how the Overlay driver simplifies multi-host networking on Docker, how to use it, possible use cases and limitations
Link to video: https://www.youtube.com/watch?v=gJVcKVdYhpI
What is the overlay network driver in Docker and how does it power docker swarm and multi-host container networking?
This blog will try to answer that (and more) as simply as possible.
Introduction
This blog is the seventh one in a series for Docker Networking.
- blog #1 - Why is Networking important in Docker?
- blog #2 - Basics of Networking
- blog #3 - Docker Network Drivers Overview
- blog #4 - None Network Driver
- blog #5 - Host Network Driver
- blog #6 - Bridge Network Driver
If you are looking to learn more about the basics of Docker, I’ll recommend checking out the Docker Made Easy series.
Here’s the agenda for this blog:
- What is the
overlaynetwork driver? - How to use it?
- When to use it? - possible use cases
- What are its limitations?
Here are some quick reminders:
- A Docker host is a physical or virtual machine that runs the Docker daemon.
- Docker Network drivers enable us to easily use multiple types of networks for containers and hide the complexity required for network implementations.
Alright, so...
What is the overlay driver?
The
overlaynetwork driver creates a distributed network that can span multiple docker hosts.

Overlay networks were designed to be used with docker swarm services.
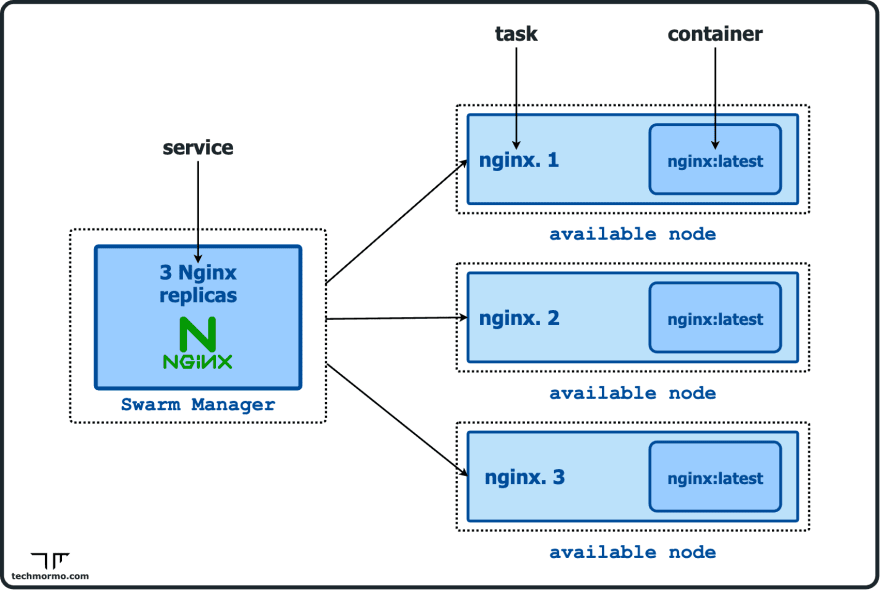
Docker swarm is a container orchestration tool (like Kubernetes) that allows us to manage multiple containers on multiple hosts.
To deploy an application (ie. docker image) on the swarm, we create a swarm service, which can run 1 or more containers from the image.
They will make more sense when we actually try them out in a moment.
When a docker host initiates or joins a swarm, 2 new networks are created:
- a default
overlaynetwork calledingresswhich handles the control and data traffic related to swarm services. - and a virtual
bridgenetwork calleddocker_gwbridgethat connects overlay networks to the individual Docker daemon’s physical network.
Like custom bridge networks we saw in the last tutorial, custom or user-defined overlay networks can be created using the docker network create command (using the --driver overlay option).
Let’s directly see overlay drivers in action…
How to use the overlay driver?
I encourage you to follow along to get the most out of this tutorial.
Initialize the swarm
Provision hosts with network connectivity
To see the full potential of overlay networks, we need multiple hosts. Let’s go with 3.
The simplest solution is to use a Virtual Machine tool like VirtualBox or UTM (on Mac) to create multiple VMs.
For multiple machines to communicate together as a swarm using overlay, docker requires the following ports to be open between the hosts:
- TCP port 2377 for cluster management communications
- TCP and UDP port 7946 for communication among nodes
- UDP port 4789 for overlay network traffic
If you’re running VMs locally, make sure the VMs can reach each other over the network (ie. select ”Internal Network” on VirtualBox, or “Shared Network” on UTM).
If you’re running VMs on the cloud or in a strict networked environment, make sure to update your firewall rules / security groups to account for the open port requirements.
Before moving forward, ensure connectivity between your hosts with something like ping.
I have created 3 Debain Linux VMs named node1, node2 and node3.
Install Docker
Follow the official docker instructions to install Docker Server on all your hosts.
https://docs.docker.com/engine/install/
Create the swarm and join the nodes
On the first node, we will run the following:
docker swarm init
This will initialize the swarm with the first node as the manager and the only member for now.
It should also print the command that will let us add other nodes into the swarm as workers, like the following:
docker swarm join --token SWMTKN-1-07ti6ugkt6hia44ljws48eik9t4v0806515jkodf3zn1pb7uod-15c75qxan0guvqmcswt4blz2l 192.168.64.4:2377
We will copy the full docker swarm join command and run it on each of our remaining nodes.
When all are successfully joined, we can check the nodes by running the following on the manager node:
docker node ls
We can also check that the 2 new networks were created with:
docker network ls
Awesome, we now have a docker swarm cluster with an overlay network!
The default overlay network - ingress and routing mesh
Let us start off by creating a service named whoami using the containous/whoami image:
docker service create \
    --name whoami \
    -p 8000:80 \
    containous/whoami
This image runs a tiny webserver on port 80 inside the container, and simply returns some OS and HTTP information.
The -p 8000:80 option tells docker to map port 80 inside the container to port 8000 on the host.
But on which host?
Check which host (NODE) the container is running on using:
docker service ps whoami
Let’s say the container is running on node2.
How can we confirm that the ingress network is being used?
Switch to the node2 terminal and get the container ID:
CONTAINER_ID=$(docker ps --filter name=whoami.1 --format '{{.ID}}')
Then inspect its network:
docker inspect $CONTAINER_ID --format='{{json .NetworkSettings.Networks}}' | jq .
You should see a json object named ingress, confirming our hypothesis.
Since the service has been published on port 8000, if we send a request with curl from node2, like:
curl 127.0.0.1:8000
We will get something like this:
Hostname: fb772a20940c
IP: 127.0.0.1
IP: 10.0.0.28
IP: 172.18.0.3
RemoteAddr: 10.0.0.3:59882
GET / HTTP/1.1
Host: 127.0.0.1:8000
User-Agent: curl/7.64.0
Accept: */*
Not surprising.
But the cool thing is, if you try to run the same curl command on the other hosts, you will still get the same response (except for RemoteAddr), even though those nodes don’t have the container running in them. Try it out!
Why is that?
All swarm nodes participate in an ingress routing mesh. The routing mesh enables each node in the swarm to accept connections on published ports for any service running in the swarm, even if there’s no container running on the node.
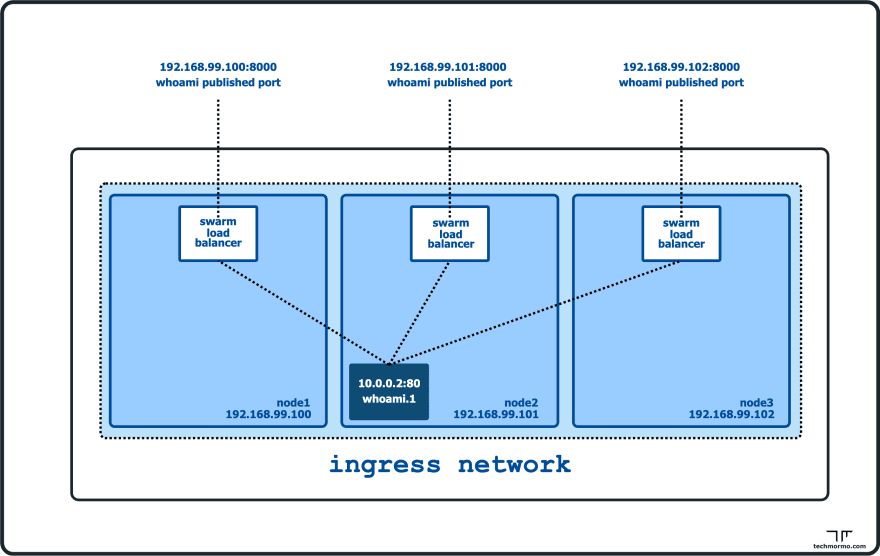
This means, whenever a docker swarm service publishes a port (with -p/--publish), that service is reachable on that port across all swarm nodes. The overlay network is responsible for routing the traffic to the correct container on the correct node.
But what if there are more than 1 containers?
Let’s find out!
Running multiple containers of a service is as simple as:
docker service scale whoami=3
In a few seconds, we should have 3 replicas of the whoami container running.
Check which host (NODE) the containers are running on using:
docker service ps whoami
We should see that all 3 nodes are assigned a container.

Docker swarm is smart enough to distribute the container workload among the available nodes.
If we now curl again on any of the nodes with:
curl 127.0.0.1:8000
We should see that the Hostnames and IPs are also changing.
This is because, containers running under a swarm service on the overlay network are automatically load-balanced!
Awesome.
Now, what if we want to attach a standalone container (not a swarm service) on the overlay network, for example to communicate across hosts?
If we try to do the following:
docker run -d --rm \
    --network ingress \
    --name app1 \
    nginx:alpine
This will raise an error like “PermissionDenied desc = network ingress not manually attachable.”
The default overlay network (ingress) doesn’t allow attaching standalone containers. For that, we can use…
User-defined Overlay Networks
At first, we have to create a network with the overlay driver option:
docker network create \
    --driver overlay \
    --attachable \
    my-overlay
By using the --attachable flag, docker will allow us to attach standalone containers to it.
If we try to run a standalone container again but this time using our custom overlay network my-overlay:
docker run -d --rm \
    --network my-overlay \
    --name app1 \
    nginx:alpine
it should work.
Since app1 is lonely, let’s run a service with 3 replicas (containers) on my-overlay as well:
docker service create \
    --name web \
    --network my-overlay \
    --replicas 3 \
    nginx:alpine
NOTE: we have not published any ports, but this image runs nginx server on port 80 inside the container.
Now, web service containers can communicate with app1 container and vice versa!
Really?
Try to reach web service from app1 simply by using the name of the service with curl:
docker exec app1 curl web
It should print out the index.html page of nginx.
To test the other way around ie. communication from web service to app1, first, get the container id of a web service container.
CONTAINER_ID=$(docker ps --filter name=web --format '{{.ID}}' | head -n 1)
Then use exec again to curl app1:
docker exec $CONTAINER_ID curl app1
See the nginx index page?
Congratulations! You now know how to use overlay networks! 🎉
Of course, there’s a lot more to it but we have covered the essentials. Feel free to learn more from the official docs.
Clean up
Let’s clean up our mess.
Remove app1:
docker rm -f app1
Then remove the services from the manager node:
docker service rm whoami web
After the services are down, remove the custom overlay:
docker network rm my-overlay
Then, remove each of the worker nodes from the swarm (by running on each worker node):
docker swarm leave
Finally, make the manager leave the swarm:
docker swarm leave --force
Well done! 👏
When to use the overlay driver? - possible use cases
- If you have multiple nodes to deploy your containerized workloads, but you have a small team with limited containerization experience.
- If you need a simple container orchestrator like docker swarm, but do not have the time/resources to invest in more complex orchestrators like Kubernetes.
Limitations of the overlay driver
-
overlaydriver is slower thanhostdriver: If you need the highest network performance and your workload is running on a single host, or you are okay with setting up the OS level routing by yourself, then thehostdriver would be more suitable thanoverlay. This is becausehostdriver directly uses the host’s network, instead of having to setup separate interfaces, and port-mapping configurations. - Docker (swarm) does not natively support autoscaling: autoscaling is not supported out of the box as you need to provision new infrastructure/servers which is out of the scope of docker. There are 3rd party tools/scripts that can help, but if you really need the ability to autoscale, you should consider something like Kubernetes or AWS ECS.
Conclusion
In this blog, we learnt about the overlay network driver in docker - what it is, how to use it, and some possible use cases and limitations.
By connecting multiple docker daemons in a swarm, the overlay driver simplifies multi-host networking. But its drawbacks are to be kept in mind, especially when using it in production.
I hope I could make things clearer for you, be it just a tiny bit.
In the next blog, we will summarize what we learnt in this docker networking series.
Thanks for making it so far! 👏
See you at the next one.
Till then…
Be bold and keep learning.
But most importantly,
Tech care!

Top comments (0)