
Link to video: https://www.youtube.com/watch?v=no9QFPUExGs
Understand the difference between Docker Images & Containers, how they work and how Storage is optimized by Docker for maximum efficiency and performance
What's the difference between Docker Images and Containers?
How does Docker manage to build and run them so quickly?
What's actually happening under the hood?
If you have ever wondered about any of the above, you're in for a treat! 🍝
Here's the agenda for this blog:
- Understand what Docker Images are and how they relate to containers
- Look under the hood to learn what makes them work on the disk/storage level
- Appreciate how Docker maximizes storage efficiency and performance by being lazy
Accompanying the explanations, we will also have examples using the docker cli which you can follow along.
This is the second blog on the "Docker Made Easy" series. If you haven't read the first one, I highly recommend you do so before continuing this one.
https://medium.com/techmormo/what-is-docker-docker-made-easy-part-1-8cd5a0a26907
If you can't access medium, try this: https://techmormo.com/posts/docker-made-easy-1-what-is-docker/
Just to help us clarify the main concepts, let's start by recalling that...
Docker is a platform that allows us to package our applications into deployable executables - called containers, with all its necessary OS libraries and dependencies.
A Docker Image is a blueprint or template for creating Docker Containers.
Docker Containers are processes that enable OS-level virtualization.
And
Virtualization gives us the ability to create virtual environments from a single physical machine or computer.
You already know this in much more detail if you have gone through the first blog.
But how do Images actually work? It seemed like magic to me when I had started out.
Let's uncover the black box...
How Docker Images work
In simple terms,
A Docker Image specifies a sequence of steps required to perform a particular task.
That task could be to run a web server or to run a cron job or send an email or whatever you can make a computer do.
An Image can be built manually by running the commands step-by-step against the Docker daemon. But in most cases, it is built using a Dockerfile where the commands to be run are specified in code, and thus, can be automated.
Since examples are an excellent way to understand concepts, let's have our own!
To follow along, open up your terminal and create a new directory to work with. If you're on windows, I suggest opening up git-bash.
mkdir docker-image-demo
cd docker-image-demo
Let's create a Dockerfile with the following contents -
FROM alpine
RUN apk update
COPY . /app
CMD [ "/app/my-app.sh" ]
This file basically says:
- use the
alpineImage as the parent of our Image (more on this later) - update of the indexes from all configured package repositories using
apk- the Alpine Linux package manager (similar toaptoryum) - copy files from the current directory of the host (in this case your computer) to the
/appfolder inside the container - run the
/app/my-app.shshell script when the container is started
NOTE: Alpine is a Linux distribution like Ubuntu or Fedora, but it is SUPER lightweight. Its Docker Image is about 5-6 MB only!
Let's create a simple shell script for our demo which prints the DateTime every 2 seconds -
#!/bin/sh
while true; do
        echo "hi! what time is it?"
        echo "it is - `date`"
        sleep 2
done
Now make this file executable.
chmod +x my-app.sh
Alright, we're all set!
Now, to create an Image from the Dockerfile, we can run -
docker build -t my-app .
The . specifies the current directory as the PATH for the build context i.e. to use the files in the current directory in building the Image. If the Dockerfile isn't explicitly mentioned on the command, Docker looks for it on the PATH i.e. current directory.
NOTE: by using a
.dockerignorefile you can exclude certain files from the context like secret credentials or large dependencies likenode_modulesetc.
-t my-app tells Docker to tag the final Image as my-app.
When you run the build command, Docker runs each step on Dockerfile one by one after loading the build context.
-
Firstly, Docker checks if the alpine Image exists locally or not. If not, It will be pulled from the Docker hub registry.
NOTE: Docker registries are stores/repositories of Docker Images.
Then, package indexes are updated for all configured repositories using
apkThen, files from the current directory are copied to a directory named
/appinside the containerFinally,
CMDspecifies the command to run when starting a container from this Image. (Important) It is NOT executed while building the Image.The Image is created and tagged as
my-app.
Now the cool thing is, if you have already built the Image before, any consecutive builds to that Image will be much faster.
You can verify that by running the build command again. You should notice that it's much faster this time.
But why is that?
This is because - Docker caches the steps which form a stack of layers.
Image as a Stack of Layers
Instead of running all the commands every time you re-build an Image, Docker detects which was the first step that changed. And then, it only performs the steps after that i.e. it rebuilds the consequent layers from the one that changed.
Each step in building an Image forms a layer. The layer itself is an Image.
Therefore, a Docker Image can be thought of as stacking (or layering) one or more Images on top of one another, where -
Each Docker Image is just a
diff(or difference) to its previous Image.
By diff, it means what has changed since the previous layer, similar to a Git diff like this one.
Sounds confusing?
We can run docker history my-app to review the history of the Image we've just built. Here's my output -
IMAGE          CREATED          CREATED BY                                      SIZE      COMMENT
421fe9cc45f6   2 minutes ago    CMD ["/app/my-app.sh"]                          0B        buildkit.dockerfile.v0
<missing>      2 minutes ago    COPY . /app # buildkit                          176B      buildkit.dockerfile.v0
<missing>      2 minutes ago    RUN /bin/sh -c apk update # buildkit            2.15MB    buildkit.dockerfile.v0
<missing>      7 weeks ago      /bin/sh -c #(nop)  CMD ["/bin/sh"]              0B
<missing>      7 weeks ago      /bin/sh -c #(nop) ADD file:f278386b0cef68136…   5.6MB
This shows there were 5 steps in building our Image, with the ones on top coming after the ones below.
The <missing> Image IDs indicate that those layers were built on another system and/or are not available locally. Ignore them. The second step from the bottom with a size of 0B practically does nothing, so that can be ignored as well.
Just wait, we will visualize the layers shortly! 👀
Tip: you can use the dive tool to peek into the layers of an Image yourself.
Each layer or Image has a unique ID, but not all of them have tags. Tags are meant to be human-readable (e.g. my-app, python:3.6, nginx:1.19), so only the final Image that you will use is tagged, skipping the intermediate ones.
You can tag any Image multiple times with whatever name you desire using docker tag.
Parent and Base Images
Now you might wonder - "If each Image is derived from the previous one(s), where does the initial Image come from?"
That's a great question.
The answer is, it comes from that Image's Parent. The FROM keyword on a Dockerfile defines the Parent Image to be used (remember that we used alpine).
There can be multiple parents of an Image, but for most use cases a single parent is good enough.
Okay, now you might wonder again - "What's the parent of that parent Image? And what's the parent of the parent of the parent?"
Before we get lost in this parent-ception - let's formalize this question.
Q. Where does the hierarchy of Images start from?
The answer is drum rolls...
It always starts from scratch.
And I mean, you literally write...
FROM scratch
# ...
Clever naming by the docker creator(s). 💯
Writing FROM scratch means - your resulting Image will not have any parents and is termed to be a Base Image.
You are provided with a totally empty Image which you have to build from the ground up. It is meant for advanced users and use cases, especially where the most minimal Image is required.
So, just knowing this option exists is good enough for us now.
Running Containers from an Image
So, how do Containers interact with this stack of layers / Images?
Remember that, we defined Images to be blueprints for containers.
When you want to run a container, you specify the Image to use. Let's say we want to run a container using our my-app Image -
docker run --name app1 -d my-app
This runs a container named app1 using the my-app Image we had built previously.
The -d says to run the container in the background, so that you have access to your terminal, instead of your terminal directly being attached to the container's I/O.
You can follow the logs generated by the container by running -
docker logs -f app1
You should see the echo statements being printed every 2 seconds.
Use ctrl+c or command+c to stop following the logs.
To stop and remove the container run -
docker rm -f app1
Storage Efficiency & Performance
The storage of the resulting container & layers can be represented like so -

NOTE: All Images are immutable once built i.e. they are read-only.
Therefore, Docker creates a thin read/write (R/W) layer on top of the Image stack for the container.
If the container wants to write/modify any files, this is the layer on which it will be written to. For doing that, Docker uses the copy-on-write (CoW) strategy.
Think of it as copying lazily.
If a write operation needs to be performed by the container, Docker copies the file(s) from the Image layer(s) underneath to the thin R/W layer of the container.
If no write operations are to be performed, the container just reads files from the Image(s) directly.
NOTE: The implementations details of how the layers are managed depend on the storage driver being used, and is well beyond the scope of this blog. You can read more about it here.
In addition to copy-on-write, Containers can also share Images!
If you create multiple containers from an Image, this is how their storage can be represented like -
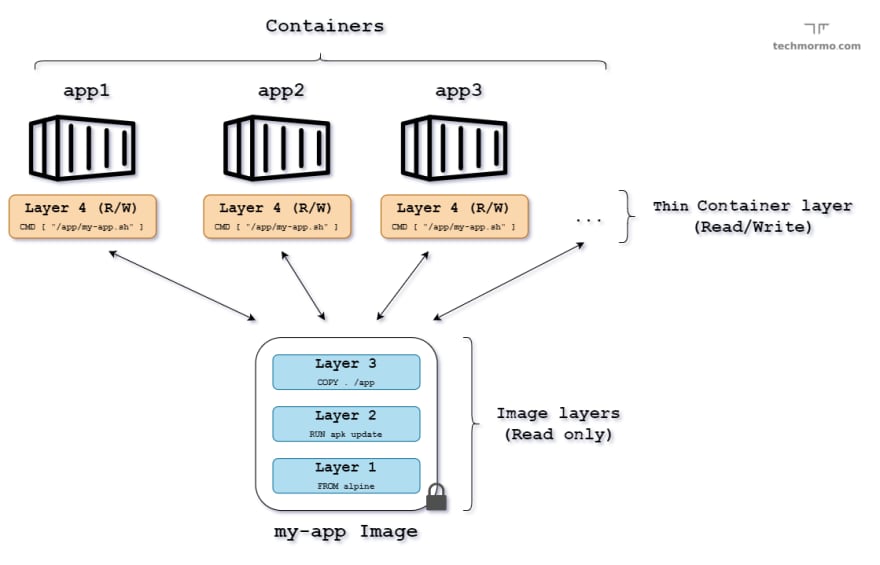
Since all the containers use the same Image, the Image can be shared, while each container will have its own thin R/W layer.
Therefore, Docker maximizes storage efficiency and performance -
- by sharing layers, which promote smaller Image sizes thus reducing the storage footprint
- and by using copying-on-write, which minimizes I/O operations - achieving super fast load times for containers.
If you, like me, think that it's an engineering masterpiece, then you, my friend deserve a high five! 👏
Just imagine, if Docker copied the entire stack of Images every time a new container was created (like VMs) - it would be really ugly, both in terms of space and time.
So, its fit to say, it pays to be lazy if you're a computer program... 🦥
Do you wish this was true for you too?
Conclusion
Alright.
Today we learnt quite a bit about how Docker Images work, and how Storage is utilized to gain stunning efficiency and performance.
What did you find the most interesting? Was I able to shed some light on the topic? I'd love to hear your thoughts.
The Containerization technology absolutely intrigues me, and I can't wait to learn and share more about it with you!
Hope to see you around! 👋
Till then, keep learning!
But most importantly…
Tech care!
Credits:
- Container Icon by Pixel perfect

Top comments (0)