introduction
in this article, I would love to discuss the journey I had when building a package and publishing it npm ( node package manager ).
Yesterday, I published the Fast File Converter Package and it's an achievement that I can give some of what I have learned to the community as I've got many from there ( all of us do ).
We will be more focused on the codebase in this article along with tips and notes that may help you when you create your next package.
Pdf Excel Generator VS Fast File Converter
Last year, I have published a package under the name of "Pdf Excel Generator" and you can find the archived GitHub repository. As of today, the package has been deprecated on NPM.
Fast File Converter is an upgrade of Pdf Excel Generator, there were limitations with the PEG :
- it was written in plain JS.
- there was a lot of bad code in it and bad architecture.
- it was supporting 2 types only ( PDF & Excel )
- there was no room to grow.
- bad input validations
- inefficient documentation.
However, with the FFC, I have opened a door with more possibilities:
- It's written with TS
- easier to achieve great source code with TS with good practices and types
- now it's supporting 7 diffrent types.
- the code & the architecture that is written has a lot of room to grow and scale up in the future.
- with TS deceleration files, you can enjoy input validations from TS.
Overall, that was a huge boost and improvement from the previous package to this one.
Fast File Converter(FFC) codebase architecture
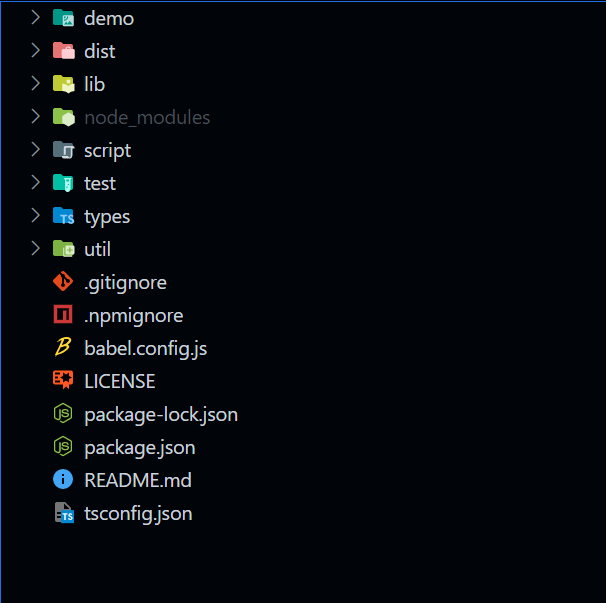
The Above image is the folder architecture of FFC, it's open source under an MIT license and you can find it on GitHub.
Demo Folder :
if you want to create a package, you must provide some examples for developers to understand to use your package.
I've created a Demo Folder and I have added some examples in it that are suitable for the usage of my package, by "suitable" I mean that the examples can change according to your package, in my case that I have built an express application that runs a server to use this package and download it when you hit the example's routes.
Dist Folder :
As some of you may don't know what a dist folder is, the dist or destination folder is a directory that I have specified for the Typescript builds to be there, so basically it's the build of the Project folder.
however it may seem weird that I have committed this folder, usually, it's not recommended to push your build into GitHub but :
if your package is running on the browser ( client side ), you must have it there so that only JS runs on the browser
my Demo folder is not importing the package from the NPM but rather from the dist folder, so it can be used as a development tool as well to see your changes right away with the demos.
Lib Folder :
Lib or Library folder is the directory where all of our core TS files of the package's functionality lie in there.
and this can be the most important folder because usually you only code in this folder to change the source code of the package and make changes to it.
and at the end, TS files in this directory will be compiled to JS to be ready for production ready.
Script Folder :
we cannot do everything with our TS code, at some point there will be limitations to achieving what you want to achieve.
The scripts folder is for my bash files, bash files are plain text files that contain a series of commands to interact with the OS usually.
you may ask what i have been using Bashs in this project, I only have 2 bash scripts that
The first one is to move or copy my assets to the build folder when a build happens
The second one is to move or copy the Type folder to the build folder when a build happens so that file declarations work properly.
Test Folder
Tests are essential and important for any project regardless of what type of test you are writing.
even though I have created a package and unit tests make more sense but I have thought that integration tests will be more beneficial for my case as I need to respond back to the user.
So I have written Integration tests inside the Test Folder to test the Demo Routes and make sure that all of our supported types work properly without any errors.
Types Folder :
The types folder is a folder where my custom types lie, any TS project should have this so that your Types are not mixed with the Application logic because I can tell you, types with the code will be an easy mess very quickly.
The Rest of the Architecture
not much left to discuss, the util folder is for utility functions but we don't have any in this project to mention.
.npmignore is a file to specify which part of your project can be downloaded when someone does npm install, it's a critical file because you don't want your users to have the whole project in their node modules.
LICENSE is a file to specify which License you are using, there are many options here but mostly the open source projects go with MIT because it gives a complete right of usage of the package.
readme.md is a file you should carefully describe your package in, that's the entry point if someone sees your package and you should carefully and completely explain & document the package.
Conclusion
thanks for reading this article :)


Top comments (0)