Introduction
Nowadays, we are used to working in a cloud environment. There are a lot of cloud solutions or platforms, google cloud, azure, AWS, Adobe cloud, and a lot of other options.


Normally, a tech team or a whole enterprise works with more than one cloud platform. This causes the need for communication between each platform. In our case, we work with two cloud platforms. We are working with Azure and AWS.
Now, we are working with a solution that needs access from the azure function to AWS redshift. We found the first big difficulty, as you know, the azure function is an isolated serverless process where you don't have control over how and where it is executed.
The problem
The need to connect to Redshift. You need a redshift odbc driver installed on the machine. I was surprised when I discovered that this driver is not installed in the azure function runtime thread.
The solution
We were working on it when we learned that the azure function can execute in docker environment. This is the link where explain how to do it(create an azure function with docker).
To solve the odbc redshift driver dependency we modified the base docker image adding the necessary odbc redshift driver.
Docker File:

What is doing with this Docker file? Let me explain all the steps:
- Publish the app
- Install redshift driver
- Initialize odbc environment
Publish the app in docker file
This step I think does not need some explanation. Is simple, build and publish our application.
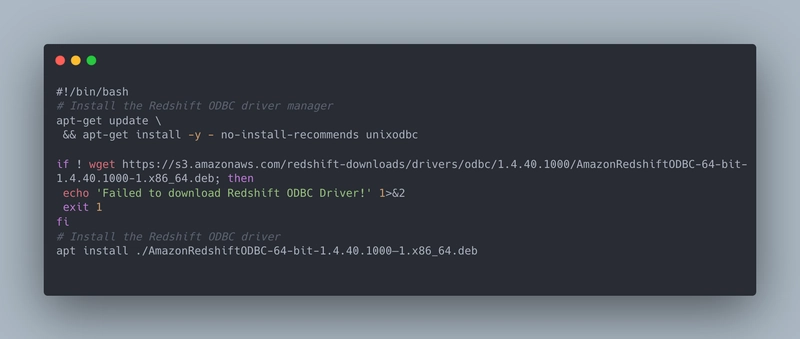
Install redshift driver
We use Jack Vanlightly's work for this proposal (document). We used the next script to install the dependencies. Is a simple apt-get instruction with all necessary packages.
install-redshift-drivers.sh
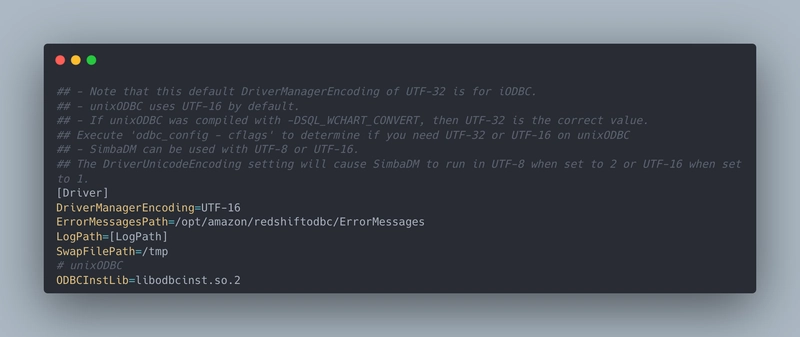
Initialize odbc environment
In this step, we execute all necessary scripts to initialize the new odbc configuration.
Odbc.ini

Odbcinst.ini

Amazon.redshiftodbc.ini
Env.sh

At this point, we have an image where the odbc redshift driver is installed. The next step is to deploy this image in your azure function.
Deploy
We are going to explain how we deploy this solution. We don't show a deep vision because it is another big topic that we can discuss extensively.
To deploy this solution we need two steps. First, we need to publish this docker image in our container registry allocated in Azure. If you are interested in this topic you can learn about it here.
The second one is to create/update the azure function with the necessary configuration. To accomplish this field we use terraform and some custom terraform modules. We are going to show our main terraform file with the configuration.
terraform {
  required_version = ">= 1.0.11"
  backend "azurerm" {
    features {}
  }
  required_providers {
    azurerm = {
      source  = "hashicorp/azurerm"
      version = "2.68.0"
    }
  }
}

provider "azurerm" {
  features {}
}

locals {
  tags = merge(
  {
    environment = var.environmentName
    keepalive   = var.environmentName != "pro" ? "false" : "true"
    team        = "crm"
    product     = "Redshift"
    feature     = "Segmentation producer"
    type        = "function"
  },
  var.tags
  )
}

module "resourceGroup" {
  source   = "./modules/resourceGroups"
  rg_name  = "rg-${var.appServiceNameBase}-${var.environmentName}"
  location = var.location
  tags     = local.tags
}

resource "azurerm_app_service_plan" "asp" {
  name                = "asp-containerized-functions-linux"
  location            = var.location
  resource_group_name = module.resourceGroup.rg_name
  kind     = "elastic"
  maximum_elastic_worker_count = 1
  //app_service_environment_id = "awstocrm365apsdev"
  reserved = true

  sku {
    tier = "ElasticPremium"
    size = "EP1"
  }
}

module "storageAccount" {
  source   = "./modules/storageAccounts"
  rg_name  = module.resourceGroup.rg_name
  sa_name  = "${var.storageAccountBase}${var.environmentName}"
  location = var.location
  env      = var.environmentName
  tags     = local.tags
}

module "applicationInsigths" {
  source   = "./modules/applicationInsigths"
  rg_name  = module.resourceGroup.rg_name
  ai_name  = "${var.prefix}-${var.appServiceNameBase}-${var.environmentName}"
  location = var.location
}

module "keyVault0" {
  source          = "./modules/keyVaults"
  env             = var.environmentName
  rg_name         = var.kvp_ResourceGroupName
  secretName      = var.keyVaultsSettings[0].keyVaultName
  kv_name         = var.kvp_Name
  configName      = var.keyVaultsSettings[0].keyVaultConfigName
  kv_subscription = var.kv_subscription
}

module "keyVault1" {
  source          = "./modules/keyVaults"
  env             = var.environmentName
  rg_name         = var.kvp_ResourceGroupName
  secretName      = var.keyVaultsSettings[1].keyVaultName
  kv_name         = var.kvp_Name
  configName      = var.keyVaultsSettings[1].keyVaultConfigName
  kv_subscription = var.kv_subscription
}

data "azurerm_container_registry" "registry" {
  name                = "crcrmcpqpre"
  resource_group_name = "rg-crm--cpq-pre"
}

resource "azurerm_function_app" "funcApp" {
  name                       = "${var.prefix}-${var.appServiceNameBase}-${var.environmentName}"
  location                   = var.location
  resource_group_name        = module.resourceGroup.rg_name
  app_service_plan_id        = azurerm_app_service_plan.asp.id
  storage_account_name  = module.storageAccount.sa_name
  storage_account_access_key = module.storageAccount.sa_primary_accesskey
  version                    = "~3"
  tags                   = local.tags
  os_type                    = "linux"

  identity {
    type  = "SystemAssigned"
  }

  app_settings = merge(merge({
    FUNCTION_APP_EDIT_MODE                    = "readOnly"
    https_only                                = true
    DOCKER_REGISTRY_SERVER_URL                = "https://${data.azurerm_container_registry.registry.login_server}"
    DOCKER_REGISTRY_SERVER_USERNAME           = "${data.azurerm_container_registry.registry.admin_username}"
    DOCKER_REGISTRY_SERVER_PASSWORD           = "${data.azurerm_container_registry.registry.admin_password}"
    WEBSITES_ENABLE_APP_SERVICE_STORAGE       = false
    DOCKER_CUSTOM_IMAGE_NAME                  = "${data.azurerm_container_registry.registry.login_server}/functions/redshiftproducer:latest"
    APPINSIGHTS_INSTRUMENTATIONKEY = module.applicationInsigths.ai_instrumentation_key
  },
  var.appSettings),
  {
    "${module.keyVault0.kv_secret_config_name}" = module.keyVault0.kv_secret_endpoint,
    "${module.keyVault1.kv_secret_config_name}" = module.keyVault1.kv_secret_endpoint
  }
  )

  site_config {
//    always_on         = true
    linux_fx_version  = "DOCKER|${data.azurerm_container_registry.registry.login_server}/functions/redshiftproducer:latest"
  }
}

module "KeyVault_Permisions" {
  source                = "./modules/KeyVault_Permissions"
  kvp_name              = var.kvp_Name
  kvp_rgpName           = var.kvp_ResourceGroupName
  kvp_tenantId          = azurerm_function_app.funcApp.identity[0].tenant_id
  kvp_objectPrincipalId = azurerm_function_app.funcApp.identity[0].principal_id
  kvp_subscription      = var.kv_subscription
}
Conclusions
Usually, as developers/engineers, we meet many stoppers in our daily lives. The first impression would be that the problem does not have solutions, but if you invest a bit of time reading other people who have the same or similar problems helps to find a solution for your problems.
For this reason, I think that it is important to share our knowledge!

Top comments (0)