
I work as a fullstack web developer at a scale up company in Sweden. At this time I was managing the website for the company, built in React and Typescript. After a deploy one day we realised we had broke the style completely of one page on our website. We rolled back, fixed it, and deployed again.
This happened a couple of times, and it started to become rather annoying. I wanted a way to quickly be able to inspect all pages of the website in just a couple of clicks and catch any design regressions. Earlier that year I had been on a meetup in Stockholm where a guy presented this tool called Happo.io which promised design testing for frontend components. This didn't really cut it for what I wanted to to though. I wanted to compare my entire pages with different environments to be able to catch any regressions.
At this time I decided to build a tool on the website that could only be reached from a special link and only in development mode. I used puppeteer to go through all pages and upload the images to the special url. There I could open them in a large window and inspect to see if any design regressions had occurred. This helped me big time and it looked something like this:
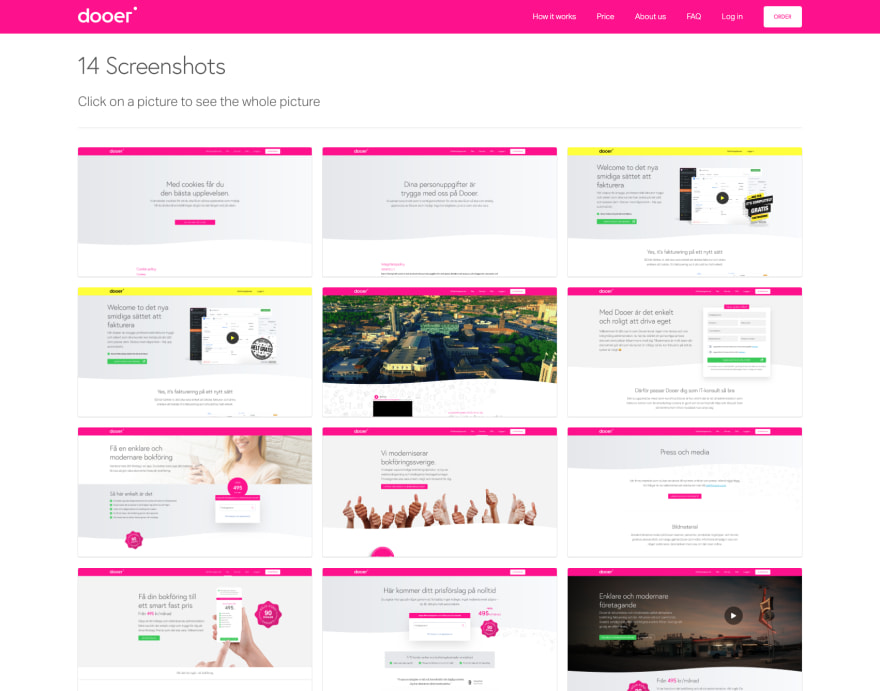
After this I decided to implemented the possibility to screenshot the pages on different environments. For example, let's say you have a local version of your website running on http://localhost:3000 and a live running on https://yourwebsite.com. Then, it would be really nice to quickly be able to compare all of pages on your website between these to environments to find any regressions in the design. This turned out to look something like this:

Breaking it out
After some time I realised this probably didn't have to live on the website itself, but rather live on a completely separate platform where you could go and inspect to results. For this, 3 different projects were set up.
- NPM module for the user to install
- Backend for the platform
- Frontend for the platform
Let's start breaking down NPM module
NPM module for the user to install
This was really the tough part I want to say. Although I already had a script from the website code that I could start out with I needed to somehow save the screenshots in the cloud, but then also save references to them in a database so that some frontend could fetch and display them for the user. For uploading images to the cloud I used the Cloudinary API. This is done from the backend project which receives straight up buffers from the NPM module in the end user project. All the NPM module really does is the following:
- Set up request with the requested user config
- Spin up headless/ful browser
- Authenticate and loop through pages requested from the user
- Take screenshot
- Send screenshot to backend
Backend for the platform
So as the NPM module loops through, screenshots, and send the screenshot images, the backend needs to somehow take these images, upload and then save them to a database. This is done using the Cloudinary API for image hosting, and the DeepAI API for image similarity classification. Here's what the backend does regarding the images.
- Sets up cloudinary config
- Upload image to Cloudinary
- Compare the new image to the old image
- Remove the old image from Cloudinary and the database
- Add the new image to the database
Image uploading
router.post("/images", async (req, res) => {
  const apiToken = req.header("api-token");

  cloudinary.config({
    cloud_name: process.env.CLOUDINARY_NAME,
    api_key: process.env.CLOUDINARY_API_KEY,
    api_secret: process.env.CLOUDINARY_API_SECRET
  });

  // Upload images to Cloudinary
  cloudinary.uploader
    .upload_stream(async function(error, result) {
      if (error) return console.error(error);

      if (result) {
        const { name, env } = req.body;

        const options = {
          useFindAndModify: false
        };

        // Find current image in project
        const currentProject = await Project.findOne(
          { apiKey: apiToken },
          {
            images: { $elemMatch: { name, env } }
          },
          options
        );

        // Delete current image before uploading new version
        let diff;

        if (
          currentProject &&
          currentProject.images &&
          currentProject.images.length
        ) {
          const currentImage = currentProject.images[0]

          const images = {
            image1: currentImage.default,
            image2: result.secure_url,
          }

          diff = await deepai.callStandardApi("image-similarity", images);

          await cloudinary.uploader.destroy(currentImage.publicId);
        }

        // Remove the image from the databse
        const project = await Project.findOneAndUpdate(
          { apiKey: apiToken },
          {
            $pull: { images: { name, env } }
          },
          options
        );

        // Add the new image
        await project.update(
          {
            $push: {
              images: {
                default: result.secure_url,
                small: getImageUrlWithSize(result, 'sm'),
                large: getImageUrlWithSize(result, 'lg'),
                publicId: result.public_id,
                name,
                env,
                diff: diff.output.distance !== 0
              }
            }
          },
          options
        );

        res.json({
          project
        });
      }
    })
    .end(Buffer.from(req.body.image));
});
The backend does a lot of other stuff that any other backend API usually does. Like:
- Create and authenticate users
- Create teams, invite members, update member roles
- Manage projects
- Create, delete and update API-keys ...
The backend is build using Node.js, Express, REST and MongoDB for the database. This is a stack I am very good with - although if I would have rebuilt everything I would probably have gone with GraphQL.
Frontend for the platform
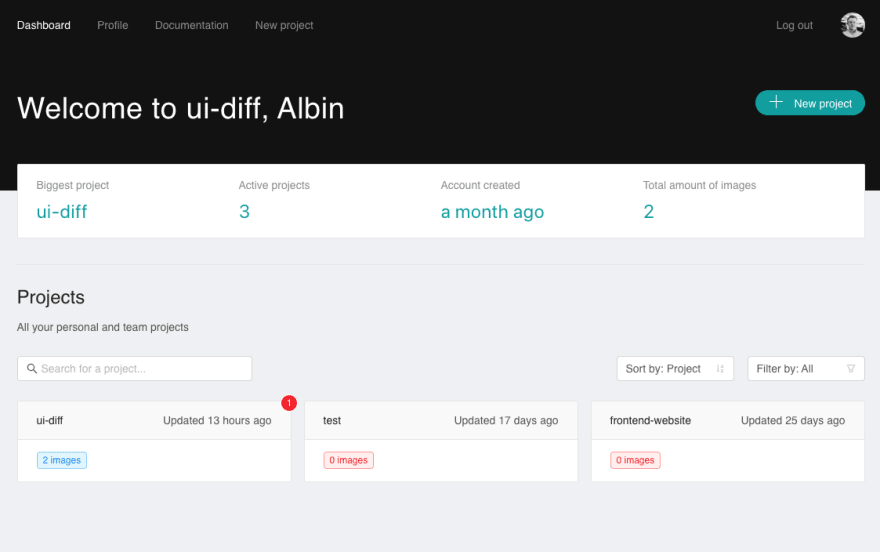
The frontend is also built using Javascript. It used Typescript, React Context API and axios-hooks (for http requests). The frontend consists of quite a few pages to create a proper and stable frontend for people to test their real projects and apps. The frontend is a platform for you to create multiple projects. You get 1 api key for each project. This means you can use this for screenshot testing all of your different projects and get the images in separate places on the platform. The dashboard view looks like this:
Dashboard
Project page
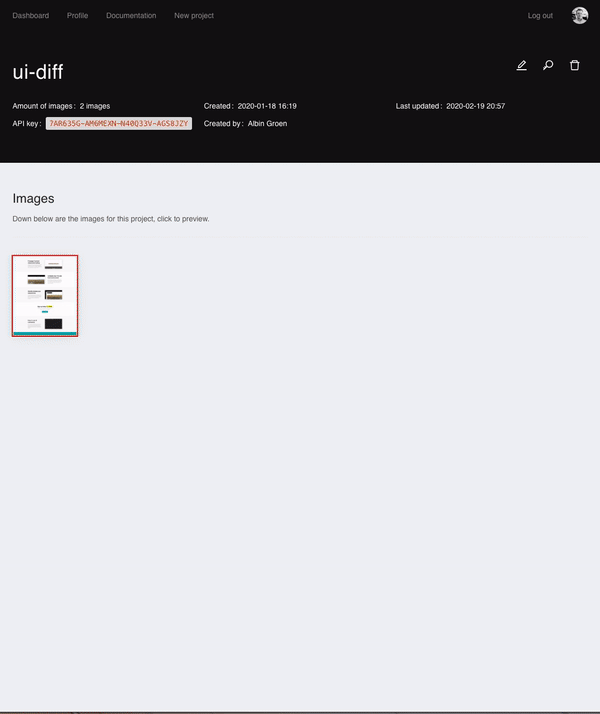
The project page does the same page as the initial page on the website I managed. It has some more features though like:
- Indicating diffs on a image
- Better and more performant previews
- Better design
- Basic statistics
This page looks like this:

As you can see here, our image has a red border around it. This means the image is different to what it previously was. If we open it we can compare it with between different environment and also browse images back and forth.
More functionality
- Login
- Dashboard
- Sort and filter projects
- Project page
- Create project
- Edit project
- New API key
- Profile
- Teams
- Create team
- Invite member
- Update member role
- Edit team
- Log out
Try it out!
This is a project I've been working on for quite some time. Right now it's totally free to use. This is because I want to see to response from you developers out there and find ways to improve it even more. It's also open source so consider contributing if you would like to!
Github page: https://github.com/albingroen/ui-diff
Project page: https://ui-diff.com/


Top comments (2)
This is just incredible. Really good work here, Albin.
Thanks David!