
This article was originally published on the DeadSimpleChat blog: Golang Websocket chat server
In this article we are going to create a chat application with golang / websocket server in the backend and html front end
It is going to be a Group chat application where everyone connected to the chat will be able to talk with each other
Prerequisites and Application Stack
Here are the prerequisites
- Knowledge of general programming
- Golang
- basic HTML and CSS
How will the Application look like
💡 New to DeadSimpleChat? It's a turn key chat that you can easily add to your website or App —without any complicated code. For Virtual / Live events, SaaS App, Social Platform, Education, Gaming, Finance Sign Up for Free

This is a simple application for learning how to create a chat server with golang and WebSockets
Scaffolding the Application
To install go in your linux machine follow the below steps
- go to usr/local/go and delete the folder if it exists
- Download the archive from the https://go.dev/dl/go1.19.5.linux-amd64.tar.gz
- run the below command as su or root or sudo
- $ rm -rf /usr/local/go && tar -C /usr/local -xzf go1.19.5.linux-amd64.tar.gz
- Add the /usr/local/go/bin to PATH environment variable. You can do this by adding $HOME/.profile or /etc/profile for system wide installation. export PATH=$PATH:/usr/local/go/bin
- Verify that you have installed go by $ go version this will print the installed version of go
Now, create a directory where you want your go chat server and name it golang-websocket-chat-server
cd into that directory
Building the backend in golang
After cd into the directory where we want to create our chat application. follow the below steps
Step 1: Creating a go.mod file for dependency tracking
We need to create a go.mod file to enable dependency tracking of our application
We our code imports different packages that are contained in other modules.
We need to manage those dependencies through our own module. That module is defined by the go.mod file that tracks the modules that provides packages that we need to import for our app to work
Basically, go.mod is a dependency tracking file that stays with our source code. This is all we need to remember.
To create the go.mod file type the below code go mod init command along with the name of the module your code will be in.
The name of the module is the path of the module. In actual development the modules path will be the location of the repository where you source code will be in like for example: github.com/chatmodule
For this chat example let us give it: example/hello
So, the command that you need to type will be
go mod init example/hello
go: creating new go.mod: module example/hello
Step 2 : Creating the Golang server
next create a new file and name it hello.go
Open the file in your favorite text editor I am using VSCode. Write the below code:
package main

import "fmt"

func main() {
    fmt.Println("Hello, World!")
}
What are we doing here.
This is just a hello world example. We are
- Declaring the main package. Package is a way to group functions
- We are importing the fmt package which comes bundled with go and contains common functions for formatting text and printing to console etc.
- Then we are implementing the main function to print a message to the console (The main function runs by default when to run the main package).
Type the below code in your terminal to see the greeting
$ go run .
hello, world
You can call the go help command for a list of available commands
Now that we have had a taste of go, open the hello.go file again and delete all the text and type the below code there:
// websockets.go
package main

import (
    "fmt"
    "net/http"

    "github.com/gorilla/websocket"
)
Here we are declaring the main package and we are importing the packages:
- _fmt _: common package that comes with go and has functions for formatting text and printing to console etc.
- net/http : Package contains all the utilities required to accept requests and handle them dynamically
- gorilla/websocket : is a websocket library nessesory for adding websockets to our application
Next, we are going to add the code to make our chat server function. Below the import add the chat server code. The complete hello.go file looks like:
package main

import (
    "fmt"
    "net/http"

    "github.com/gorilla/websocket"
)

var upgrader = websocket.Upgrader{
    ReadBufferSize:  1024,
    WriteBufferSize: 1024,
}

var clients []websocket.Conn

func main() {
    http.HandleFunc("/echo", func(w http.ResponseWriter, r *http.Request) {
        conn, _ := upgrader.Upgrade(w, r, nil) // error ignored for sake of simplicity

        clients = append(clients, *conn)

        for {
            // Read message from browser
            msgType, msg, err := conn.ReadMessage()
            if err != nil {
                return
            }

            // Print the message to the console
            fmt.Printf("%s sent: %s\n", conn.RemoteAddr(), string(msg))

            for _, client := range clients {
                // Write message back to browser
                if err = client.WriteMessage(msgType, msg); err != nil {
                    return
                }
            }

        }
    })

    http.HandleFunc("/", func(w http.ResponseWriter, r *http.Request) {
        http.ServeFile(w, r, "index.html")
    })

    http.ListenAndServe(":8080", nil)
}
What are we doing here:
We have imported the required dependencies.
- We are creating an array for clients that will be connecting to this server and the type of this data in this array would be websocket.Conn
var clients []websocket.Conn
then in the main function we are using the http library and on the /echo path we are listning for websocket connections
Whenever a client is connected to the server we are pushing the client to the clients array. We will be iterating over this array when we need to send messages to all the connected clients
We are running a for loop that reads the messages coming in from the browser. then
Prints the messages to the console then
we run a for loop inside of the for loop that iterates over the clients array and sends the messages to everyone of the clients that are in that array
Lastly whenever a client connects to the server we send them the static index.html file and listen and serve the server on port 8080
Building the frontend
Let's build the index.html file that we will be sending when a client connects to our chat server
Create a new file in your root directory and name it index.html
In the index.html file paste the below code:
<input id="input" type="text" />
<button onclick="send()">Send</button>
<pre id="output"></pre>
<script>
    var input = document.getElementById("input");
    var output = document.getElementById("output");
    var socket = new WebSocket("ws://localhost:8080/echo");

    socket.onopen = function () {
        output.innerHTML += "Status: Connected\n";
    };

    socket.onmessage = function (e) {
        output.innerHTML += "Server: " + e.data + "\n";
    };

    function send() {
        socket.send(input.value);
        input.value = "";
    }
</script>
What are we doing here?
- We have created an input tag and given it an id of input
- We have created a send button and we will call the send function when its clicked
- we have created a pre tag and given it the id of output we will be outputting the messages coming from the server in the pre tag
After this we will need to write some JavaScript code:
We have created var input and put the value of the element with id input into that variable
we have created var output and put the value of element with id output into that variable
we have created a var socket and created a new WebSocket instance that is connecting on ws://localhost:8080/echo
When the chat is connected to the server we print Status: Connected\n
When a message is recieved from the server we print the message using the socket.onmessage function in the pre tag
and When we click the send button we send the message to the server using the socket.send(input.value); and we clear the input to type a new message
The Completed Application
Here is the completed application:

You can find the complete code for this application at the bottom of this article.
thus we have created golang websocket chat server. Next let us learn about how we can add Pre-built chat to our golang project.
We will be using DeadSimpleChat for our Project.
DeadSimpleChat: Adding Pre-built Chat to your Golang Project
You can easily add Pre-built Chat to your existing golang project. Adding DeadSimpleChat is just a matter of pasting the iframe code in your HTML where you want the chat to appear
Let's look at the step-by-step method of adding DeadSimpleChat to our Golang Project
Step 1 : Go to DeadSimpleChat.com and create an account
Go to DeadSimpleChat.com and click on the Get Started for Free button to create a Free account.

Step 2: Create A Chat Room
Once you have created an account you will land up in the dashboard page, Where you can create a chat room. Click on the Create Chat Room button to create start the process of creating a chat room

Next on the create chat room page name the chat room whatever you want and click on the save button to create the chat room

Next you will land up in the general settings page, there click on the embed info button to get the embed code

This will take you to the Embed Info page, there copy the embed code you will need this to add chat to your Golang project

Copy the embed code and let us go to our GO lang project
Step 3: Add Chat to your Golang project
Open the index.html file and just below the pre tag paste the embed code that we copied from the DeadSimpleChat page
As you can see we have added the chat below the chat that we created in the project above by adding a single like of code.
Using Chat SDK and APIs: DeadSimpleChat
DeadSimpleChat is a scalable Chat powering millions of concurrent users in chat rooms across the world
The features of DeadSimpleChat can be used through UI based tools including customization, creating moderators, creating 1-1 Chat and Group Chat with upto 10 million online participants and much more.
But all the features and many more can used through DeadSimpleChat SDK and API
In this tutorial we are going to learn about how to add API and SDK to our GOlang Project and use those features.
If you interested in learning more about what API and SDK methods are available you can refer to API and SDK Chat documentation
Adding Chat SDK to Golang Project
We have already added the DeadSimpleChat to our Golang Project. To add the chat sdk to our project we will need four things
- Chat RoomID
- ID of the iFrame
- Public API Key
- Code for the SDK
Chat Room ID
The chat room id is the part of the url in the iframe after deadsimplechat for example in this embed code
<iframe id="chat-frame" src="https://deadsimplechat.com/sq94k9OZV" width="100%" height="600px"></iframe>
the chat room id : sq94k9OZV
You can also find the chat room id in Dashboard -> Chatrooms -> Room ID
ID of the iframe
You need to give an id to the iframe that you are adding to the HTML. We can give any id we like. Let us give and id of chat-frame to our iframe so the embed code looks like
<iframe id="chat-frame" src="https://deadsimplechat.com/CGOC0byXC" width="100%" height="600px"></iframe>
Public API key
The Public API key can by found in the developers section of the website
Dashboard-> developers

Code for the SDK
We need to add code for the SDK as well. Paste the below code in the HTML to add the Chat SDK to your GOlang application
<script src="https://cdn.deadsimplechat.com/sdk/1.0/dschatsdk.min.js"></script>
Initializing the SDK
Now that we have added the code to the sdk let us initalize the sdk and call some of the methods of the SDK to test it out
Paste the below code in the script tag on the html
<script>
    (async () => {
    // DSChatSDK construction accepts two parameters:
    // 1. Chat Room Id
    // 2. ID of the iFrame tag
    // 3. Dead Simple Chat Public API Key.
    const sdk = new DSChatSDK("CGOC0byXC", "chat-frame", "pub_7172586270477a656a3863587a594f46566e736839307737544b532d3463484c4e524b5743676b7733336d5151767a4b")
    // Call the connect method to connect the SDK to the Chat iFrame.
    await sdk.connect();
})();
</script>
Here we are initializing the Chat SDK using the parameters that we have collected in the section above
We are calling a new instance of the DSChatSDK with the parameters of
- Chat room ID
- ID of the iFrame Tag
- and the DeadSImplechat Public API key
Testing out the Chat SDK
Now that we have initialize the Chat SDK now let us try calling some methods on it.
For a full list of SDK methods go to the Chat SDK documentation
We are going to create a logout button and call the SDKs logout funtion to log the user out of the chat room
In the HTML create a logout button and call the logout function onclick
<button onclick="logout()">logout</button>
Now, create a global variable logout and assign it null
now, in the function where we initialized the SDKassign the logout variable the value of sdk.logout
Now when the logout button is clicked the user is logged out of the chat room
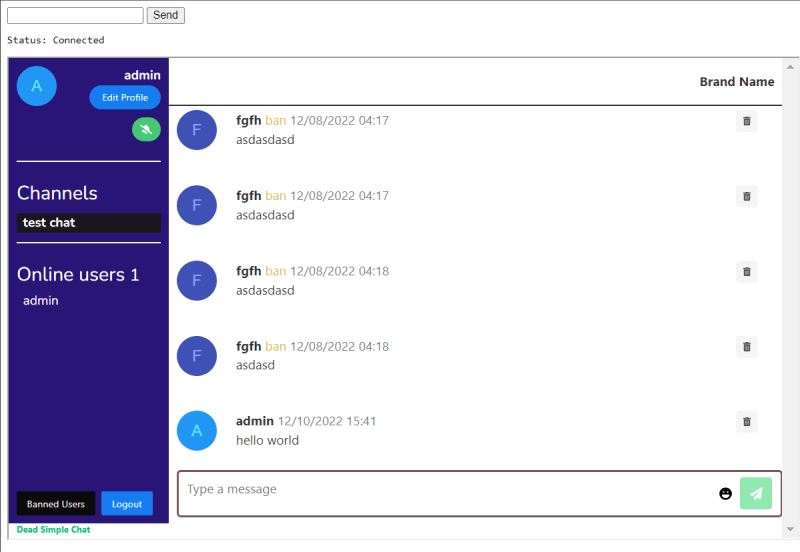
The completed Chat functionality looks like:


Here is the final code of the chat application:
index.html:
<input id="input" type="text" />
<button onclick="send()">Send</button>
<button onclick="logoutOfChat()">logout</button>
<pre id="output"></pre>

<iframe id="chat-frame" src="https://deadsimplechat.com/CGOC0byXC" width="100%" height="600px"></iframe>
<script src="https://cdn.deadsimplechat.com/sdk/1.0/dschatsdk.min.js"></script>


<script>
    var input = document.getElementById("input");
    var output = document.getElementById("output");
    var socket = new WebSocket("ws://localhost:8080/echo");
    var logout = null
    socket.onopen = function () {
        output.innerHTML += "Status: Connected\n";
    };

    socket.onmessage = function (e) {
        output.innerHTML += "Server: " + e.data + "\n";
    };

    function send() {
        socket.send(input.value);
        input.value = "";
    }

    (async () => {
    // DSChatSDK construction accepts two parameters:
    // 1. Chat Room Id
    // 2. ID of the iFrame tag
    // 3. Dead Simple Chat Public API Key.
    const sdk = new DSChatSDK("CGOC0byXC", "chat-frame", "pub_7172586270477a656a3863587a594f46566e736839307737544b532d3463484c4e524b5743676b7733336d5151767a4b")
    // Call the connect method to connect the SDK to the Chat iFrame.
    await sdk.connect();
        logout = sdk.logout
})();

function logoutOfChat (){
    logout()
}
</script>
hello.go:
package main

import (
    "fmt"
    "net/http"

    "github.com/gorilla/websocket"
)

var upgrader = websocket.Upgrader{
    ReadBufferSize:  1024,
    WriteBufferSize: 1024,
}

var clients []websocket.Conn

func main() {
    http.HandleFunc("/echo", func(w http.ResponseWriter, r *http.Request) {
        conn, _ := upgrader.Upgrade(w, r, nil) // error ignored for sake of simplicity

        clients = append(clients, *conn)

        for {
            // Read message from browser
            msgType, msg, err := conn.ReadMessage()
            if err != nil {
                return
            }

            // Print the message to the console
            fmt.Printf("%s sent: %s\n", conn.RemoteAddr(), string(msg))

            for _, client := range clients {
                // Write message back to browser
                if err = client.WriteMessage(msgType, msg); err != nil {
                    return
                }
            }

        }
    })

    http.HandleFunc("/", func(w http.ResponseWriter, r *http.Request) {
        http.ServeFile(w, r, "index.html")
    })

    http.ListenAndServe(":8080", nil)
}
go.mod:
module example/hello

go 1.19

require github.com/gorilla/websocket v1.5.0
go.sum
github.com/gorilla/websocket v1.5.0 h1:PPwGk2jz7EePpoHN/+ClbZu8SPxiqlu12wZP/3sWmnc=
github.com/gorilla/websocket v1.5.0/go.mod h1:YR8l580nyteQvAITg2hZ9XVh4b55+EU/adAjf1fMHhE=
Conclusion
In this article I have explained how to make a golang chat server. I hope you liked the article.

Top comments (0)