
Let's a Create HTML File
Start by creating an HTML file and adding the basic structure, such as the HTML, head, and body tags.
Add a title tag to the head section and a header tag to the body section.
In the header section, create an input field for the user to input their city or location.
Add a button that, when clicked, will trigger a JavaScript function to fetch the weather data using an API.
In the JavaScript function, use the fetch method to make a request to an API that provides weather data.
Use the response from the API to dynamically create a section for the weather information in the HTML file.
Use CSS to style the webpage, including the input field, button, and weather section.
You can also add additional features, such as icons to represent the weather conditions or a daily forecast.
9.Test the webpage to make sure that it works properly and displays the weather information accurately.
Here is an example of what the HTML code might look like:
<!DOCTYPE html>
<html lang="en">

<head>
    <meta charset="UTF-8">
    <meta http-equiv="X-UA-Compatible" content="IE=edge">
    <meta name="viewport" content="width=device-width, initial-scale=1.0">
    <title>Document</title>
    <link rel="stylesheet" href="main.css"/>
</head>

<body>
    <main>
        <div class="row" style="text-align: center;">
            <form action="">
                <input type="search" id="search" placeholder="Search by city name">
            </form>
        </div>
        <div class="row" id="weather">
        </div>
    </main>
    <script src="app.js"></script>
</body>

</html>
Let's Create a CSS File
Here are some tips for creating beautiful CSS styles:
Choose a color scheme that fits the mood and purpose of your webpage. You can use tools like Adobe Color or Coolors to find complementary or analogous colors that work well together.
Use typography to create a clear and consistent visual hierarchy. Choose fonts that are easy to read and that match the tone of your webpage. Use font sizes, weights, and styles to emphasize headings and subheadings.
Use layout to create balance and harmony on your webpage. Use a grid system to align elements and create a sense of order. Consider using white space to give your content room to breathe and to create a clean and modern look.
Use visual hierarchy to guide the user's attention to the most important content on your webpage. Use contrast, color, size, and placement to create a hierarchy of importance.
Consider using animation or interactive elements to create a dynamic and engaging user experience. Use CSS transitions and animations to add subtle visual effects or to create more complex interactions.
Here is an example of how you might style the HTML code we created earlier to make it look more beautiful:
* {
    padding: 0;
    margin: 0;
    font-family: Verdana, Geneva, Tahoma, sans-serif;
    box-sizing: border-box;
}

main {
    width: 100%;
    height: 100vh;
    background-color: #BFEAF5;
    display: flex;
    justify-content: center;
    align-items: center;
    flex-direction: column;
}

.row {
    display: flex;
    align-items: center;
    /* vertically */
    justify-content: center;
    /* horizontally */
    width: 1000px;
    margin: 10px;
    font-size: 40px;
    color: white;
}

#search {
    font-size: 25px;
    padding: 10px;
    border-radius: 25px;
    border: none;
    outline: none;
    box-shadow: 0px 0px 5px grey;
}
And here is an example of what the JavaScript code might look like:
const API_KEY = `YOUR_API_KEY_HERE`
const form = document.querySelector("form")
const search = document.querySelector("#search")
const weather = document.querySelector("#weather")
const getWeather = async(city) => {
    weather.innerHTML = `<h2> Loading... <h2>`
    const url = `https://api.openweathermap.org/data/2.5/weather?q=${city}&appid=${API_KEY}&units=metric`
    const response = await fetch(url);
    const data = await response.json()
    return showWeather(data)
}

const showWeather = (data) => {
    if (data.cod == "404") {
        weather.innerHTML = `<h2> City Not Found <h2>`
        return;
    }
    weather.innerHTML = `
        <div>
            <img src="https://openweathermap.org/img/wn/${data.weather[0].icon}@2x.png" alt="">
        </div>
        <div>
            <h2>${data.main.temp} ℃</h2>
            <h4> ${data.weather[0].main} </h4>
            <p>Humidity: ${data.main.humidity}%</p>
        </div>
    `
}

form.addEventListener(
    "submit",
    function(event) {
        getWeather(search.value)
        event.preventDefault();
    }
)
The Above Codes Is For Just For Sample Example With Simple Guide
Output For The Above Is:
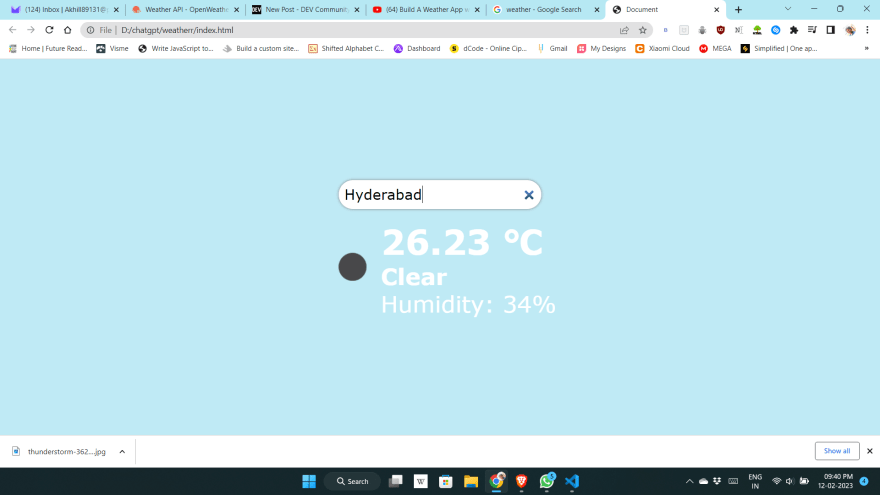
Thank You!
If Any Thing Doesn't Work Feel Free To Contact Me


Top comments (0)