
When developing an application we always must take care of the user experience and our primary focus on the user’s smooth check-in. When implementing a login screen, we can implement passwordless login for users.
For those guys who don't know what is passwordless email sign in, when users log in by Gmail instead of asking for a password we only ask Gmail and we should send an email to the user's Gmail id with a specified URL. When the user taps on the URL he should be redirected to our application and he has done his login with the most friction-less method.
Prerequisites:
Basic knowledge in flutter and firebase
Step 1 — Create your project
Create a new project and delete all the boilerplate code if you are learning, if you are implementing go to the next step.
Step 2— Adding packages to pubspec.yaml file
firebase_auth: ^3.1.1

firebase_dynamic_links: ^2.0.9

firebase_core: ^1.6.0
Step 3— Adding Firebase to your project
Create a new project at firebase
After you created a project you will end up on a screen like this

Here we are going for android. The next step is to register your application on firebase so select the android icon if you are developing an android project. Then you will navigate to this screen.

Here you should give your necessary pieces of information and don't forget to give sha-1 key. For getting the sha-1 key go to your terminal and paste the code which I shared below.
cd android

./gradlew signingReport
Step 4— Setting firebase auth
For setting up authentication go to the authentication tab in the top left corner. Now we can get started with authentication. Then you will reach a window like this.

Firebase provides a variety of sign-in options but in this article, we are doing passwordless sign-in. We can do other sign-in options for upcoming articles and I will release them soon.
So here we wanted to select the Email/password sign-in option. Then you will be guided to this screen and you wanted to enable email/password sign in and also password signing below that.
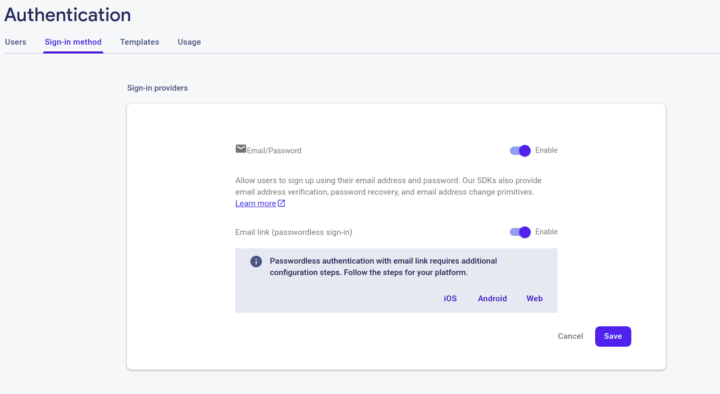
Now we have enabled email sign in and we can exit the page by clicking the save button.
Step 5— Setting dynamic links
For passwordless login, we must set up a dynamic link so that only users can be redirected to the application
Note: This feature will only work if users click on the link they are using our application.
So there might be a problem that arises if the user opens it from elsewhere. So we must inform the user about this. For that, you can create a simple HTML website to inform users about this, it's completely optional for you.
Now we can set up our dynamic link for that scroll to the very bottom until you see the dynamic link under the engage section. Then you will ended up on a screen like this.

Click on Get started button

on clicking continue if it's successful this pop up will be shown.
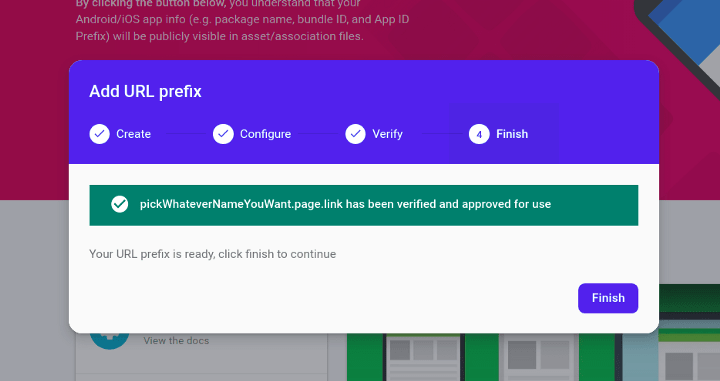

step 1 on creating dynamic link


Don't get confused by seeing a deep link URL it's just a page URL to show the user if the user has not logged in from mobile where the application was installed.
If you are integrating on IOS you follow step 3 otherwise you can jump to step 4
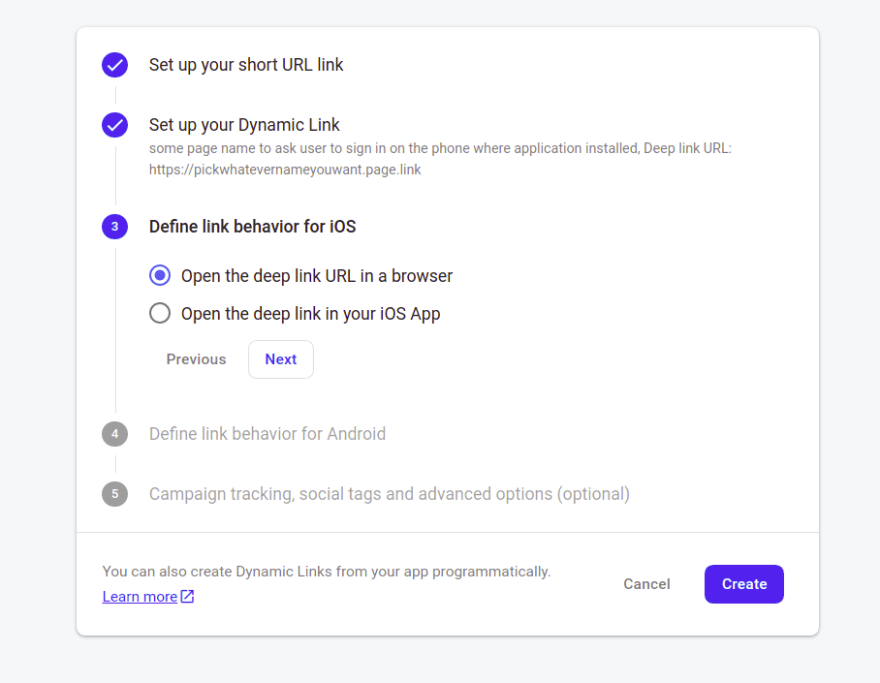
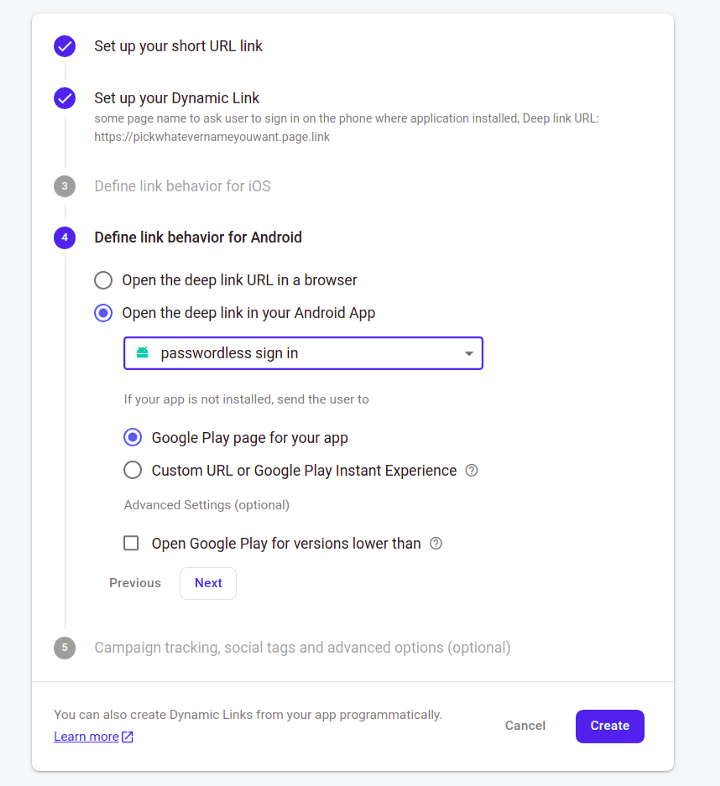
In step 4 you can select what action should perform if the user clicks on the URL and other options are too. You can go through it. Its very useful.
After creating a dynamic URL you can see a table on the window.
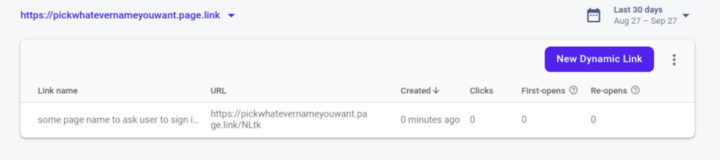
Note : If you are not seeing this table even after the successful creation try reloading the page.
Now we have created our dynamic link now we wanted to white list it to allow the interactions between app and link.
For that go to the authentication tab, then under the sign-in methods tab, scroll down. There you can find the authorized domain, in that list add your link generated it should look like this after you have added it.
 __newly generated link is at last
So now we have generated and whitelisted our link now it’s time for some coding part.
Step 6— Creating your first screen
Here we have used our main. dart file to check if the user logged in or not using the authstatechanges function given firebase and I had given it in stream builder so its actions should be instant.
import 'package:firebase_auth/firebase_auth.dart';
import 'package:flutter/material.dart';
import 'package:passwordles_sign_in/views/home_screen.dart';
import 'package:passwordles_sign_in/views/login_page.dart';

void main() async{
  WidgetsFlutterBinding.ensureInitialized();
  await Firebase.initializeApp();
  runApp(MyApp());
}

class MyApp extends StatelessWidget {
  const MyApp({Key? key}) : super(key: key);

  // This widget is the root of your application.
  @override
  Widget build(BuildContext context) {
    return MaterialApp(
      title: 'Passwordless Sign in',
      theme: ThemeData(
        primarySwatch: Colors.blue,
      ),
      home: StreamBuilder(
        stream:FirebaseAuth.instance.authStateChanges(),
        builder: (BuildContext context,snapshot)
        {
          if(snapshot.connectionState==ConnectionState.waiting){
            return const CircularProgressIndicator();
          }
          else if(snapshot.hasData){

            return const HomeScreen();
          }
          else{
            return const LoginPage();
          }

        },

      ),
    );
  }
}
In the above, we have given a stream builder and we have given authStateChanges function as a stream. So if the user successfully logged In then sends it to the home screen and if not it will stay in the login screen and that's all about the coding part on main.dart.
Now we can take a look at our login screen, I will give a brief description of the code which I have given below.
import 'package:firebase_auth/firebase_auth.dart';
import 'package:firebase_dynamic_links/firebase_dynamic_links.dart';
import 'package:flutter/material.dart';
import 'package:passwordles_sign_in/common/colors.dart';

class LoginPage extends StatefulWidget {
   const LoginPage({Key? key}) : super(key: key);

  @override
  State<LoginPage> createState() => _LoginPageState();
}

class _LoginPageState extends State<LoginPage> with WidgetsBindingObserver {
final TextEditingController _emailController=TextEditingController();

final FirebaseAuth _auth = FirebaseAuth.instance;

   Future signInWithEmailandLink(userEmail)async{
     var _userEmail=userEmail;
     return await _auth.sendSignInLinkToEmail(
         email: _userEmail,
         actionCodeSettings: ActionCodeSettings(
           url: "https://pickwhatevernameyouwant.page.link/",
           handleCodeInApp: true,
           androidPackageName:"com.example.passwordles_sign_in",
           androidMinimumVersion: "1",
         )
     ).then((value){
       print("email sent");
     });
   }
@override
  void initState() {
    // TODO: implement initState
    super.initState();
    WidgetsBinding.instance!.addObserver(this);
  }
   @override
   void didChangeAppLifecycleState(AppLifecycleState state) async {
     try{
       FirebaseDynamicLinks.instance.onLink(
           onSuccess: (PendingDynamicLinkData? dynamicLink) async {
             final Uri? deepLink = dynamicLink?.link;
             if (deepLink != null) {
              handleLink(deepLink,_emailController.text);
               FirebaseDynamicLinks.instance.onLink(
                   onSuccess: (PendingDynamicLinkData?dynamicLink) async {
                     final Uri? deepLink = dynamicLink!.link;
                     handleLink(deepLink!,_emailController.text);
                   }, onError: (OnLinkErrorException e) async {

                 print(e.message);
               });
               // Navigator.pushNamed(context, deepLink.path);
             }
           },
           onError: (OnLinkErrorException e) async {

             print(e.message);
           }
       );

       final PendingDynamicLinkData? data = await FirebaseDynamicLinks.instance.getInitialLink();
       final Uri? deepLink = data?.link;

       if (deepLink != null) {
         print(deepLink.userInfo);
       }
     }catch(e){
       print(e);
     }
   }

   void handleLink(Uri link,userEmail) async {
     if (link != null) {
       print(userEmail);
       final UserCredential user = await FirebaseAuth.instance.signInWithEmailLink(
         email:userEmail,
         emailLink:link.toString(),
       );
       if (user != null) {
         print(user.credential);
       }
     } else {
       print("link is null");
     }
   }

  @override
  Widget build(BuildContext context) {
    return Scaffold(
      appBar: AppBar(
        title: const Text("Login"),
      ),
      body: Padding(
        padding: const EdgeInsets.all(8.0),
        child: Column(
          mainAxisAlignment: MainAxisAlignment.center,
          children:  [
            TextField(
              decoration: InputDecoration(
                  border: OutlineInputBorder(
                    borderRadius: BorderRadius.circular(10.0),
                  ),

                  filled: true,
                  hintStyle: TextStyle(color: Colors.grey[800]),
                  hintText: "Type in your email address",
                  fillColor: Colors.white70),
              controller: _emailController,
            ),
            const SizedBox(
              height: 15,
            ),
            MaterialButton(onPressed: (){
              signInWithEmailandLink(_emailController.text);
            },
              color: blue,
            child: const Text("Login"),
            )
          ],
        ),
      ),
    );
  }
}
Here we have given a stateful widget with WidgetsBindingObserver and inside that, there is a simple appbar and inside the column, we have given textfield and a material button as children. That's all about the UI part of the login screen now we can describe the functional part.
When the user gives an email address we are storing it in a controller and when user taps on the material button we are calling a function called signInWithEmailandLink and we are also passing the email address to the function. Inside that function, we have given the authentication function sendSignInLinkToEmail provided by firebase. There we are giving the email address to whom we send the verification email. We are also giving URL(dynamic link we generated) line no: 23 and also the android package name.
Then we have called didChangeAppLifecycleState to know if the app is resumed, if the app is resumed and the user clicks on the URL on email it will retrieve the link and passes it to the handleLink function. In that function, we are retrieving the email address and UID.
In init state we are adding the observer for the lifecycle method we given.
WidgetsBinding.instance!.addObserver(this);
If all the process is done successfully then the stream builder gets notified and navigate to the home screen.
Step 7— Final step
Here we are developing the welcome screen when the user logged in successfully it's a simple UI with a centered text to notify users they are logged in.
import 'package:flutter/material.dart';
class HomeScreen extends StatelessWidget {
  const HomeScreen({Key? key}) : super(key: key);

  @override
  Widget build(BuildContext context) {
      return Scaffold(
        appBar: AppBar(
          title: const Text("Home Screen"),
        ),
        body: const Center(
          child: Text("You are on home screen"),
        ),
      );
  }
}
Congrats...
It might seem difficult once you went through the process but once you have done it. It feels useful
If you have any doubts you can freely contact me on
GitHub project link :
[](https://github.com/akhilannd/passwordelessSignIn
)

Latest comments (0)