
Cover: studykouffee.tumblr.com
Watch in Youtube: https://youtu.be/z2heFiDrH_I
One of the most useful application for developer, the XAMPP. And one of my starter kit in development. This is how I configure this application.
I.Installing XAMPP
- Download XAMPP depends upon the OS you are using. Note: In these example, I'm using Windows operating sytem
- Install the application, ignore the UAC first. Decide where your XAMPP folder will be created. In my case I have an allocated drive for all my development applications and I never put it in drive C.
- And then Start XAMPP Control Panel.
II.Configuring Apache, PHP and MySQL
A. Accessing phpMyadmin
By default you will get the following error when accessing the phpMyadmin over network in during fresh installation.
Access forbidden!
New XAMPP security concept:
Access to the requested directory is only available from the local network.
This setting can be configured in the file "httpd-xampp.conf".
If you think this is a server error, please contact the webmaster.
Error 403
192.168.5.6
Apache/2.4.37 (Win32) OpenSSL/1.1.1a PHP/7.3.1
The following are the steps to fix the problem:
- Open XAMPP Control Panel
- In the Apache service config button or select box, click httpd-xampp.conf
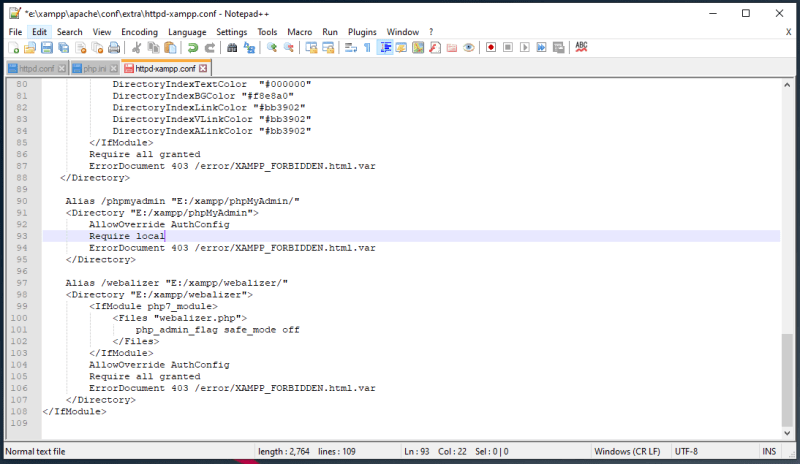 A preview of http-xampp.conf file
 - Go to the following line and change the Require local by Require all granted.
- The go back to the XAMPP control panel and restart the Apache service.
B. Setting PHPMyAdmin With Credentials
- Open XAMPP Control Panel
- In the Apache service config button or select box, click config.inc.php
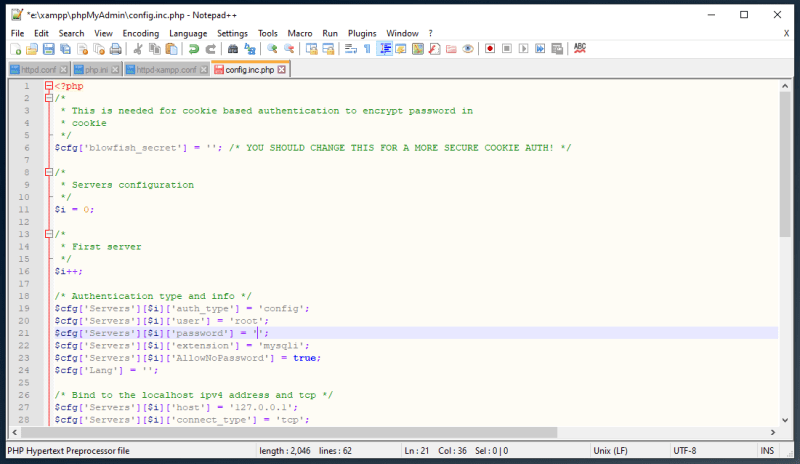 A preview of config.inc.php file
 - Add blowfish secret key
$cfg['blowfish_secret'] = 'yourblowfishkeyhere12345'; - And change the auth_type ,user, password, and AllowNoPassword Authentication type and info
$cfg['Servers'][$i]['auth_type'] = 'cookie';

$cfg['Servers'][$i]['user'] = 'root';

$cfg['Servers'][$i]['password'] = 'yourpasswordhere';

$cfg['Servers'][$i]['extension'] = 'mysqli';

$cfg['Servers'][$i]['AllowNoPassword'] = false;

$cfg['Lang'] = ''; - The go back to the XAMPP control panel and restart the Apache service.
C. Grant All Privileges To MySQL User in Any Host
By default root account are not accessible outside your localhost
It means that you are not allowed to connect to the MySQL database over the network, but you can use it in your host PC or server and use with your project. Even adding new connection to your database management tool like HeidiSQL and Navicat is not working. To fix the following problem, this is the solution.
- Go to phpMyadmin or CLI login using root account or any SUPER USER.
- Run the following query to grant all privilage of your user in any valid host.
mysql > GRANT ALL PRIVILEGES ON *.* TO 'root'@'%' IDENTIFIED BY 'yourpassword' WITH GRANT OPTION;
3.To save changes using the execute FLUSH PRIVILEGES.
mysql > FLUSH PRIVILEGES;
D. Configuring Timezone
By default PHP timezone is date.timezone=Europe/Berlin, to change timezone, follow the steps below.
- Open XAMPP Control Panel
- In the Apache service config button or select box, click php.ini
- Find
date.timezoneusing CTRL + F in your text editor. - Change the value of the timezone depends on your location or preference. In my case it set it to
date.timezone=Asia/Manila. - Save and restart apache services.
E: Changing Apache Ports
By default XAMPP ports are set to 80 but some instances that port 80 are already use by other web server like IIS and Nginx. Here's the way to change it.
- Open XAMPP Control Panel
- Click the Config button on panel side to show the Configuration of Control Panel.
- Click Service and Port Settings and Save.
- In the Apache service config button or select box, click httpd.conf
- Find
Listen 80and change the port to your desired port number. To easily change all port number use CTRL + H to find and replace all ports. - The go back to the XAMPP control panel and restart the Apache service.
III.Configuring FileZilla
XAMPP also has FileZilla Server in order for the developer securely tranfer all files via ftp or sftp. By default Filezilla server listen to port 21 and has unlimited user set. To get started to use filezilla server follow the simple instructions below.
- Open XAMPP Control Panel and start Filezilla services
- In the Filezilla service click the admin button to show the filezilla server login credentials. By default it's server address
127.0.0.1, port 14147 and empty administration password. - To configure settings, just go to edit and select settings. In these section we just change the admin password. To do this go to the Admin Interface Settings and check the change admin password. Then enter your desired password for your FileZilla server and click OK.
- Then start to add ftp group for your team.
a. Click the group icon to show the groups configuration window.
b. In General click the add group button and enter your desired group name.
c. The go to theShared Folder to add project directory.
Note:
In these part, the shared directory are the directory where my project located. For example our group project directory name firstproject are located under the htdocs folder. Therefore, the directory will be added to this part. If there are more than one project directory for your group, use aliases to display each folder every time you use you FTP account.
5.Then start to add ftp user.
a. Click the user icon to show the user configuration window.
b. In General click the add user button and enter your desired username. Add password, choose your group if you belong to a group, and make sure to check the enable account.
c. To add project directory go to Shared Folder to add project directory. If you belong to a group, make sure you choose a groupname under General tab because a configure group has shared folder that will be display to your account when you login.
6.To check if the FTP configuration properly working, open Windows Explorer
or browser,type ftp://yourhostserver, and press enter. Then login credentials will appear, use the account created in your ftp server to enter the directory. Once you log successfully all project will be display, you can read, write, append, and delete file directly depends on your account.
IV.Overview with Mercury
Mercury is a fully independent mail server and can provide email services to all standards-compliant email clients. This is a application that you can create email for your organization.
Credits:Parag Dhali
V.Configuring Tomcat
Tomcat provides a "pure Java" HTTP web server environment in which Java code can run. By default tomcat server are set to port 8080 and tomcat users are not set in the manager-gui. manager-gui role are required to operate the "/manager/html" web application.
Tomcat Roles:
- Open XAMPP Control Panel
- In the Tomcat service config button or select box, click tomcat-users.xml
- Copy and paste the given roles above inside
tomcat-users. - The go back to the XAMPP control panel and restart the Tomcat service.
All things ready for your development.
Info: XAMPP configuration video tutorial is posted soon in my youtube channel. Please like, subscribe and press notication bell.


Top comments (11)
That was a beautiful nostalgic moment! I've used xampp for several years with pleasure and only stopped using it when I switched to Linux.
Definitely recommended for those developing on Windows and don't want to mess with Docker. Great post!
Thank you so much sir.
Cover image is Graden of Words.
Really? So that's another beautiful anime movie of Makoto Shinkai if ever, I just get the image in Pinterest.
By the way I use it as cover because for me it's represent hardwork and determination.
Yeh, I love this anime. I watched in many years and I love it so much and the music and sound of Shinkai.
I would highly recommend Laragon for local development.
Switched from XAMPP, never looked back.
Thank you for recommendation. I will try Laragon for dev.
Getting started with XAMPP is crucial for any developer's toolkit, much like installing the GoGoAnime APK for anime enthusiasts. Both serve as foundational tools, with XAMPP facilitating local server setup for web development, while the GoGoAnime APK brings easy access to a vast library of anime content. Configuring XAMPP marks the initial step towards creating dynamic websites, just as installing the GoGoAnime APK opens doors to a world of animated entertainment, making them indispensable resources for respective pursuits.
Thanks a lot. This worked perfectly as described
The only concern with PHP is whether I can have multiple projects / web servers in one PC?
What do you think about composer?
PHP can be hosted using Nginx, Apache and IIS, 3 of my tested web server of it and you can do multiple project on it, I hope this answer your first question.
Then I love Composer, this provide great package for my projects. I also recommend NPM.