
Usually as developer we don't reinvent the wheel. Most of the time we just end up using a 3rd party library for calendar. But for some cases the 3rd party calendar won't suit our design and functionality. So, when there is no choice, we need to come up with our own calendar.
Let's start, below are the packages we are going to use
-
dates-generator- https://www.npmjs.com/package/dates-generator -
styled-components- https://styled-components.com/
I am not going to explain the above library in detail, please refer to the link if you are not familiar with the library above.
Setup your React project by running the command below
npx create-react-app custom-calendar && cd custom-calendarnpm install dates-generator --savenpm install styled-components --save
styled-components is used to apply the css styling to the components and I find it easier to write the css styling using styled-components
Now let's edit the /src/App.js
import React, { useState, useEffect } from 'react';
import styled from 'styled-components'

const months = ['Jan', 'Feb', 'Mar', 'Apr', 'May', 'Jun', 'Jul', 'Aug', 'Sep', 'Oct', 'Nov', 'Dec'];

const Container = styled.div`
  width: 300px;
  border: 1px solid black;
  margin: 0 auto;
  box-shadow: 10px 10px 0px black;
`

const MonthText = styled.div`
  font-size: 26px;
  font-weight: bold;
  text-align: center;
`

const App = () => {
  const [selectedDate, setSelectedDate] = useState(new Date());
  const [dates, setDates] = useState([]);
  const [calendar, setCalendar] = useState({
    month: selectedDay.getMonth(),
    year: selectedDay.getFullYear(),
  });


  useEffect(() => {}, [])

  return (
    <div style={{ width: '100%', paddingTop: 50 }}>
      <Container>
        <MonthText>
          {months[calendar.month]}
        </MonthText>
      </Container>
    </div>
  );
}

export default App;
If you run this, you will see the current month being rendered in your browser.
selectedDate is the date that we selected in the calendar. By default the date is present date.
dates is the state that will hold all the dates for the given month.
calendar is the state that will hold the month and year for the calendar.
Now lets fill up the calendar with the dates, by default the calendar will be the present month calendar.
...

const [calendar, setCalendar] = useState({
    month: selectedDay.getMonth(),
    year: selectedDay.getFullYear(),
});

useEffect(() => {
  const body = {
    month: calendar.month,
    year: calendar.year
  };
  const { dates, nextMonth, nextYear, previousMonth, previousYear } = datesGenerator(body);

  setDates([ ...dates ]);
  setCalendar({
    ...calendar,
    nextMonth,
    nextYear,
    previousMonth,
    previousYear
  });
}, [])

...
As you can see that, we have added useEffect inside our component. Inside the useEffect we run the datesGenerator function that is provided by dates-generator.
This function will return the all the dates that is available for the given month. We provided the month and year by passing the body inside the datesGenerator function. We can use the previousMonth/nextMonth and previousYear/nextYear attributes to get the previous/next month calendar dates.
Read more on how dates-generator work here
Since now we already store the all the dates in the state, let's display it at our browser.
const days = ['Sun', 'Mon', 'Tue', 'Wed', 'Thu', 'Fri', 'Sat']

...

return (
  <div style={{ width: '100%', paddingTop: 50 }}>
    <Container>
      <MonthText>
        {months[calendar.month]}
      </MonthText>
      <div>

        <div>
          <table style={{ width: '100%' }}>
            <tbody>
              <tr>
                {days.map((day) => (
                  <td key={day} style={{ padding: '5px 0' }}>
                    <div style={{ textAlign: 'center', padding: '5px 0' }}>
                      {day}
                    </div>
                   </td>
                 ))}
              </tr>

              {dates.length > 0 && dates.map((week) => (
                <tr key={JSON.stringify(week[0])}>
                  {week.map((each) => (
                    <td key={JSON.stringify(each)} style={{ padding: '5px 0' }}>
                      <div style={{ textAlign: 'center', padding: '5px 0' }}>
                        {each.date}
                      </div>
                    </td>
                  ))}
                </tr>
              ))}
            </tbody>
          </table>
        </div>

      </div>
    </Container>
  </div>
);

...
I have add the days variable to be rendered on top of the dates. If you look at your browser now, you will see the calendar for the present month.
Now let's write 3 more function:
-
onClickNext- to go to next month calendar -
onClickPrevious- to go to previous month calendar -
onSelectDate- to set the selected date by the user
  const onClickNext = () => {
    const body = { month: calendar.nextMonth, year: calendar.nextYear };
    const { dates, nextMonth, nextYear, previousMonth, previousYear } = datesGenerator(body);

    setDates([ ...dates ]);
    setCalendar({
      ...calendar,
      month: calendar.nextMonth,
      year: calendar.nextYear,
      nextMonth,
      nextYear,
      previousMonth,
      previousYear
    });
  }

  const onClickPrevious = () => {
    const body = { month: calendar.previousMonth, year: calendar.previousYear };
    const { dates, nextMonth, nextYear, previousMonth, previousYear } = datesGenerator(body);

    setDates([ ...dates ]);
    setCalendar({
      ...calendar,
      month: calendar.previousMonth,
      year: calendar.previousYear,
      nextMonth,
      nextYear,
      previousMonth,
      previousYear
    });
  }

  const onSelectDate = (date) => {
    setSelectedDate(new Date(date.year, date.month, date.date))
  }

...
return (
  ...
    <div style={{ padding: 10 }}>
      <div onClick={onClickPrevious} style={{ float: 'left', width: '50%' }}>
        Previous
      </div>
      <div onClick={onClickNext} style={{ float: 'left', width: '50%', textAlign: 'right' }}>
        Next
      </div>
    </div>
    <MonthText>
      {months[calendar.month]}
    </MonthText>

    ...
      <div onClick={() => onSelectDate(each.jsDate)} style={{ textAlign: 'center', padding: '5px 0' }}>
        {each.date}
      </div>
    ...

    <div style={{ padding: 10 }}>
      Selected Date: {selectedDate.toDateString()}
    </div>
  </Container>
  ...
)
...
Now the date that you click will be shown at the bottom of calendar. if you look at your browser you will see this calendar:
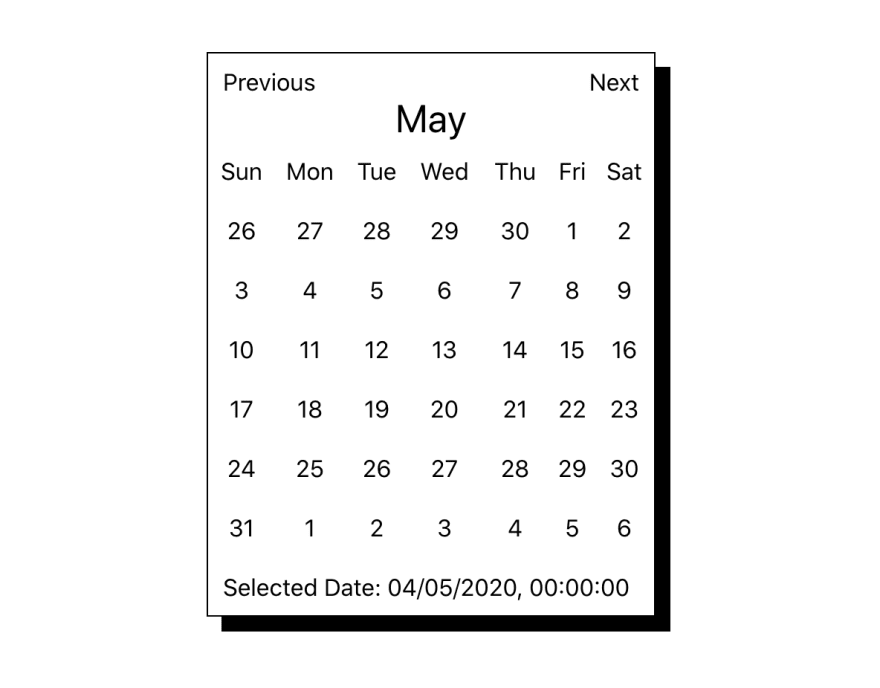
That's it, Now you have the basic calendar, You can customise it as you like. That's all from me.
Can get the full code for /App.js at this gist here
Feedback appreciated.
Cover Image credit to @esteejanssens


Top comments (2)
Hi,
I absolutely loved your work. I just want to know how can I remove the extra dates I am getting in a particular Month.
Hey,
Sorry for the late response. unfortunately for now the library doesn't support it yet.
You can use javascript to trim it out for now manually. Contribution are welcome if you would like to add the feature. Thanks.
Cheers.