Lately, there has been a lot of fuss over Flutter. Some people call it the future, while some say it’s overrated. But I think it’s a good framework to learn nonetheless. The sheer amount of things that can be done with Flutter is unbelievable, including Android, iOS, desktop, and web programming.

Here in this tutorial, I’m going to share how to implement your Flutter web deployments using GitHub Actions. Also, we’re going to use Netlify. Why Netlify? Because, honestly, Netlify is very easy to use. Now, without further ado, let’s get to it.
Creating Your Netlify Site
This section will discuss how you can create an empty Netlify site using the Netlify CLI. We’ll be using npm to install it for us. In my case, I use Ubuntu 18.04 as the host OS for the npm installation.
1. Install the Netlify CLI
To install the Netlify CLI, you just need to run:
npm install netlify-cli -g
After the installation is complete, check if it’s installed correctly by running this command:
netlify
2. Log in to Netlify from the CLI
Before you can start using the CLI, Netlify needs you to authenticate yourself.
netlify login
Then a browser window will open:

3. Creating a blank site
After finishing your login, create a blank site using this command:
netlify sites:create --name _<site name>_
4. Retrieving your Site ID and personal access token
To run continuous development remotely, you need both your site ID and your personal access token to help you.

Retrieve your site ID by:
- Going into the site settings.
- Copy the API ID value.
The next step would be to retrieve the personal access token.

Go to the user settings.
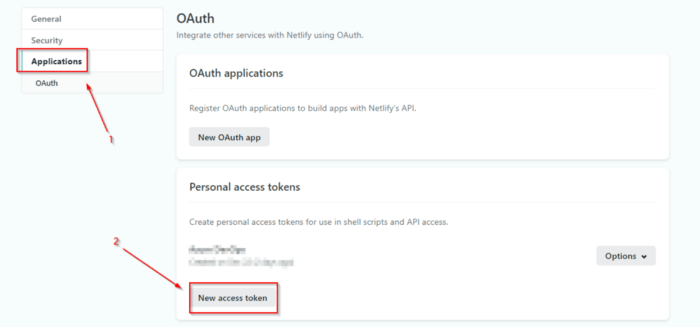
To get an access token, you have to make a new one:
- Go to the Applications tab.
- Click “New access token.”
Copy and save the access token shown on the next screen, and save it because you’ll need it later.
Set Repository Secrets
After we’ve retrieved the access tokens and site ID, we’ll save them inside the repository secret.
Note: Why do we need to use repository secrets? To prevent sensitive IDs or tokens from being pushed to the repository.

To create a secret:
- Go to the repository settings.
- Click Secrets on the left-side tab.
- Click “New repository secret.”

On the “New secret” page input the secret name and value. When finished, click the “Add secret” button.
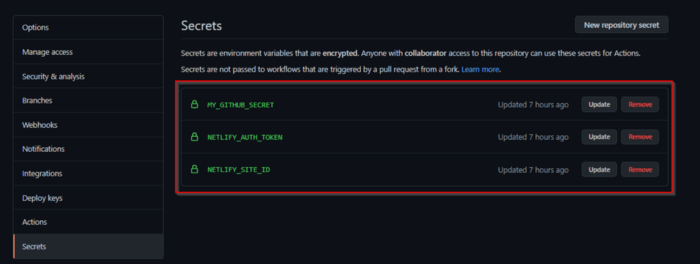
In its entirety, we’ve added about three secrets: the GitHub personal access token, the Netlify personal access token, and the Netlify site ID.
Retrieving the GitHub Access Token
Because we’re going to automate deployments using GitHub Actions, a personal access token would be required. You’d need to open your GitHub Developer Settings here.
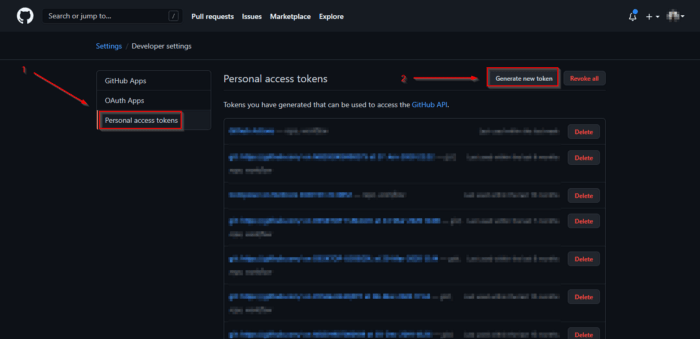
After opening your developer settings page:
- Open the personal access tokens page.
- Generate a new token for GitHub Actions.

The next steps would be:
- Input a name for your token.
- Check the workflow to give access to GitHub Actions.
- Scroll to the bottom of the page.
- Click the “Generate token” button.

Copy the access token and save it somewhere because it’ll be used later on.
Creating the CI/CD Workflow
CI/CD using GitHub Actions is fairly simple. It requires us to make a YAML file. This YAML file is called a workflow in GitHub Actions because it defines the steps needed to form a CI/CD.
name: Flutter-CI
on:
  push:
    branches: [master]
  pull_request:
    branches: [master]
  workflow_dispatch:
To start our workflow, we must enable builds to start after push/pull requests to the master branch, assuming all deployments would be from the master.
jobs:
  build:
    runs-on: ubuntu-latest
    steps:
    - uses: actions/checkout@v2
    - uses: subosito/flutter-action@v1
      with:
        channel: beta
    - run: flutter config --enable-web
    - run: flutter build web
For the Flutter building process, I used an action made by subosito. You can check the Flutter Actions detail here. For Flutter web, we first have to initialize the configurations to enable web builds. Thus, we ran:
flutter config --enable-web
Then if you want to add tests to the workflow, you can by adding the command:
flutter test
Finally, build the app using:
flutter build web
The results of the build will be in the build/web folder.
    - name: Deploy to Netlify
      uses: nwtgck/actions-netlify@v1.1
      with:
        publish-dir: './build/web'
        production-branch: master
        github-token: $
        deploy-message: "Deploy from GitHub Actions"
        enable-pull-request-comment: false
        enable-commit-comment: true
        overwrites-pull-request-comment: true
      env:
        NETLIFY_AUTH_TOKEN: $
        NETLIFY_SITE_ID: $
      timeout-minutes: 1
After a successful build, deploy the files to Netlify manually. Here’s a snippet I used by nwtgck. I changed a few variables to be able to publish Flutter apps, but you can check Netlify Actions here.
In this last workflow, you’ll access the secrets we previously stored on our repository settings. The entire workflow can be copied from this gist below:
name: CI

on:
  push:
    branches: [master]
  pull_request:
    branches: [master]
  workflow_dispatch:

jobs:
  build:
    runs-on: ubuntu-latest
    steps:
    - uses: actions/checkout@v2
    - uses: subosito/flutter-action@v1
      with:
        channel: beta
    - run: flutter config --enable-web
    - run: flutter build web

    - name: Deploy to Netlify
      uses: nwtgck/actions-netlify@v1.1
      with:
        publish-dir: './build/web'
        production-branch: master
        github-token: $
        deploy-message: "Deploy from GitHub Actions"
        enable-pull-request-comment: false
        enable-commit-comment: true
        overwrites-pull-request-comment: true
      env:
        NETLIFY_AUTH_TOKEN: $
        NETLIFY_SITE_ID: $
      timeout-minutes: 1
Your CI/CD workflow should be finished. Save the workflow inside .github/workflows, and try running it yourself! You can check the dummy site I deployed here.
Summary
We’ve successfully created a CI/CD pipeline for Flutter web using Github Actions. To summarize our steps:
- Create a blank Netlify site.
- Retrieve the personal access token from Netlify and the site ID.
- Retrieve the personal access token from GitHub.
- Set the secrets inside the repository settings.
- Create a GitHub Action YAML file inside
.github/workflows.
Voila! We’ve finished our tutorial. Now you have an open playbook to deploy your future Flutter web apps using GitHub Actions.

Top comments (0)