
Introduction
For network testing scenarios where deploying physical machines is impractical, Vagrant offers a solution. This tool allows the creation of multiple virtual hosts within a controlled, private network, enabling you to simulate real-world network interactions and test connectivity between systems.
In this article, you’ll explore the technical aspects of using Vagrant for network simulation and learn about the advantages of using it for interconnected systems.
Prerequisites
- A working Vagrant installation. See the installation guide on their official website.
- A working Virtualbox installation. Check their official website to install it.
- A fair understanding of Linux. You can check this Linux tutorial series on Digital Ocean.
- An internet connection to download any necessary dependencies.
Steps
Step 1 - Downloading the box
A vagrant box is a copy of a specific operating system. Vagrant makes these copies available on the cloud for reproducing virtual environments.
For this tutorial, you are using a Eurolinux CentOS box. To download this box, enter the following commands in your terminal:
$ vagrant box add eurolinux-vagrant/centos-stream-9
This command downloads the CentOS Stream 9 box image from Vagrant Cloud (a repository for pre-build Vagrant boxes). The locally stored box enables you to create multiple virtual environments without downloading it again.
Step 2 - Provisioning the virtual machine
Create a folder named netsim and move into it:
$ mkdir netsim
$ cd netsim
To create a virtual machine you’ll need a Vagrantfile.
A Vagrantfile is a plain text file written in Ruby that tells Vagrant exactly what kind of virtual machine to create and configure. It’s a blueprint for your development environment.
Create a Vagrantfile using this Command:
$ touch Vagrantfile
This tutorial demonstrates using Vim to add configuration details to the file, but you can use any editor you prefer.
Open the file in Vim:
$ vim Vagrantfile
Switch to insert mode by pressing i.
- Declare
vm_memoryandvm_cpus:
vm_memory = 1024
vm_cpus = 1
vm_memory allocates 1024MB(1GB) of RAM to the virtual machine. vm_cpus assigns a single CPU to the VM.
- Configure Base Box for the development environment:
Vagrant.configure("2") do |config|
  config.vm.box = "eurolinux-vagrant/centos-stream-9"
  config.vm.box_check_update = false
Vagrant.configure("2") do |config| initiates a configuration block within the Vagrantfile, specifying version 2 of the Vagrant configuration syntax. config.vm.box = "eurolinux-vagrant/centos-stream-9" instructs Vagrant to use CentOS Stream 9 virtual machine image. config.vm.box_check_update = false disables automatic box update for the virtual machine.
- Increase memory allocation:
  config.vm.provider "virtualbox" do |vb|
  #   Customize the amount of memory on the VM:
      vb.memory = 1024
      vb.cpus = 1

   end
vb.memory allocates 1024MB of RAM to the virtual machine. vb.cpus assigns a single CPU to the VM.
- Define a virtual machine:
config.vm.define "server-1" do |config|
The line above creates a new virtual machine named server-1.
Under this configuration block, equip the virtual machine with a shell script that executes during the provisioning process:
    config.vm.provision "shell", inline: <<-SHELL
     ip addr | grep \"inet\" | awk '{print $2}'
   SHELL
This script retrieves the IP address of the VM and prints it to the console.
- Assign a static IP address to the VM:
config.vm.network "private_network", ip: "192.168.56.39", virtualbox__intnet: "true"
  end
end
The line above establishes a private network interface for the virtual machine, assigns a static IP address(192.168.56.39), and isolates it within a VirtualBox-specific internal network.
Private networks create isolated environments for virtual machines. They are ideal for testing and development in security-sensitive scenarios.
virtualbox__intnet: "true" enables VirtualBox’s internal networking for that specific virtual machine. This means the network is completely isolated from the host machine or outside networks and can only communicate with other machines on the same private network.
Step 3 - Adding a new machine
To add a virtual machine to this private network, repeat the process in the previous step and assign a different static IP:
  config.vm.define "server-2" do |config|
    config.vm.provision "shell", inline: <<-SHELL
     ip addr | grep \"inet\" | awk '{print $2}'
   SHELL
  config.vm.network "private_network", ip: "192.168.56.40", virtualbox__intnet: "true"
  end
This creates a new virtual machine named server-2 and provisions it with the same configurations as the first machine.
Step 4 - Applying DRY principles
DRY stands for Don’t Repeat Yourself. It’s an important principle in software development that emphasizes the importance of writing reusable code to avoid unnecessary duplication.
In the previous step, you duplicated the configuration setup for the first machine. This goes against the DRY principle.
To make the virtual machine creation process reusable, you’re going to make some changes.
- Clear the configuration setups for both machines.
- Declare
vm_numat the top of the file and set it to2:
vm_num = 2
- Paste the script below:
  (1..vm_num) .each do |n|
    #a lAB in the 192.168.56.0/24range
    lan_ip = "192.168.56.#{n+10}"
    config.vm.define "server-#{n}" do |config|
      config.vm.provision "shell", inline: <<-SHELL
        ip addr | grep \"inet\" | awk '{print $2}'
      SHELL
      config.vm.network "private_network", ip: lan_ip, virtualbox__intnet: "true"
    end
  end
Here’s a breakdown of what the script does:
-
(1..vm_num) .each do |n|is a loop that iterates over a range from 1 tovm_num, where vm_num is the total number of VMs you want to create. For each iteration, n is the current number in the range. -
lan_ip = "192.168.56.#{n+10}"sets the LAN IP address for each VM. The IP addresses start from “192.168.56.11” and increment by 1 for each VM. -
config.vm.define "server-#{n}" do |config|defines a new VM with the name “server-n”, wherenis the current number in the range. -
config.vm.provision :shell, :inline => "ip addr | grep \"inet\" | awk '{print $2}'"provisions the VM using a shell script. The script retrieves the IP address of the VM. -
config.vm.network "private_network", ip: lan_ip, virtualbox__intnet: "true"set up a private network for the VM and assigns it thelan_ipdefined earlier. Thevirtualbox__intnet: "true"option specifies that the network should be a VirtualBox internal network as explained in the previous steps. -
endterminates the definition for the current VM. The loop then moves on to the next number in the range, until all VMs have been defined.
Below is the complete Vagrantfile, after all the necessary configurations:
# -*- mode: ruby -*-
# vi: set ft=ruby :

vm_num = 2

Vagrant.configure("2") do |config|
  config.vm.box = "eurolinux-vagrant/centos-stream-9"
  config.vm.box_check_update = false

  config.vm.provider "virtualbox" do |vb|
  #   Customize the amount of memory on the VM:
      vb.memory = 1024
      vb.cpus = 1

   end

  (1..vm_num) .each do |n|
    #a lAB in the 192.168.56.0/24range
    lan_ip = "192.168.56.#{n+10}"
    config.vm.define "server-#{n}" do |config|
      config.vm.provision "shell", inline: <<-SHELL
        ip addr | grep \"inet\" | awk '{print $2}'
      SHELL
      config.vm.network "private_network", ip: lan_ip, virtualbox__intnet: "true"
    end
  end
end
If you have less than 8 gigs of RAM, consider lowering the virtual machine’s memory to 512MB.
Save and exit the file.
Then, run the vagrant up command in your terminal:
$ vagrant up
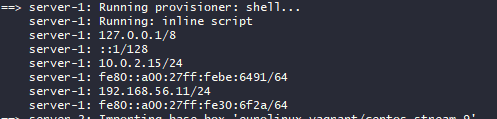
This command creates the virtual environments as configured in the Vagrantfile.
The provisioning process prints the IP addresses of both machines to the console.

Step 5 - Testing their connectivity
You’ve fully set up the virtual machines. To test the connection between them, you’ll need to run a ping test on each machine. If configured successfully, they would operate on the same private network, accessible only to each other.
Login to server-1 and send 4 packets to server-2:
$ vagrant ssh server-1
$ ping 192.168.56.11 -c 4
A solid connection ensures zero packet loss. To verify, log in to server-2 and send 4 packets to server-1:
$ vagrant ssh server-2
$ ping 192.168.56.12
Conclusion
In this article, you’ve set up a multi-host environment for development with Vagrant. Additionally, you utilized private networking within these environments.
Private networks safeguard your environment from external threats and ensure secure communication.
If you enjoyed this article or have any questions, kindly indicate in the comments.


Top comments (0)