The development of ASP.NET Core simplified the development process by adding the concept of middleware to replace older technologies such as HTTP handlers and modules with a more unified set of interfaces. This is a huge part of ASP.NET Core, making developers more effective in how the request and response pipelines are managed. It’s a necessary key concept to understand when building your applications.
The library of middleware comes with ASP.NET Core as part of your applications. As of this writing, the library now has Use when ASP.NET Core 1.0 was first announced and effectively released. This permits your application to manage its request pipelines, so the supervision of incoming HTTP requests and the change of outgoing HTTP responses can be enhanced with each request.
If you’re not familiar with middleware or the types that are commonly used in most projects, there’s no need to despair. Included with our discussion of how middleware is implemented, we’ll explore the common types and the roles that request delegates (Run, Map, Use) play in the pipeline.
Running some examples will also show how to optimize its use. We’ll also demonstrate, with a simple example, how middleware is used in ASP.NET Core which might help you with some best practices when your applications are facing more complex challenges.
Use of Middleware
Middleware is a feature or a component which you set at the beginning of your application when it first start processing. It is important to remember that you only add the Middleware you are actually going to need based on the application you are building*. You don’t need to dump in every single component.*
It is just as important to note that Middleware has evolved from earlier versions of ASP.NET.
Understanding Middleware in Web Apps
Middleware is setup when your web app starts and it lasts for the life of the app. The Middleware components that you register run in a specific order. The order matters because some components depend on others being setup first.
For example, It is important to setup the Authentication component before the Authorization component. We need to know who someone is before we can decide what they can do.
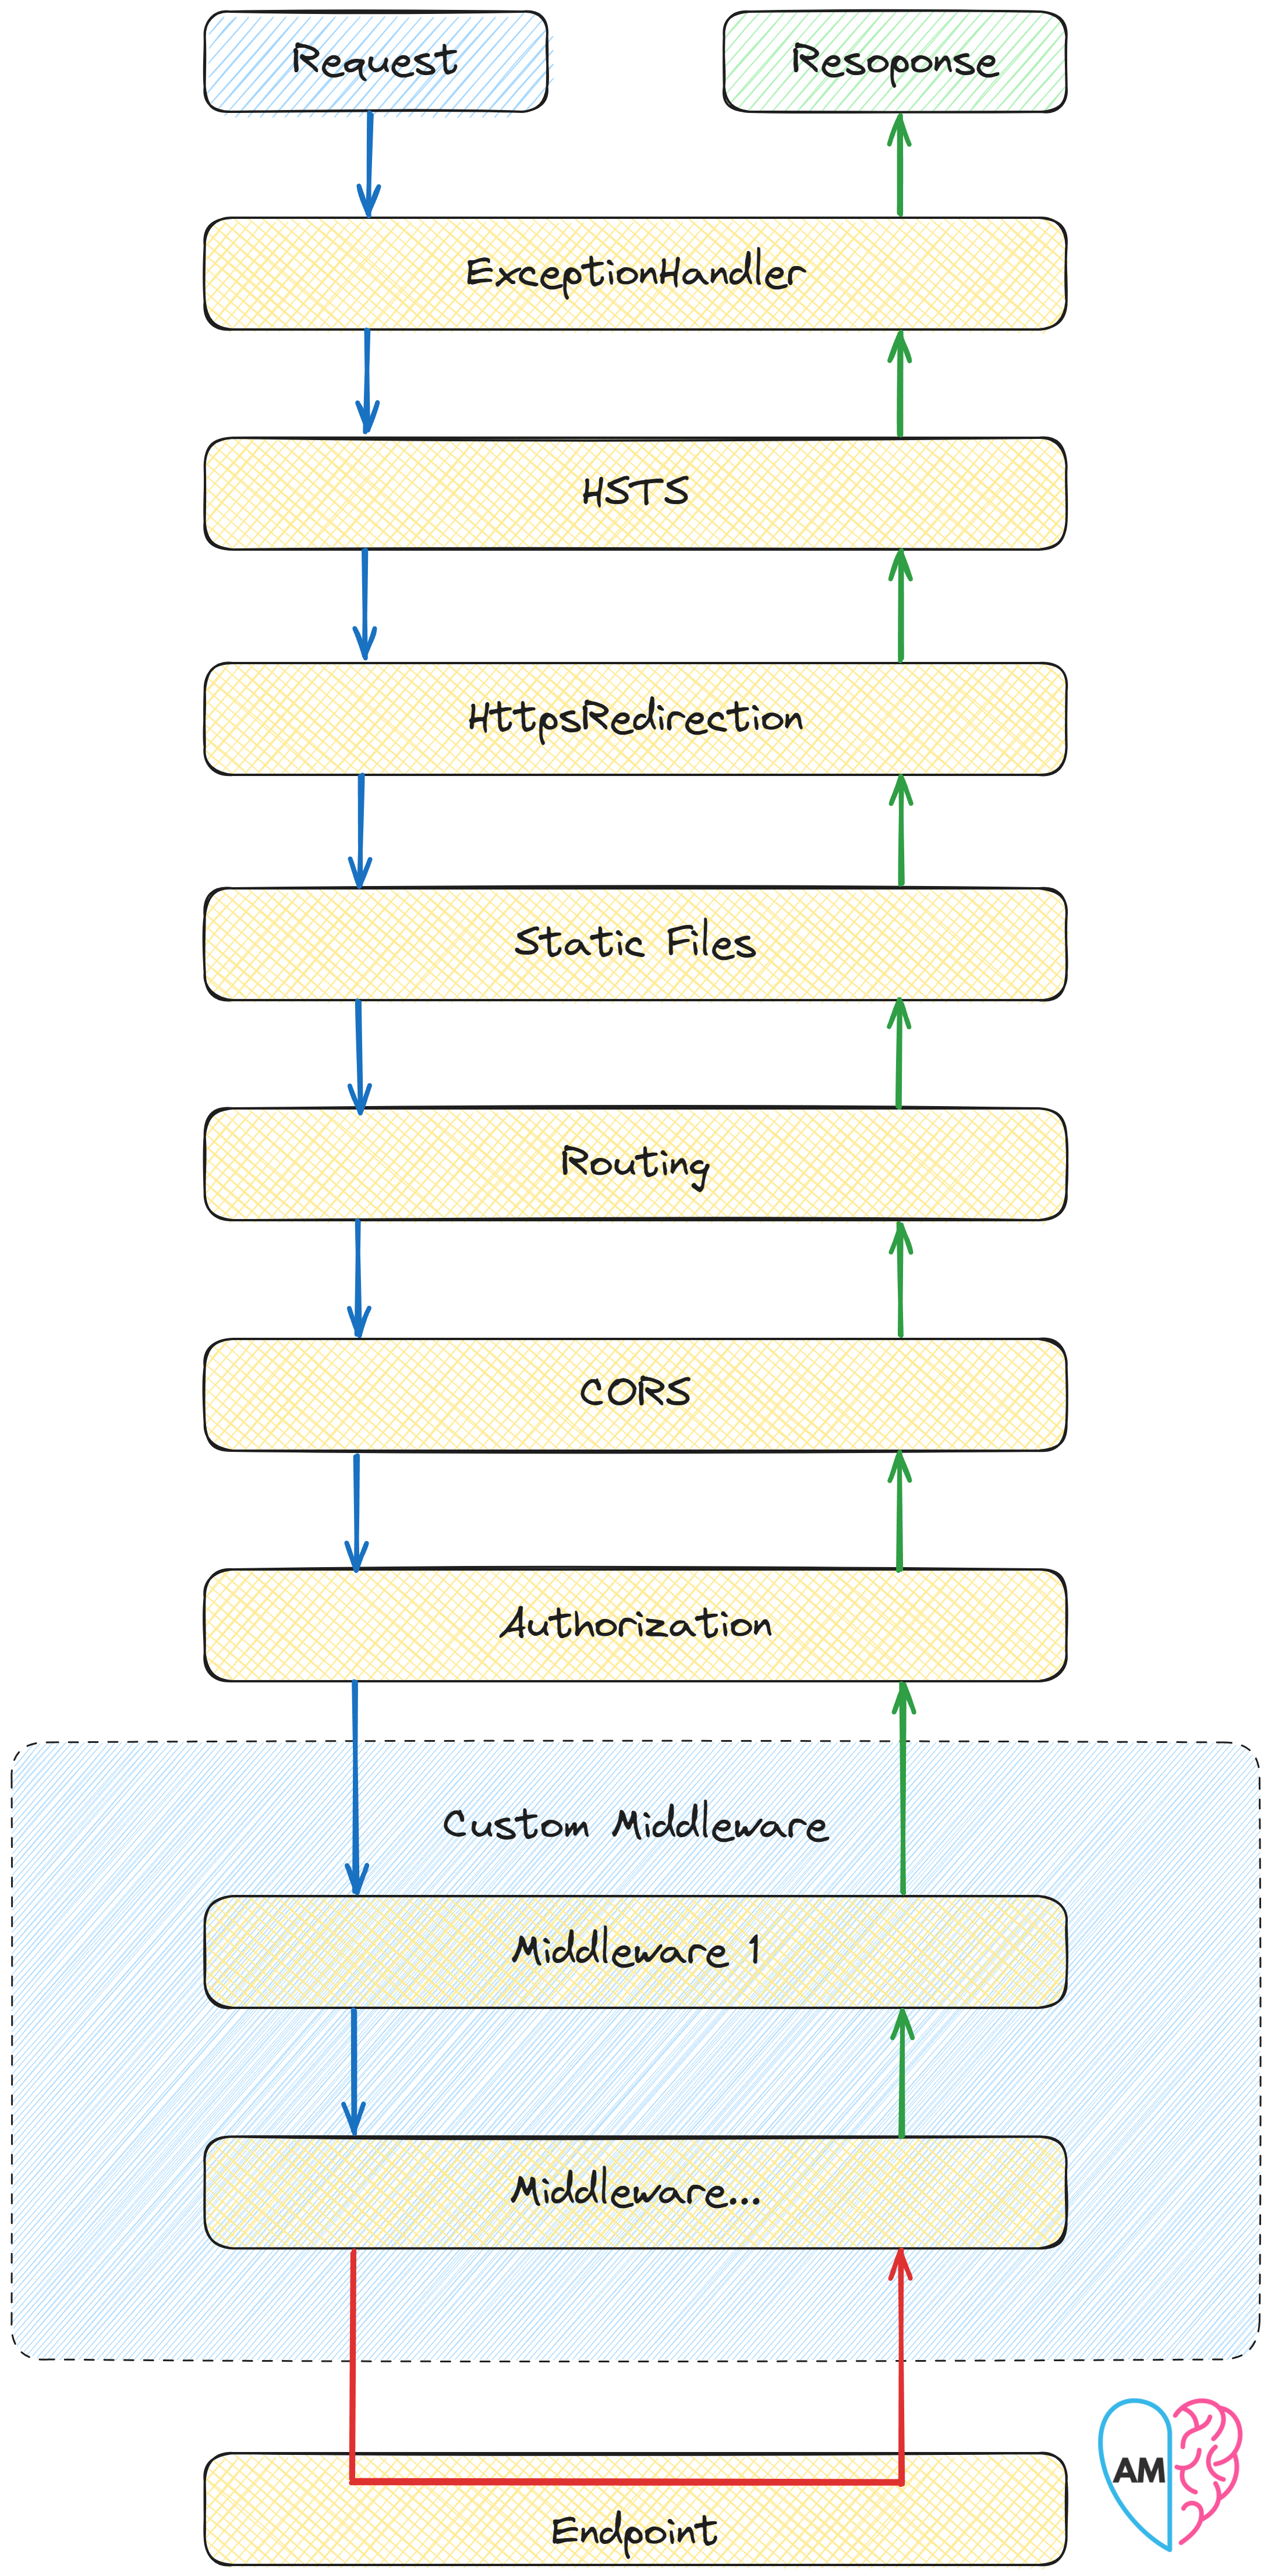
Let’s take a look at what a typical Middleware setup would look like in a web app like the ASP.NET 8 Web Application below.

Standard Middleware pipeline for an ASP.NET 8 Web Application
Each Middleware component is optional, but some rely on others. When a user requested a URL, the first Middleware component (ExceptionHandler) would get hit. Once it was finished, the request would move onto the next component (HSTS), and so on until the end. Finally, the response would go back through the Middleware in reverse order.
Your Middleware will depend on your app’s needs. For a Single-Page Application (SPA) for example, it would be important to have CORS, Static Files, and Routing Middleware components setup.
Each Middleware component can be used to pass information on to the next component or it can terminate the process. If they choose to terminate, they are called terminal Middleware components. They will intentionally stop the Middleware from processing any further requests and exit the process.
Using Request Delegates – Run, Use, and Map
Following along with what we've talked about thus far, you might be wondering how to come up with a pipeline. There are three request delegates available to you. The Run, Use, and Map extension methods you will doubtlessly use these frequently in your Program.cs code, yet what differentiates the three?
Run
The Run() request delegate is tasked with being the final step of the middleware sequence, operating its assigned function and then terminating the pipeline immediately. Other middleware components may be designed to hand off control to the next element in the chain, which is different. It does not accept a next parameter, so its invocation ensures that the end of the line is clearly marked.
As you can see from the following example, components that are Run() are explicitly set up to stop the pipeline immediately:
app.Run(async context =>
{
    await context.Response.WriteAsync("Pipeline execution ends here.");
});
This snippet omits the next parameter within its delegate, indicating that it's the final action to be taken. Upon execution, it will present the message "Pipeline execution ends here." to the user in the web browser and then directly terminate any additional processing within the pipeline.
Use
In ASP.NET Core, the Use() method connects the individual middleware components in the request-response pipeline. In the snippet, the await next.Invoke() ensures the middleware is executed in sequence. Code before this line modifies the incoming request and anything after it is altering the outgoing response.
You can easily see how a request is navigated by placing customised text inside each of the middleware methods. To provide a simple example of how the result comes together, a sample set of middleware with descriptive text is shown below.
app.Use(async (context, next) =>
{
    await context.Response.WriteAsync("Entering first middleware.\n");
    await context.Response.WriteAsync("Moving to the next stage...\n");
    await next();
    await context.Response.WriteAsync("Returning from first middleware.\n");
});

app.Use(async (context, next) =>
{
    await context.Response.WriteAsync("Inside second middleware.\n");
    await next();
    await context.Response.WriteAsync("Exiting second middleware.\n");
});
This setup generates output that flows from the first middleware to the second and back, illustrating how control passes through the pipeline. Before next.Invoke(), actions are applied to the request. After it, the response is tailored before returning to the client, mirroring the journey through the middleware in reverse order for the response.
After each Middleware component is executed, the application runs and then returns in reverse order.
Map
Map() is used in web development for directing traffic in an application. This provides branches in the processing pipeline based on the path of the request. More common in practice is to use built-in middleware methods such as .MapRazorPages() or .MapControllers() which have built-in paths for routing and skip the need for this functionality to be custom-built.
MapWhen() allows more specific routing based on conditions. It lets you execute code if a certain condition is true. An example included in the associated code shows how the MapWhen() method can be used to output a message in the event that the website is being maintained.
The boolean true or false is used to switch between which temporary message will be output. If underMaintenance = true then the text Site is under maintenance. Please check back later! is output. Here’s a simplified example:
app.MapWhen(_ => underMaintenance, ctx => ctx.Run(async context =>
{
    await context.Response.WriteAsync("Site is under maintenance. Please check back later!");
}));
In this code, we use underMaintenance to control the display of a maintenance message. This illustrates the flexibility and control middleware offers in handling web requests.
Best Practices for Middleware
In this part, we'll go over some key tips and strategies for crafting your middleware, ensuring your web application operates smoothly. Let's dive in!
Shift to Async
In Middleware, performance is essential to providing a seamless user experience. As our application scales, efficiency becomes more important. Where synchronous tasks would queue, slowing down the main thread, asynchronous operations will parallelize the work.
The async/await syntax will allow a much smoother execution, making your application appear snappier.
These async methods not only quicken the processes in Middleware, they also provide more scalability and responsiveness to your application, making it more robust as your user numbers increase.
Organizing Middleware Sequence
Ensuring your Middleware is organized correctly is a crucial step. Match your application’s needs against the above diagram to determine which middleware components are necessary and their proper sequence for your web application.
For instance, should you decide to integrate the W3C Logging Middleware component, it needs to be positioned at the start of the pipeline. This placement allows it to record all incoming requests throughout the application’s operation.
Placement matters, as each component plays a specific role within the pipeline.
Simplifying ASP.NET Middleware Setup
In a new ASP.NET project, Program.cs often populates with all manner of app.UseXxx() methods. You can reduce some of the clutter by bundling related middleware setup into extension methods. Aside from just tidying up your code, this means you can more easily manage new middleware as you add it to your application.
For example, all of our client-related middleware setup is bundled up into a single extension method:
public static class WebApplicationExtensions
{
    public static void UseClientOptions(this WebApplication app)
    {
        app.UseHttpsRedirection();
        app.UseStaticFiles();
    }
}
Now, the code in your Program.cs file contains one line, and you know exactly what the extension method does:
app.UseClientOptions();
Encapsulating Middleware in ASP.NET Core
When developing a web application using ASP.NET Core, it’s common to have a requirement to introduce custom logic that gets executed for every HTTP request.This is where middleware comes in, and initially you might add your middleware logic directly within the Program.cs file like so:
app.Use(async (context, next) =>
{
    app.Logger.LogInformation("Processing request in custom Middleware...");
    await next(); // Continues to the next middleware in the pipeline
});
This approach works well, but results in a somewhat cluttered Program.cs file as you add more middleware components. To ensure that your middleware codebase remains clean and maintainable, it can be helpful to encapsulate your middleware logic into a separate class.
Refactor the inline middleware from above to a separate class which is a more descriptive and developer-friendly name RequestAuditMiddleware. By doing this, your middleware becomes much better encapsulated, and much more likely to be reusable between projects:
public class RequestAuditMiddleware
{
    private readonly RequestDelegate _next;
    private readonly ILogger<RequestAuditMiddleware> _logger;

    public RequestAuditMiddleware(RequestDelegate next,  ILogger<RequestAuditMiddleware> logger)
    {
        _next = next;
        _logger = logger;
    }

    public async Task InvokeAsync(HttpContext context)
    {
        _logger.LogInformation("Entering RequestAuditMiddleware...");
        await _next(context);
    }
}
The RequestAuditMiddleware class contains a constructor that receives RequestDelegate and ILogger instances, which are automatically supplied by ASP.NET Core's dependency injection mechanism. The InvokeAsync method encapsulates the middleware logic you wish to apply.
To incorporate this middleware into your application, update your Program.cs file accordingly:
app.UseMiddleware<RequestAuditMiddleware>();
For an even more streamlined setup, create an extension method for the middleware to simplify its registration:
public static class RequestAuditMiddlewareExtensions
{
    public static IApplicationBuilder UseRequestAuditMiddleware(this IApplicationBuilder builder)
    {
        return builder.UseMiddleware<RequestAuditMiddleware>();
    }
}
Now, adding your middleware to Program.cs becomes straightforward:
app.UseRequestAuditMiddleware();
This approach to organizing middleware enhances code readability, maintainability, and reusability. By following this encapsulation pattern, you're adhering to best practices in ASP.NET Core development, ensuring your application remains well-organized and scalable.
Stream-Based Processing in ASP.NET Core
Very important to be able to handle HTTP requests and responses effectively in ASP.NET Core middleware. For high-performance scenarios there are advanced methods like pipelines, but one very common approach involves stream-based processing. This is useful any time you might want to modify or inspect the content of HTTP messages as they flow through your middleware.
Consider RequestAuditMiddleware for example. This middleware intercepts the HTTP response stream and does things like logging or modifying the content. The primary interaction with the stream is through the HttpContext by accessing the HttpRequest.Body and HttpResponse.Body.
We can implement this with a custom stream class, AuditStream, which inherits from the .NET Stream class. This custom stream wraps the original response stream and allows us to override the Write method to log the information and/or modify it so that the modified content reaches the client.
public class AuditStream : Stream
{
    private readonly Stream _baseStream;
    private readonly ILogger _logger;

    public AuditStream(Stream baseStream, ILogger logger)
    {
        _baseStream = baseStream;
        _logger = logger;
    }

    public override void Write(byte[] buffer, int offset, int count)
    {
        _logger.LogInformation($"AuditStream is processing {count} bytes of data.");
        _baseStream.Write(buffer, offset, count);
    }

    // Implement required abstract members of the Stream class...
}
Within the RequestAuditMiddleware, we use this AuditStream to wrap the original response stream:
public async Task InvokeAsync(HttpContext context)
{
    var originalBodyStream = context.Response.Body;
    using var auditStream = new AuditStream(originalBodyStream, _logger);
    context.Response.Body = auditStream;

    await _next(context); // Proceed with the next middleware

    context.Response.Body = originalBodyStream; // Restore the original stream
}
On this way we will allows RequestAuditMiddleware to perform essential auditing tasks transparently, showcasing how stream-based processing is utilized within ASP.NET Core middleware for content inspection and modification. This approach is vital for developers looking to extend functionality or integrate custom logging mechanisms seamlessly within their web applications.
Final words
The introduction of middleware in ASP.NET Core is a game changer. Our pipelines for request and response are no longer hard to manage. No longer do application developers have to deal with HTTP handlers or modules. Now developers can add only the pieces they need for a very fast application that is designed exactly how they want it.
Middleware fundamentally alters how we construct our request and response pipelines. Gone are the days of the order dependent HTTP modules. You know, the one where authentication had to happen before authorization. Middleware can start from the beginning of your application and should be ordered properly to function as you would expect. I'm most excited about these flexible request delegates.
Like our extension methods, the community has an opportunity to build up a ton of best practice here with some maintainable code. A run delegate is the simplest and most specialized. If this is all you need, then you never even get access to the HttpContext. This obviously is not likely to be very often.
What have you built with the IApplicationBuilder?
When do see yourself rolling your own middleware?
What were you building anyways?


Top comments (2)
Hi Admir Mujkic,
Your tips are very useful.
Thanks for sharing.
I am glad if you find it useful!