
With ROS, you have a powerful array of tools to help in your robotics project. One of these tools is rviz, a visualization tool for your robot model described in an URDF file. When I wanted to use rviz, I thought it would be as simple as starting rviz via the command line and to provide the URDF file as a parameter. But this is not a case! While I was following other URDF tutorials, the simulation always worked. But I did not understand why. However, when I learn things from ground up, I want to know why things work - and if they don’t work, how to fix them.
In this spirit, this blog post explains my attempts to get rviz running. Read about what I tried, what did not work, and about the essential steps that you need to follow.
This article originally appeared at my blog admantium.com.
Try & Fail Part 1: Just start Rviz
If you just start rviz via the command line, it does not work. You receive a clear error message.
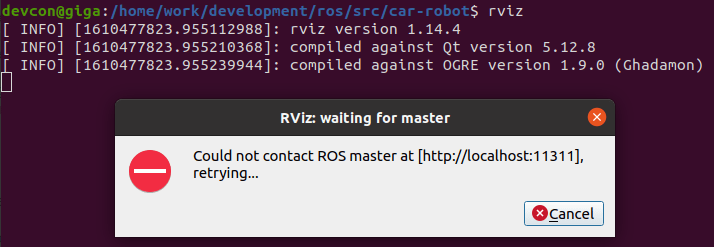
Every ROS system is composed of different nodes that communicate with each other. An essential node is the master node, it offers, among other features, a registry of all nodes in the local network. When you start rviz, it is just another node in your network. But it is not the master node.
The master node can be manually started with the command roscore as follows:
$> roscore

... logging to /home/devcon/.ros/log/25db6b78-4ce6-11eb-af10-2bdc7827bddf/roslaunch-ubuntu-16348.log
Checking log directory for disk usage. This may take a while.
Press Ctrl-C to interrupt
Done checking log file disk usage. Usage is <1GB.

started roslaunch server http://ubuntu:36485/
ros_comm version 1.15.9
Then we can start rviz.
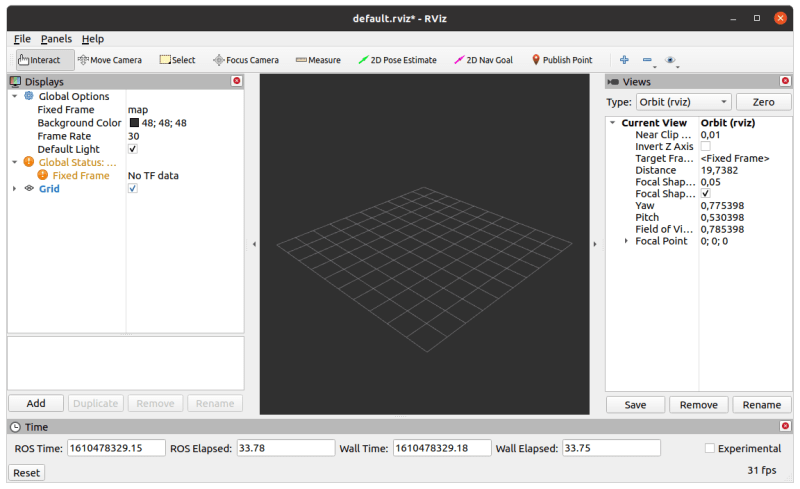
Good! Now lets load a URDF model.
Try & Fail Part 2: Add a Robot Model to Rviz
Ok, so we have rviz running. Now, how can we add a robot model to it?
In the GUI, you can follow these menu paths: Add => By Display Type => Robot Model. However, you will see an error: The parameter robot_description is missing.

How can we add this parameter to the GUI? I spend some time searching and reading tutorials, but could not find an answer. Only after more experience with ROS, I recognized that this parameter needs to be provided for the rviz node. When starting rviz, you need to see something like this in your console:
PARAMETERS
 * /robot_description: <?xml version="1....
 * /robot_model: True
 * /rosdistro: noetic
 * /rosversion: 1.15.9
However, I could not find any way to add this parameter manually. And also, that you need to start separate notes in separate terminal windows feels laborious.
And here I went back to the ROS tutorials and finally understood that the CLI tool roslaunch exactly targets these issues. But we need to provide some other boilerplate code beforehand...
Essential Step 1: Create a new ROS Workspace & Package
The essential steps - with a big thank you to a tutorial from theconstructsim.com - are these:
- Create a custom workspace and a new ROS package
- Change to the workspace root dir, and compile the custom package with
catkin_make - Add this workspace to your shell environment
- Create a ROS launch file
launch/rviz.launch, and add the launch commands - Use
roslaunchto start the launch file
A custom workspace is any directory on your computer in which you can add additional ROS packages. Issue the following commands
$> mkdir -p ~/ROS/src
$> cd ~/ROS
$> catkin_make

Base path: /home/devcon/ROS
Source space: /home/devcon/ROS/src
...
Then we create a package inside the directory ROS/src, in this example we give it the name car-robot.
$> cd ~/ROS/src
$> catkin_create_pkg car-robot
Created file car-robot/package.xml
...
Then, return to the workspace, e.g. cd ~/ROS/, and run catkin_make. The output should mention that the new package is processed correctly.
$> catkin_make
Base path: /home/devcon/ROS
...
-- ~~~~~~~~~~~~~~~~~~~~~~~~~~~~~~~~~~~~~~~~~~~~~~~~~
-- ~~ traversing 1 packages in topological order:
-- ~~ - car-robot
....
Then we add the new workspace to our shell environment.
source ~/Ros/devel/setup.bash
Now that the new package in our custom workspace is registered and ready, we can create a launch file.
Essential Step 2: Create a Launch File
Instead of manually starting the ROS master node, and then spawn a rviz node and your robot as a node, all steps can be automated with the CLI tool roslaunch.
First of all, inside the new package add the following content to the new file launch/rviz.launch:
<launch>
  <param name="robot_description" textfile="$(find car-robot)/urdf/bot.urdf"/>
  <arg name="rvizconfig" default="$(find urdf_tutorial)/rviz/urdf.rviz" />
  <node name="robot_state_publisher" pkg="robot_state_publisher" type="robot_state_publisher"/>
  <node name="joint_state_publisher" pkg="joint_state_publisher" type="joint_state_publisher"/>
  <node name="rviz" pkg="rviz" type="rviz" args="-d $(arg rvizconfig)" />
</launch>
The first param declaration defines the standard parameter name robot_description. It refers to the URDF file that contains your robot definition. Take care: Here you need to use the name of your package, in this example its car-robot, and refer to your URDF file, in this case its bot.urdf
The second declaration is an argument to the rviz file - we load a default configuration file that will include setting so that our robot will be displayed automatically.
We also need to launch 3 ROS nodes. The robot_state_publisher and joint_state_publisher are important for the visualization - you will get strange errors inrRviz if you do not include them. The final node is the rviz visualization.
With this launch file, we can finally start the simulation with the following command.
$> roslaunch car-robot rviz.launch

roslaunch car-robot rviz.launch
... logging to /home/devcon/.ros/log/f85832ac-524a-11eb-95f4-070c1d9ad706/roslaunch-giga-5809.log
Checking log directory for disk usage. This may take a while.
Press Ctrl-C to interrupt
Done checking log file disk usage. Usage is <1GB.

started roslaunch server http://giga:46009/
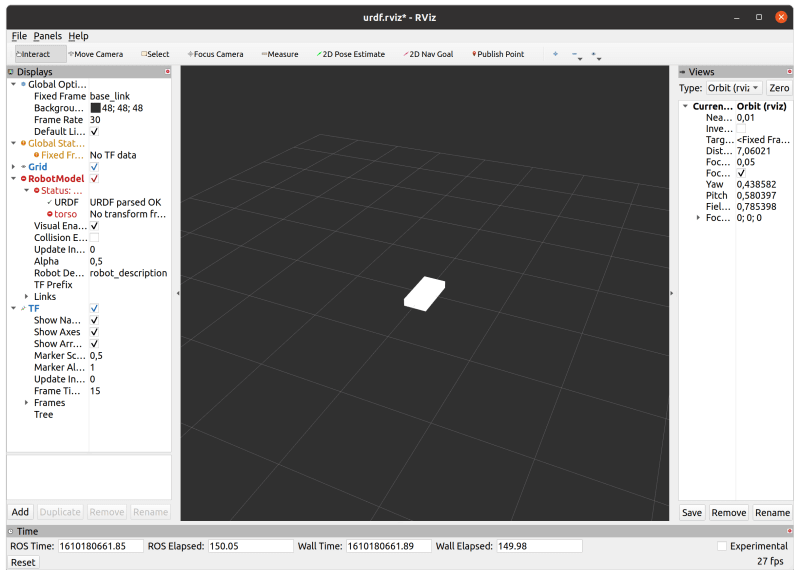
And see the rviz visualisation of our robot:
Conclusion
The visualization tool rviz is a powerful tool for seeing your robot model. This article explored how to run this tool within the complex ROS ecosystem. As we saw, it is not possible to just run rviz on its own: It is just one node within the ROS systems, and therefore needs at least a master node. Also, essential configuration parameters and properties are defined as parameters of the ROS node on which rviz runs. All of this can be provided with a launch file inside a custom package inside a custom workspace - lots of boilerplate, but when applied you are following the ROS standards and also obtain seamless integration with other ROS packages.

Top comments (0)