
This article was written by Jeff Christman. He is a frequent contributor to the Adam the Automator (ATA) blog. If you'd like to read more from this author, check out his ATA author page. Be sure to also check out more how-to posts on cloud computing, system administration, IT, and DevOps on adamtheautomator.com!
Hackers are continually scanning and actively hunting for accessible virtual machines with open management ports. If you're VMs are in Azure though, you have a tool at your disposal called Azure Just-in-Time Access (JIT).
Azure JIT is a service that allows you to open network ports "just in time" or only when you need them open and no longer. Part of the Azure Security Center suite of products, Azure JIT is a component inside of the broader Azure Defender brand. With Azure Defender and JIT, you can control who has access to network ports on any of your Azure virtual machines.
In this article, you learn what Azure Just-In-Time access is, how to enable it, configure options and policies, and how to request access. We will also walk through different ways to allow JIT access using the Azure portal, PowerShell, and the Azure Security Center API.
Once enabled, you'll then learn how request access to VMs and also how to audit Azure JIT activity.
Prerequisites
This will be a hands-on tutorial blog post. If you would like to follow along, be sure to have the following prerequisites in place before starting this article. You'll need:
- An Azure Subscription
- Logged into the Azure Portal with an Azure account with the Subscription Owner role. For more detail, check out the Permissions in Azure Security Center documentation.
- A Standard Azure Defender plan. You can sign up while logged into the Azure Portal via Azure Security Center.
- Azure Cloud Shell or PowerShell. Be sure you log in once to create the storage account it needs at least once. Later on in the article, you'll learn how to enable Azure JIT using PowerShell. Azure Cloud Shell is the easiest way to do that unless you'd like to use the Azure PowerShell module installed on your local computer.
- The Azure Defender service enabled. Part of Azure Security Center, you'll need to first enable it on your subscription.
If you'd like to manage on-prem Windows or Linux servers, be sure to install the Azure Defender for Servers software.
Azure JIT Pricing
Before you get too far, know that Azure JIT is not free. There are various Azure JIT pricing levels you need to know before diving in headfirst.
You can find all of the pricing options available on the Azure Security Center blade in the Azure portal. Since Azure JIT is part of Azure Defender (which is part of Azure Security Center), the pricing you're looking for is for Azure Defender.
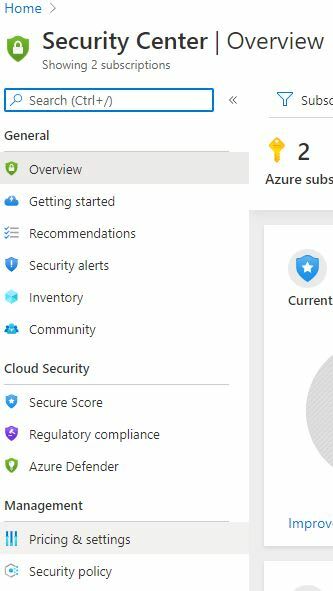
Once you've enabled Azure Defender, you'll notice a Pricing and Settings option on the left-hand side of the page as shown below in the Azure portal.
Azure Defender is free for the first 30 days and anything beyond the initial 30 days will be charged as per the pricing chart below. The chart below shows the per month pricing for the various services available that can utilize Azure Defender. Generally speaking, you can expect a cost of about $15.00 per month for your virtual machines the use Azure Defender and Just-In-Time service.
All prices are valid as of 10/06/20. You can find the latest prices on the Azure Security Center pricing page.
Azure Defender Pricing
| Resource | Price |
| Azure Defender for Servers | $14.60/Server/Month |
| Azure Defender for App Service | $14.60/App Service/Month |
| Azure Defender for SQL | $15/Server/Month |
| Azure Defender for MySQL | Free |
| Azure Defender for PostgreSQL | Free |
| Azure Defender for Storage | $0.02/10K Transcations |
| Azure Defender for IoT - By Device | $0.001/month |
| Azure Defender for IoT - By Messages | $0.20/25K Transactions |
| Azure Defender for Kubernetes | $0.00268/vCore/hour |
| Azure Defender for ACR | $0.29/image |
| Azure Defender for Key Vault | $0.01/10K Transactions |
Enabling Azure JIT on Azure VMs
The first task you'll need to accomplish is enabling the Azure JIT feature on each of your VMs. This can be done through the Azure Security Center in the Azure portal.
For a simple demonstration, this section will show you how to enable JIT on a single VM.
If you have hundreds of VMs, don't worry. You'll learn how to enable JIT in bulk with PowerShell a little later.
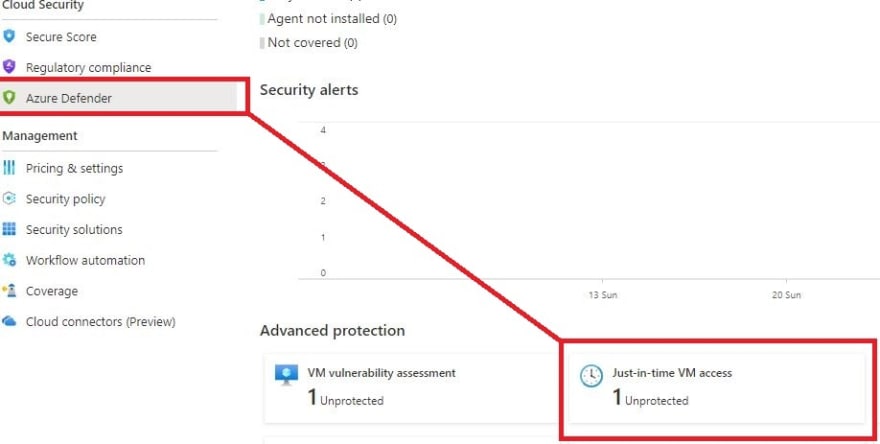
- Once at the Azure Security Center page, click on Azure Defender on the left side of the page. You should then see a Just-in-time VM access title as shown below.
2. Next, click on the Just-in-time VM access tile. This will open the JIT settings blade. Once open, the blade will show three tabs: Configured, Not Configured, and Unsupported. These tabs represent the various state of Azure JIT against each VM in your subscription.
3. If this is your first time enabling Azure JIT, all of your VMs will be under the Not Configured tab as shown below. To enable JIT on the VM, click on the VM and then click on the Enable JIT on 1 VM button.
Note that the Resource Group and Subscription Name will be unique to your environment.

4. Once you click on the Enable JIT button, you'll then see a JIT VM access configuration page. This page allows you to view all of the default ports and also add any existing ports you'd like to actively manage.
To add a new port, click on Add and provide the Port, Protocol, Allowed source IPs, and IP addresses fields as required. When complete, click on OK.
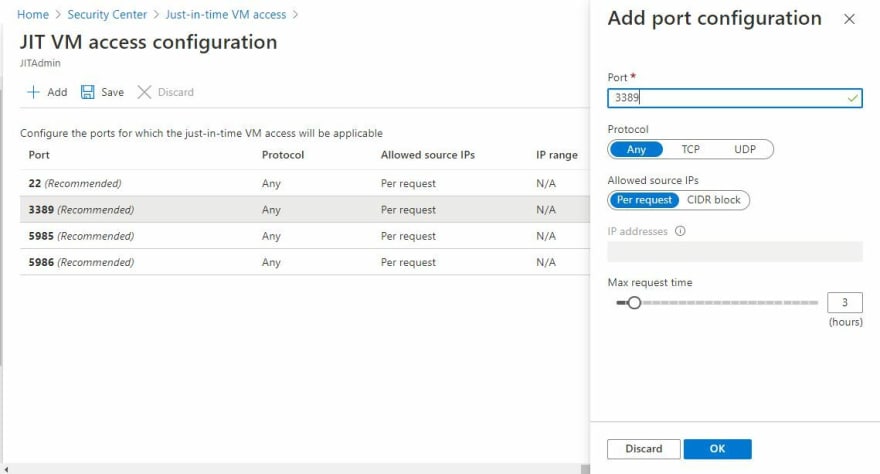
When complete, you'll then have ensured the ports under management are only open for a specific amount of time (Max request time).
Once you set an access policy, when a user requests access (shown how below), a firewall rule is created with the settings set in the policy. After the Max request time has been exceeded, Azure will remove the firewall rule that opened the port, to begin with.
Know that Azure Bastion and JIT access cannot be used together. If you enable Azure Bastion with an existing JIT access policy enabled on a VM, the bastion host will not connect to the target machine and you will get a connection error!
Requesting Access to a Virtual Machine
Now that you've enabled JIT on a VM, how do you (or your users) get access to that VM through one of the managed ports?
- While logged into the Azure portal, navigate to the VM you'd like to access and select Connect.
- Now, select the protocol you'd like to use and change the Port number or desired Source IP, if required. Typically, when you attempt to connect to a VM, you'll immediately be able to download an RDP file or see SSH methods, for example. When a JIT access policy is applied to a VM, you'll see options like in the below screenshot.

Know that requesting access to VMs only opens the requested port. Just like logging into a virtual machine using RDP, you will need a valid Active Directory account with the appropriate permissions to log in to the virtual machine.
Automating Azure JIT using PowerShell
So let's say you've got hundreds of VMs that you need to control management ports on. Maybe you've got a request from management to get all of VM management ports locked own ASAP. You're not going to want to go through the steps you just took to enable an access policy on a single VM. Let's automate this.
Instead of logging into the Azure Security Center each time and enabling a JIT access policy for each VM, you can write a script using PowerShell. Once you've built the script, you can then incorporate it into a CI/CD pipeline too.
Below you'll find a copy/pastable code snippet for you to get started. This code creates and applies a JIT access policy to the VMName VM that limits Port 22 (SSH) and RDP (3389), all protocols, from all source IPs for a maximum of three hours.
## Build the policy with the VM's resource ID
$JitPolicy = (@{ id="/subscriptions/SUBSCRIPTIONID/resourceGroups/RESOURCEGROUP/providers/Microsoft.Compute/virtualMachines/VMNAME"
ports=(@{
     number=22; ## SSH
     protocol="*"; ## all protocols
     allowedSourceAddressPrefix=@("*"); ## any source IP
     maxRequestAccessDuration="PT3H"}, ## up to three hours
     @{
     number=3389;
     protocol="*";
     allowedSourceAddressPrefix=@("*");
     maxRequestAccessDuration="PT3H"})})
$JitPolicyArr=@($JitPolicy)

## Send the policy to Azure and commit it to the VM
Set-AzJitNetworkAccessPolicy -Kind "Basic" -Location "LOCATION" -Name VMNAME -ResourceGroupName "RESOURCEGROUP" -VirtualMachine $JitPolicyArr
Auditing JIT Access Activity
So you've set up JIT access to a bunch of VMs but is it being used? If so, how often? You need to audit the access policy activity. Auditing can be done via each VM's activity log.
When someone requests access to a management port and Azure creates an access policy, JIT logs this activity in the activity log. The activity log contains information such as when the request was made, who made the request, if it was successful, and so on.
To view the activity log, navigate to the JIT VM Access blade in the Azure Portal, click on the three ellipses on the far right of the selected virtual machine, and select Activity Log.
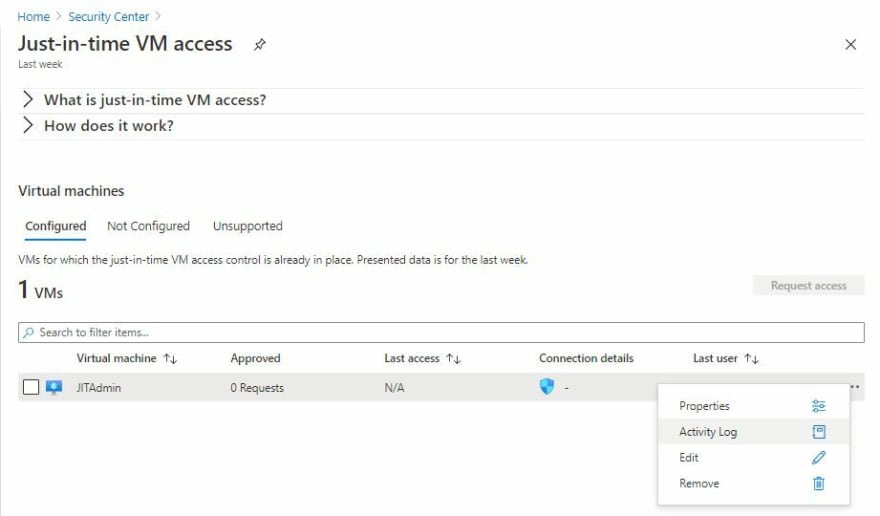
As you can see below, the activity log tracks when an access polity has been applied to a virtual machine, who requested access, and when access was granted or denied.


Top comments (0)