
Authentication is a crucial aspect of web development, especially when dealing with user data. If you're looking to deepen your understanding of how to securely handle user passwords, I highly recommend reading my article on how to store user passwords securely. This current guide builds on that foundation and will walk you through setting up a basic authentication system within the MERN stack (MongoDB, Express, React, Node.js). If you're already familiar with password security and bcrypt, you can jump right into this article without needing to read the previous one. In this tutorial, we'll use Express for the backend, MongoDB for storing user data, and JSON Web Tokens (JWT) to secure the authentication process.
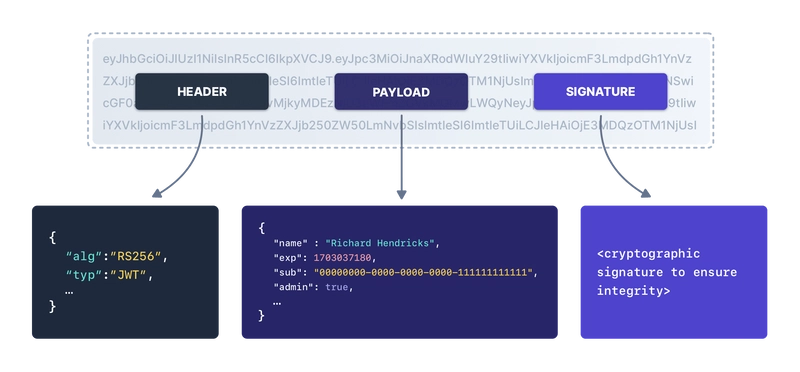
Structure of JWT:
1. Setting Up the Express Server
First, let's create an Express server. We'll start by initializing a new Node.js project and installing the necessary dependencies.
mkdir auth-system
cd auth-system
npm init -y
npm install express mongoose bcrypt jsonwebtoken
Next, create an index.js file in the root directory to set up the Express server and connect to MongoDB.
Let’s retrieve our connection string:
- Create a MongoDB Atlas account and set up a cluster (this may take a few minutes).
- Access Network Access from the sidebar, edit the IP Whitelist entry, and select "Allow Access from Anywhere."
- Click on "Connect" and choose "Drivers".
- Select "Mongoose" as the driver, and then copy the provided connection string.
- Replace the placeholder for the password in the connection string with your actual password.
import express from "express";
import mongoose from "mongoose";
import authRoutes from "./routes/auth.js";
import protectedRoute from './routes/protectedRoute.js';

const mongoURL = 'your-mongodb-connection-string';
const app = express();

app.use(express.json());
app.use("/auth", authRoutes);
app.use("/protected", protectedRoute);

const PORT = process.env.PORT || 3000;

// We'll only start our server once we have successfully connected to the database.
mongoose.connect(mongoURL, () => {
    console.log('Database Connected');
    app.listen(PORT, () => {
        console.log(`Server is running on port ${PORT}`);
    });
});
In this code:
- We import necessary modules like express, mongoose, and our route files.
- The MongoDB connection string is specified in the mongoURL.
- We set up the Express server to use JSON and link it to our authentication and protected routes.
- We connect to the MongoDB database using Mongoose.
2. Creating the User Model
Create a models folder, and within it, a User.js file. This file will define the Mongoose schema for storing user data.
import mongoose from 'mongoose';

const userSchema = new mongoose.Schema({
    username: {
        type: String,
        unique: true,
        required: true,
    },
    password: {
        type: String,
        required: true,
    }
});

export const User = mongoose.model("User", userSchema);
Here, we define a simple schema with two fields: username and password. The username is unique to prevent duplicate users, and both fields are required.
3. Implementing Authentication Routes
Next, create a routes folder with two files: auth.js and protectedRoute.js.
auth.js will handle user registration and login:
import express from "express";
import { User } from "../models/User.js";
import bcrypt from "bcrypt";
import jwt from "jsonwebtoken";

const router = express.Router();

// Registration
router.post("/register", async (req, res) => {
    try {
        const { username, password } = req.body;
        const hashedPassword = await bcrypt.hash(password, 10);
        const user = new User({ username, password: hashedPassword });
        await user.save();
        res.status(201).json({ message: "User registered successfully" });
    } catch (error) {
        console.log(error.message);
        res.status(500).json({ error: "Registration Failed" });
    }
});

// User Login
router.post("/login", async (req, res) => {
    try {
        const { username, password } = req.body;
        const user = await User.findOne({ username });
        if (!user) {
            return res.status(401).json({ error: "User Not Found" });
        }
        const passMatch = await bcrypt.compare(password, user.password);
        if (!passMatch) {
            return res.status(401).json({ error: "Wrong Password" });
        }
        const token = jwt.sign({ userId: user._id }, "secretKey", {
            expiresIn: "1h",
        });
        res.status(200).json({ token });
    } catch (err) {
        console.log(err);
        res.status(500).json({ error: err.message });
    }
});

export default router;
Key Concepts:
- Registration: We hash the password using bcrypt before storing it in the database.
- Login: We compare the hashed password with the stored one, and if they match, we generate a JWT token that the user can use for accessing protected routes. #### 4. Creating a Protected Route Now, let's create a route that is accessible only to authenticated users.
protectedRoute.js:
import express from 'express';
import verifyToken from '../middleware/authMiddleware.js';

const router = express.Router();

router.get('/', verifyToken, (req, res) => {
    res.status(200).json({ message: 'Protected route accessed' });
});

export default router;
authMiddleware.js:
In the middleware folder, create an authMiddleware.js file to verify the JWT token:
import jwt from "jsonwebtoken";

function verifyToken(req, res, next) {
    const token = req.header("Authorization");
    if (!token) return res.status(401).json({ error: "Access denied" });
    try {
        const decoded = jwt.verify(token, "secretKey");
        req.userId = decoded.userId;
        next();
    } catch (error) {
        res.status(401).json({ error: "Invalid token" });
    }
}

export default verifyToken;
Key Concepts:
- JWT Verification: We verify the token sent in the request header. If the token is valid, the request is allowed to proceed; otherwise, an error is returned.
5. Testing the System
To test the system, you can use tools like Postman or cURL. Postman is particularly user-friendly and straightforward for testing.

Top comments (0)