I have been recently developing a game using vanilla HTML, CSS and JavaScript. (If you want to try the game out you can check out this site.) When I was initially developing the game, I took the "spaghetti code" approach. That means all of my code was crammed into a single javascript file which at the end of my first test release became almost 500 lines. Now, as I have coded it fresh it is really easy for me just to navigate the file and find out and edit things. I tried to be organized in the beginning but as time passed by, I was a little uncautious about the placement of the code. This created an utter mess. But then I found out, there is a better solution, currently supported by all the major browser - ES6 modules
Support
If you are using any feature in your latest vanilla web app(if you are using frameworks then the frameworks generally take care of those files) then make sure to check out the Can I Use website. So, before using ES6 in my game I went to Can I Use and searched the feature I was going to use - ES6 import. The result looked something like this:
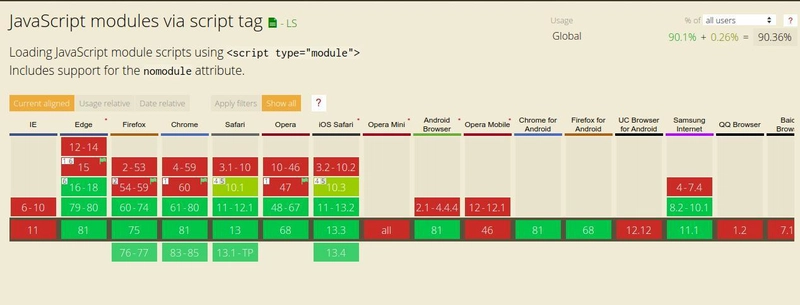
So, as you can see, most of the mainstream modern browsers support es6 modules(90% devices overall). Now, production-level apps need to support almost all of the devices. But for your hobby projects, it is not so important. As chrome, safari and firefox (the major 3 browsers in the desktop and android world) can support ES6 modules so there is no reason for not using it.
Advantages
Using ES6 modules keeps your code short and clean for future use. Instead of cramming hundreds of lines of code into one file, it can be distributed into different files and thus the code will be readable for others using it later.
Moreover, unit testing can be done easily on this kind of code.
Project
I don't feel my posts are complete until I make a project using the technology I'm talking about. So, let's make a simple TODO app with CRUD functionality. The app will be using JavaScript variables to store the TODOs, so there is no permanence of data in this app.
Folder Structure
To start with I will keep my HTML and my CSS at the root of the project and the javascript will be kept in the js folder. So the initial folder structure will look like this:

Getting the basic HTML done
So, to start with I will be using the bolierplate code created by emmet and change the title to be modualrized todo. Meanwhile, I also linked the CSS to my HTML. So the initial code looks like:
<!DOCTYPE html>
<html lang="en">
  <head>
    <meta charset="UTF-8" />
    <meta name="viewport" content="width=device-width, initial-scale=1.0" />
    <title>Modularizeed todo</title>
    <link rel="stylesheet" href="style.css" />
  </head>
  <body>
  </body>
</html>
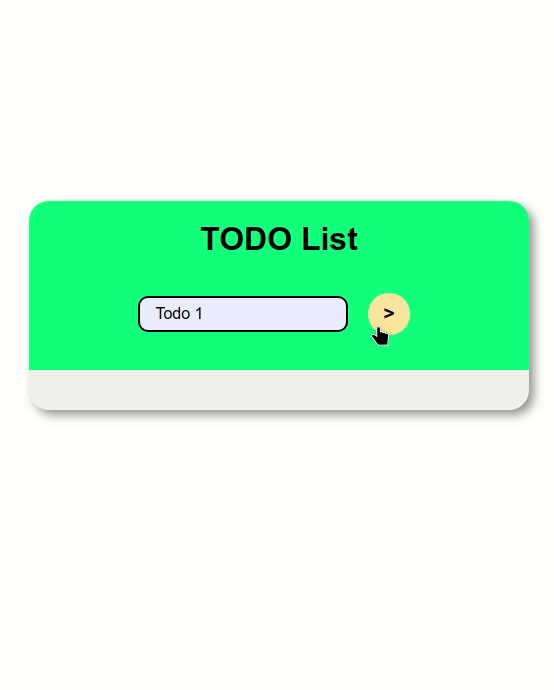
Now let me explain the design I have used for the app and the markup will be really easy to understand. So I have taken a container, where on the top portion I have an h1 and a form, and on the bottom half I have the todos shown as an unordered list. Inside the list elements I have the name of the todo and each todo has two buttons, one for showing that the todo is done and another one is for deleting the tode. So the HTML inside the body looks something like this:
<div class="container">
<div class="topbar_holder">
<h1>TODO List</h1>
<form id="add_todo" class="add_todo">
<input type="text" id="todo_input" placeholder="Type your todo" />
<input
type="submit"
id="submit_button"
class="action_button green_button special"
value=">"
/>
</form>
</div>
<ul class="todo_list">
<li class="todo_card">
<h3 class="todo_title">Test todo 001</h3>
<div class="buttons_container">
<button class="action_button green_button">
✓
</button>
<button class="action_button">
✗
</button>
</div>
</li>
</ul>
</div>
The list items in the ul are just temporary right now, we will be creating them via javascript, that is why we have given an id to the ul to populate it in javascript.
The styling
A small disclaimer before diving into the CSS, as this is not a CSS tutorial I have not explained that much CSS. if you want your app to look exactly like my app, use the styles or you can skip to the javascript part straight.
The styling of this app starts with the usual resets, and then I give the body and the div with the class container such styles that the container div is centred on the page and when it increases with the amount of todos added, it does not touch the edge:
* {
  margin: 0px;
  padding: 0px;
  box-sizing: border-box;
}

body {
  background-color: #ffffff;
  display: flex;
  justify-content: center;
  align-items: center;
  min-height: 100vh;
  padding: 20px;
}

.container {
  width: 90%;
  max-width: 500px;
  background-color: #f0f0f0;
  box-shadow: 5px 5px 10px rgba(0, 0, 0, 0.4);
  font-family: Arial, Helvetica, sans-serif;
  border-radius: 20px;
}
In the next step I centered the h1 and stylized the topbar to have the form front and center:
.container h1 {
  text-align: center;
  margin-bottom: 20px;
}

.topbar_holder {
  border-radius: 20px 20px 0 0;
  padding: 20px;
  background-color: #00d87e;
}

.add_todo {
  display: flex;
  justify-content: center;
  align-items: center;
  padding: 15px;
}

#todo_input {
  padding: 7px 15px;
  border-radius: 10px;
  outline: none;
  border: none;
  background: none;
  margin-right: 10px;
  font-size: 1rem;
  display: block;
  border: 2px solid black;
  transition: border 0.3s linear, color 0.3s linear 0.3s;
}

#todo_input:focus {
  border: 2px solid #003800;
  color: #003800;
}

#submit_button {
  border-radius: 100%;
  background-color: #ffdea1;
  color: black;
  font-weight: bold;
}
Next step was to implement the style for the todo list and the list items, so that each item shows the todo, the checkmark button and the cross button in a flex properly:
.todo_list {
  list-style: none;
  padding: 20px;
}

.todo_card {
  padding: 20px;
  border-radius: 20px;
  margin-bottom: 10px;
  border: 2px solid black;
  background-color: #fff;
  display: flex;
  justify-content: space-between;
  align-items: center;
}

.buttons_container {
  display: flex;
}

.action_button {
  padding: 10px 15px;
  border-radius: 20px;
  margin: 0px 10px;
  display: flex;
  align-items: center;
  cursor: pointer;
  background-color: #ff2a2a;
  color: #fff;
  font-size: 1.2rem;
  outline: none;
  border: none;
  transition: background-color 0.3s ease-in-out, color 0.3s ease-in-out;
}
Next I defined the style for the buttons on hover:
.action_button:hover {
  background-color: #be0404;
}

.action_button .button_text {
  font-size: 0.8rem;
  display: block;
}

.green_button {
  background-color: #05dd6a;
  color: black;
}

.green_button:hover {
  background-color: #077a2d;
  color: white;
}
Meanwhile I defined some style for displaying the todos marked as done differently:
.done h3 {
  color: red;
  display: block;
  position: relative;
}

.done h3::after {
  content: "";
  position: absolute;
  top: calc(50% - 1.5px);
  left: 0;
  right: 0;
  height: 3px;
  background-color: black;
}
Remember this class name done, it will come in use later.
Finally, I have defined some CSS to make the website responsive:
@media only screen and (max-width: 400px) {
  .add_todo,
  .todo_card {
    flex-direction: column;
  }

  .container h1 {
    margin-bottom: 5px;
  }
  .buttons_container {
    margin-top: 10px;
  }

  #todo_input {
    margin-bottom: 20px;
  }
}
JavaScript
Now let's get to the meat part of this tutorial, JavaScript. So, the first thing to note, while you are working with javascript modules you can not use the onclick methods to call some javascript functions. So I will be using addEventListener to listen to the click method.
The first thing will be to link our main JavaScript file to the HTML, and here is the first thing to note - we need to import as module. So the linking the main JavaScript file will be done this way:
<script type="module" src="./js/main.js"></script>
In this specific project, I will be using two classes. One class will be for declaring a todo and all its functionalities. So, let's just define the todo class. So I will be creating a new file in the js folder named todo.js
So, what properties do we need for a todo? We will need an id and a name and its status(to determine whether it is done or not). so that will be defined in a class like this:
export class Todo {
  id = "";
  name = "";
  status = false;
}
Now just having a class is not enough, we need to have a constructor function to create an object which we will be using to interact with one todo. So, the constructor function for this class will be to get the id of the todo and the name of the todo and initiate it. So the constructor for this will be:
export class Todo {
  id = "";
  name = "";
  status = false;
  constructor(id, name) {
    this.id = id;
    this.name = name;
    //false means not done and true means done
    this.status = false;
  }
}
Now, we will also need another function to deal with changing the status of our todo. Technically, as the status is a public variable so we can edit it directly, but I want to show how to work with member functions of a class. So, let's just define our function. So with all this code our todo class will be:
export class Todo {
  id = "";
  name = "";
  status = false;
  constructor(id, name) {
    this.id = id;
    this.name = name;
    //false means not done and true means done
    this.status = false;
  }

  toggleStatus() {
    this.status = !this.status;
  }
}
Now the next thing will be to define the todoManager. For that we will be using a new file named todoManager.js The todoManager will be class which will be keeping a list of the todos, adding them, updating them and deleting them. So the properties we need will be: a list of todo, a constructor function, a function to create and add todos to the list(this function will take the todo name and generate an id and will create the todo object), a function to find and update the status of a todo, a function to delete the todo. So, as per the explanation, we will need to import the todo class definition to create todo objects. So, with all of the things explained above the code in our todoManager.js will look like:
import { Todo } from "./todo.js";

export class TodoManager {
  todoList = [];

  constructor() {
    this.todoList = [];
  }

  addTodo(todoName) {
    this.todoList.push(new Todo(this.todoList.length, todoName));
  }

  removeTodo(id) {
    this.todoList = this.todoList.filter((todo) => todo.id !== id);
  }

  updateTodo(id) {
    this.todoList = this.todoList.map((todo) => {
      if (todo.id === id) todo.toggleStatus();
      return todo;
    });
  }
}
Now we can code in the main JavaScript file - main.js. So, in this file we need to first import our todoManger and initiate it:
import { TodoManager } from "./todoManager.js";

let todoHandler = new TodoManager();
Now the first thing will be to get the form and the input and on submission of the form, we need to get the input, create a new todo in our todoManager and clear our input. This will look like:
//after importing and initializing todoManager

//getting the input element
const todoInput = document.getElementById("todo_input");

//getting the add todo form and listne for the submit
document.getElementById("add_todo").addEventListener("submit", (e) => {
  e.preventDefault();
  if (todoInput.value === "") return;

  todoHandler.addTodo(todoInput.value);
  todoInput.value = "";
});
Now, this code can officially add a todo to the managing list, but we need to show the todos. For that, we need to get the ul inside which we are going to place the li elements. In the HTML we already made some dummy code. We are going to use a similar code here. For that we need to get the reference of ul then and update its innerHTML:
//initialization of todoManager
const todoList = document.querySelector(".todo_list");
todoList.innerHTML = "";
const updateTodoView = () => {
todoList.innerHTML = "";
todoHandler.todoList.forEach((e) => {
todoList.innerHTML += `<li
class="todo_card ${e.status ? "done" : ""}"
id="${e.id}"
}>
<h3 class="todo_title">${e.name}</h3>
<div class="buttons_container">
<button class="action_button green_button" id="button_done_${e.id}">
✓
</button>
<button class="action_button" id="button_delete_${e.id}">
✗
</button>
</div>
</li>`;
});
};
//the form submission handling
In this case, we are simply giving each todo a class of done based on its status and id based on its ID. Then again we are adding ids to our check button and cross button so that we can reference them later to add event-listeners to them and handling their mark as done and delete events.
Now this app will be able to show the todos we add, once we call this updateTodoView function in our from submission handler:
document.getElementById("add_todo").addEventListener("submit", (e) => {
  //other code
  updateTodoView();
});
Next, our final task will be to make the ✓ and ✗ buttons work. For that, the best case will be to add those event listeners after we have rendered the todos in the list. And for that, we will be using the ids we provided to the specific button.
const updateTodoView = () => {
  // all of the rendering code

  todoHandler.todoList.forEach((e) => {
    document
      .getElementById(`button_done_${e.id}`)
      .addEventListener("click", () => {
        todoHandler.updateTodo(e.id);
        document.getElementById(e.id).classList.toggle("done");
      });

    document
      .getElementById(`button_delete_${e.id}`)
      .addEventListener("click", () => {
        todoHandler.removeTodo(e.id);
        updateTodoView();
      });
  });
};
We are simply using the ids we gave to each todo and its button and for the ✓ button we are toggling the status of the todo and instead of re-rendering the whole list, we are adding the class of done to the individual todo. And for the ✗ button we are getting the todo and removing it and then re-rendering the whole todo list.
And now, the app works completely fine. It can add remove and update the todo.
Conclusion
So this was just a basic app to bring up the module based javascript approach. There can be a lot more we can do with this approach. The final project code is available at GitHub. You can also see the hosted app here

Top comments (0)