
This tutorial is the second part of our React Native Car Parking App UI clone series. In the previous part, we successfully implemented the MapView section as well as separated different UI sections for the map screen. This tutorial is the continuation of the same tutorial from where we left off in the last part. So, it is recommended to go through the previous part in order to establish the basis and get insight into the overall project.
As mentioned in the previous part, the motivation to implement this UI clone series came from the Store Locator App template that provides us with a dynamic, fully-coded starter kit written in React Native that anyone can use to build their own store locator React Native application or initiate their own startup. And, this second part is also the continuation of coding implementations and designs from the Youtube video tutorial by React UI Kit for the Camping Spots Finder App clone. The video tutorial provides overall guidance using fast coding which may be difficult to grasp for any developer especially the beginners. This written tutorial provides the step by step implementation which will be easier to understand and implement.
Overview
In this second part of this tutorial series, we are going to make some configurations to the parking section that we separated in the previous part of this tutorial. The idea is to define some mock car parking spot data and integrate that data into the parking section as a card view. Then, we are going to implement scrolling animations to swipe each parking spot card to the left. Here, we are going to make the scrolling or swiping transition as smooth as possible.
So, let us begin!!
Defining Mock Data
Here, we are going to define the mock data array which will contain the parking spot information as key-value pair in the object. Hence, we are going to initialize an array of objects in the Map.js file. So, we are going to initialize an array constant called parkingSpots with some parking spot data as shown in the code snippet below:
const parkingsSpots = [
    {
      id: 1,
      title: 'Parking 1',
      price: 5,
      rating: 4.2,
      spots: 20,
      free: 10
    },
    {
      id: 2,
      title: 'Parking 2',
      price: 7,
      rating: 3.8,
      spots: 25,
      free: 20
    },
    {
      id: 3,
      title: 'Parking 3',
      price: 10,
      rating: 4.9,
      spots: 50,
      free: 25
    },
  ];
Each data has an id, title, price, rating, the total number of parking spots as spots and total free parking spots as free.
Now, we are going to integrate this data into our parking section by using it in our renderParkings() and renderParking() functions that we have defined in the earlier part of the tutorial. Here in the renderParkings() method, we are going to use map() array function in order to iterate through each item in the parkingSpots array. Then, the map() function will call the renderParking() function by sending a parameter which is an item of the parkingSpots array as shown in the code snippet below:
renderParkings(){
      return(
          <ScrollView horizontal contentContainerStyle={styles.parkings}>
              {parkingsSpots.map((parking) => this.renderParking(parking))}
          </ScrollView>
      )
  }
Now, the renderParking() method is going to receive an item of parkingSpots array as a parameter. Then, we are going to use the parameter item in order to return the template with parking spot data as shown in the code snippet below:
renderParking(item){
      return(
          <View key={`parking-${item.id}`} style={styles.parking}>
              <Text>{item.title}</Text>
          </View>
      )
  }
Here, we have used the item id as a key in order to identify each View component of a particular parking spot uniquely. Then, for now, we have just used the title information from the parking data.
Hence, we will get the following result in our emulator screen:
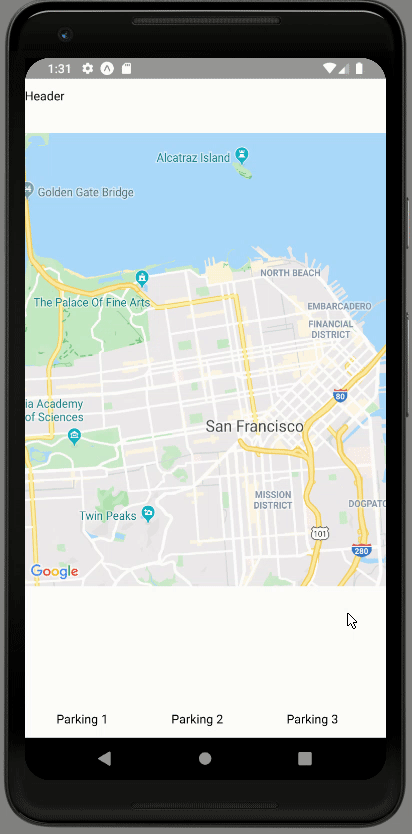
As we can see, we have got three parking spots data in the parking section.
The post React Native Car Parking Finder App UI Clone # 2: Scrolling/Swiping Transition appeared first on Kriss.
Disclosure
This post includes affiliate links; I may receive compensation if you purchase
products or services from different links provided in this article.


Top comments (1)
Creating a Car Parking Finder App UI clone in React Native with a focus on scrolling and swiping transitions involves implementing smooth, intuitive navigation for users to easily search and view parking options. This includes designing responsive UI components that handle dynamic content efficiently and provide a seamless user experience. For additional inspiration or solutions related to parking systems, you can explore caarparking.com.tr/ to see how real-world applications manage similar features.
Some comments may only be visible to logged-in visitors. Sign in to view all comments.