
This tutorial is the second part of our implementation of the React Native eCommerce app. In the previous part, we successfully implemented the splash screen on the iOS platform. This part is the continuation of the same tutorial series where we are going to implement a Splash Screen for the Android platform. So, for the implementation of Splash Screen in the iOS platform it is highly recommended to go through the first part of this tutorial series.
_ Note that this tutorial part may not have any connection with the first part of the tutorial. The main essence of this part is to implement only the Splash Screen for the Android platform. _
As mentioned in the first part, this tutorial series was inspired by the React Native Eccomerce template which helps us build dynamic and powerful ready to deploy eCommerce applications that anyone can use to build their own eCommerce startups or sell the application templates. This part follows the coding implementations and designs from the Youtube video tutorial by Handlebar Labs for the Splash Screen in Android. The video tutorial uses the old version of React Native and the required plugins. We are going to use the same design and coding implementation for the splash screen but in the latest version of React Native and required plugins.
Overview
In this part, we are going to implement the Splash Screen for the Android platform using the latest version of React Native and plugins. Most of the phases in this tutorial are going to take place in Android Studio as we need to configure the Native part (android) of the app for displaying the Splash Screen. The idea is to start off with the boilerplate React Native app. Then, we are going to add the required splash screen icons and configure the native android app directory in the Android Studio. Lastly, we are going to make use of the react-native-splash-screen package in the React Native part as well as the Native Android part to display the splash screen more appropriately.
So, let us begin!!
Setting up a boilerplate App
In this step, we are going to set a React Native boilerplate project first. For that, we are going to use the React Native CLI. Now, to set up a boilerplate project, we need to run following command in our desired directory command prompt:
react-native init splash
This is will set up the started React Native project for you.
Now, if we go to App.js, we are going to see some starter welcome template provided by the latest version of React Native. Instead of using the template in App.js, we are going to simplify it by replacing the existing code by the code in the following code snippet:
import React, { Component } from 'react';
import {
  StyleSheet,
  Text,
  View,
} from 'react-native';
export default class App extends Component{
  render() {
    return (
      <View style={styles.container}>
        <Text style={styles.welcome}>
          Welcome to React Native!
        </Text>
        <Text style={styles.welcome}>
          To get started, edit App.js
        </Text>
      </View>
    );
  }
As we can see, there are some styles bound to the View and Text components. These styles are provided in the code snippet below:
const styles = StyleSheet.create({
  container: {
    flex: 1,
    justifyContent: 'center',
    alignItems: 'center',
    backgroundColor: '#c9c9c9',
  },
  welcome: {
    fontSize: 20,
    textAlign: 'center',
    margin: 10,
    color: '#F5FCFF',
  }
});
Hence, by using the code above we are going to get a simple welcome screen when we run our app in the android emulator.
Note that the screen template is simplified in this tutorial to provide better simulation and transition of Splash Screen to the app screen. Any type of screen template can be used according to the developer’s choice.
Therefore, if we run the app in the android emulator, we will get the following result:

Now, we will move on to adding splash screen icons to our React Native application.
Downloading and Adding Splash Screen Icons
In this step, we are going to download the required icons that we are going to integrate into our splash screen.
For that, we need to go to this link and download the icons.
![]()
We can see that icons are of different sizes in order to match the screen size of the app. Now, we need to copy these icon files in the required project directory. Therefore. we need to navigate to ‘/splash/android/app/src/main/res’ directory of our project folder. Then, we need to copy the icon files to respective directories in the ‘./res’ as shown in the code snippet below:

Here, we need to add the icons according to their sizes to different folders:
- For small, we can use icon.png
- For medium icon, we can use icon@2x.png
- And for other larger size, we can use icon@3x.png
Lastly, we need to rename all the icon files as ‘ icon.png ‘ in all the directories.
Now, we move on to the Native Phase where we are going to work on ‘./android/’ of our project folder.
Native Phase (Configurations in the ./android directory)
In this step, we are going to make configurations in our native ‘./android/’ directory. For that, we need to open our ‘./android’ as a project in Android Studio.
Hence, we will see the following result in the Android Studio:

In the screenshot above, we can see the icons that we copied in the ‘./res/icon/ folder.
Drawing an Icon with background
Now, we need to create a new directory called ‘drawable’ in the ‘./res/’ directory. Then, inside the ‘./res/drawable’ directory, we need to create a new Drawable Resource File named ‘background_splash.xml’. This ‘background_splash’ screen will allow us to draw a splash screen for our app. After we create the file, we will get the following result:
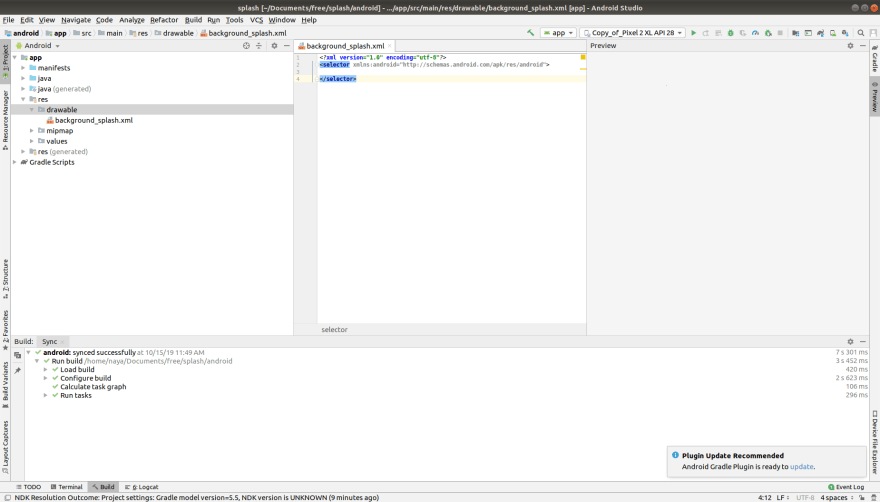
Here, we can see that we have not got any preview in the Preview section on the right side of the screenshot. We need to show the preview of the icon section in the Preview section. For that, we need to make use of the code in the following code snippet in the ‘background_splash.xml’ file:
<?xml version="1.0" encoding="utf-8"?>
<layer-list xmlns:android="http://schemas.android.com/apk/res/android">
    <item
        android:drawable="@color/primary_dark"/>
    <item
        android:width="200dp"
        android:height="200dp"
        android:drawable="@mipmap/icon"
        android:gravity="center" />
</layer-list>
Here, we are drawing a native android item component with width, height, icon, and alignment center for our splash screen. We can see that we have also include the color for our background but have not implemented it yet which will show an error in our Android Studio.
Now, to solve this, we need to create a new Drawable Resource File named ‘colors.xml’ inside the ‘./res/values’ directory. Then, we need to add the following code to the ‘colors.xml’ file in order to define colors for our splash screen background:
<?xml version="1.0" encoding="utf-8"?>
<resources>
    <color name="green">#c9c9c9</color>
    <color name="primary_dark">#c9c9c9</color>
</resources>
Here, we have added a light green color code to the color component with name as green as well as the same color named primary dark. This will be used in the background_splash.xml file as well as other files in order to impart color properties into our splash screen.
Hence, we will get the following result in the Preview section of ‘background_splash.xml’ file of the Android Studio:

As we can see, we have got the background color as well as the icon in the Preview section.
Configuring styles and AndroidMenifest.xml file
Here, we are going to configure some styles for our native phase. For that, we need to need to copy the code from following code snippet into the ‘./values/styles.xml’ file:
<resources>
    <!-- Base application theme. -->
    <style name="AppTheme" parent="Theme.AppCompat.Light.NoActionBar">
        <!-- Customize your theme here. -->
        <item name="android:statusBarColor">@color/green</item>
    </style>
    <style name="SplashTheme" parent="Theme.AppCompat.Light.NoActionBar">
        <item name="android:windowBackground">@drawable/background_splash</item>
        <item name="android:statusBarColor">@color/green</item>
    </style>
</resources>
Here, we are creating a basic style named AppTheme into our Native app. Then, we added an additional style named SplashTheme with background_splash and color property.
Now, we need to make some configuration in our AndroidManifest.xml file.
Configuring AndroidManifest.xml file
Here, we need to open the AndroidManifest.xml file from the ‘./android/app/src/main’ directory. This file contains the MainActivity for our Native phase of the app. Now, we need to add an additional activity named SplashActivity with SplashTheme theme and intent-filter before the MainActivity as shown in the code snippet below:
<application
  android:name=".MainApplication"
  android:label="@string/app_name"
  android:icon="@mipmap/ic_launcher"
  android:roundIcon="@mipmap/ic_launcher_round"
  android:allowBackup="false"
  android:theme="@style/AppTheme">
    <activity
        android:name=".SplashActivity"
        android:theme="@style/SplashTheme"
        android:label="@string/app_name">
        <intent-filter>
            <action android:name="android.intent.action.MAIN" />
            <category android:name="android.intent.category.LAUNCHER" />
        </intent-filter>
    </activity>
    <activity
        android:name=".MainActivity"
        android:configChanges="keyboard|keyboardHidden|orientation|screenSize"
        android:windowSoftInputMode="adjustResize"
        android:label="@string/app_name"
        android:exported="true"
        />
  <activity android:name="com.facebook.react.devsupport.DevSettingsActivity" />
</application>
Here, we have added the SplashActivity but we have not implemented it yet. So now, we need to implement the SplashActivity.
Creating SplashActivity class
in order to create SplashActivity class, we need to create a new class file in the ‘./app/java/com.splash’ folder named ‘SplashActivity.java’ as shown in the screenshot below:

Now, we need to add the following code to the SplashActivity.java file in order to show the Splash screen activity in the app when it runs:
package com.splash;
import android.content.Intent;
import android.os.Bundle;
import androidx.appcompat.app.AppCompatActivity;
public class SplashActivity extends AppCompatActivity {
    @Override
    protected void onCreate(Bundle savedInstanceState) {
        super.onCreate(savedInstanceState);
        Intent intent = new Intent(this, MainActivity.class);
        startActivity(intent);
        finish();
    }
}
Here, we have created an activity named SplashActivity which will run before the MainActivity when the native part of our react native app runs in the emulator.
Now, to test if the splash screen runs in the emulator, we need to re-run the android emulator. Then, we will get the following result in our emulator screen:

As we can see, the splash screen with the basket icon is displayed before the app screen shows up. Hence, we have successfully displayed the splash screen in our app.
But, a white screen appears between the transition from the splash screen to the app screen. We can see that in the emulator simulation above. This issue takes place because there is gap between an android app running with the splash screen and the running of the React native app.
We have to handle this issue. For that, we need to resolve the gap between the running of native part and react native part. One way is to display the splash screen until the react-native part runs in the app. So, we are going to implement this now.
Resolving the White Screen Gap
In this step, we are going to close down the appearance of a white screen between the splash screen and app screen. We are going to do that by displaying the splash screen until the react-native part runs in the app.
For this, we need to include a package known as react-native-splash-screen. The react-native-splash-screen package provides us with a splash screen API for react-native which can programmatically hide and show the splash screen. This package works both on iOS as well as Android. All the configuration for the React Native part as well as the native part is provided in the documentation. Now, in order to install this package into our react native project, we need to run the following command:
>>> npm install react-native-splash-screen –save        //using npm

>>> yarn add react-native-splash-screen                 //using yarn

>>> react-native link react-native-splash-screen        //To link the package to the react-native project
Running Splash Screen in MainActivity
Now, we need to go back to the Android Studio project and open ‘MainActivity.java’ file from the ‘./app/java/com.splash’ folder. And then, we need to copy the code from the following code snippet into it:
package com.splash;
import com.facebook.react.ReactActivity;
import android.os.Bundle;
import org.devio.rn.splashscreen.SplashScreen;
public class MainActivity extends ReactActivity {
  @Override
  protected void onCreate(Bundle savedInstanceState) {
    SplashScreen.show(this);
    super.onCreate(savedInstanceState);
  }
  /**
   * Returns the name of the main component registered from JavaScript. This is used to schedule
   * rendering of the component.
   */
  @Override
  protected String getMainComponentName() {
    return "splash";
  }
Here, we have imported the SplashScreen package that we installed before. Then, we have used the show() method of SplashScreen module in our MainActivity in order to show the splash screen until the react-native part of the app runs in the emulator.
Now when we run the app, the SplashActivity that we created before will run first and display the splash screen. Then, the MainActivity that runs after the SplashActivity will also display the Splash screen.
Hiding Splash Screen in the React Native part
Next, what we need to do is to hide the splash screen when our react-native part of the app runs on the emulator.
For that, we need to go back to the App.js file of our React Native project. Then, we need to import the react-native-splash-screen package into it as shown in the code snippet below:
import SplashScreen from 'react-native-splash-screen'
Then, we need to use the hide() method provided by SplashScreen module in order to hide the splash screen when the react-native part of the app runs in the emulator. For that, we need to use the code from the code snippet below:
export default class App extends Component{
  componentDidMount() {
    SplashScreen.hide();
  }
Now, when the react-native app screen mounts to the app screen the hide() method will automatically hide the splash screen.
Configuring layout of splash screen for MainActivity
We still need to create a layout of the splash screen that will run during the MainActivity. For that, we need to go back to the Android Studio project. Then in ‘./res’ directory, we need to create a ‘layout’ folder. Inside the ‘./res/layout’ folder, we need to create a new Layout Resource File called ‘launch_screen.xml’. This ‘launch_screen.xml’ file will include the splash screen template which will run during the white screen gap.

As we can see in the screenshot above, the Preview section is empty. Now, we need to add the code to draw the splash screen template. The code is provided in the code snippet below:
<?xml version="1.0" encoding="utf-8"?>
<LinearLayout xmlns:android="http://schemas.android.com/apk/res/android"
 android:orientation="vertical"
 android:layout_width="match_parent"
 android:layout_height="match_parent"
 android:background="@color/green"
 android:gravity="center">
   <ImageView
    android:layout_width="200dp"
    android:layout_height="200dp"
    android:layout_marginTop="24dp"
    android:src="@mipmap/icon"
    />
</LinearLayout>
Here, we have created a native linear layout with the image containing width, height, and icon source.
Hence, we will get the following result:
 As we can see in the screenshot above, the layout in the Preview section will appear as a splash screen in the white screen gap to solve the white screen gap issue.
Now, if we run the app in our emulator, we will get the following result:

As we can see, the white screen gap doesn’t appear between the splash screen and the app screen. This means that the splash screen is also running the MainActivity and is hidden in the when App.js file of React Native loads.
Finally, we have successfully completed the implementation of the splash screen in the Android Platform.
Conclusion
This tutorial is the second part of the React Native Ecommerce app development tutorial series. In this part, we continued from where we left off in the first part of this tutorial series but it may not concern the development of the previous part. Here, we learned how to add the icons to the required folder in order to implement the splash screen. Then, we got the step by step guide on how to configure the native part in order to display the splash screen. Lastly, we also learned how to resolve the white screen gap issue by using the react-native-splash-screen in both the native as well as react-native parts of our app.
The post Build React Native E-commerce App #2 | Splash Screen in Android appeared first on Kriss.
Disclosure
This post includes affiliate links; I may receive compensation if you purchase
products or services from different links provided in this article.


Top comments (0)