Introduction
In network-related product development and debugging, useful gadgets can often achieve more. Based on the Network development scenario, RT-Thread developed the RT-Thread NetUtils component that collecting lots of easy-to-use network development tools for developers.
The RT-Thread NetUtils component is created based on the commonly used network tools, which are dynamically configured via RT-Thread Env, it is out-of-box and can effectively reducing resource consumption.
NetUtils Component Introduction
RT-Thread NetUtils serves as a network tool gadget, it is useful in ping commands for testing debugging; NTP tools for time sync; Iperf, NetIO for performance and bandwidth testing; and lightweight file transfer tool TFTP that widely used in embedded systems, to easily transfer files between two devices over the network. In addition, RT-Thread provides advanced aids to solve the practical problem, such as Telnet tools that can log on remotely to RT-Thread Finsh/MSH Shell, and tcpdump packet capture tool that based lwIP.
Here's the categories of RT-Thread NetUtils:
| Name | Categories | Description |
|---|---|---|
| Ping | Debugging Test | The "ping" command can be used to check that the network is connected and help us analyze network failures. |
| NTP | Time Sync | Network time protocol. |
| TFTP | File Transfer | TFTP is a simple protocol for transferring files, it is lighter than FTP. |
| Iperf | Performance Test | Test maximum bandwidth performance of TCP and UDP, can report bandwidth, latency jitter, and packet loss. |
| NetIO | Performance Test | Test the throughput of the network. |
| Telnet | Remotely Access | Remotely log to RT-Thread Finsh/MSH Shell |
| tcpdump | Network Debugging | tcpdump is a packet capture tool that based on lwIP |
Each gadget can be enabled/disabled independently using menuconfig and provides Finsh/MSH commands. Start by opening the RT-Thread Env tool, entering the BSP directory, entering menuconfig on the Env command line for entering the configuration interface to configure project, and selecting the right NetUtils functionality for your needs, as shown below:
Notes:
Pings and TFTPs rely on lwIP and need to turn on lwIP dependencies before they can be displayed.
RT-Thread online packages
  -> IoT - internet of things
    -> netutils: Networking utilities for RT-Thread

Ping
Ping is a network diagnostic tool that tests whether packets can reach a particular host through an IP protocol. Estimating packet loss rates (drop rates) and packet round-trip times with hosts (network latency, Round-trip delay time)
The Ping tool relies on lwIP and needs to enable the lwIP dependency in the Env tool before it can be seen, as shown as follows:
-> RT-Thread Components
  -> Network stack
    -> light weight TCP/IP stack
      -> Enable lwIP stack
Enable ping options in the NetUtils menu bar:
RT-Thread online packages
  -> IoT - internet of things
    -> netutils: Networking utilities for RT-Thread
    [*] Enable Ping utility
Ping supports access to 'IP address' or 'domain name' and is tested using the Finsh/MSH command, as follows:
- Ping domain name.
msh />ping rt-thread.org
60 bytes from 116.62.244.242 icmp_seq=0 ttl=49 time=11 ticks
60 bytes from 116.62.244.242 icmp_seq=1 ttl=49 time=10 ticks
60 bytes from 116.62.244.242 icmp_seq=2 ttl=49 time=12 ticks
60 bytes from 116.62.244.242 icmp_seq=3 ttl=49 time=10 ticks
msh />
- Ping IP
msh />ping 192.168.10.12
60 bytes from 192.168.10.12 icmp_seq=0 ttl=64 time=5 ticks
60 bytes from 192.168.10.12 icmp_seq=1 ttl=64 time=1 ticks
60 bytes from 192.168.10.12 icmp_seq=2 ttl=64 time=2 ticks
60 bytes from 192.168.10.12 icmp_seq=3 ttl=64 time=3 ticks
msh />
NTP
NTP is the Network Time Protocol that used to synchronize the time of individual computers on the network. NTP clients are implemented on RT-Thread, and when connected to the network, the current UTC time can be obtained and updated to the RTC.
Enable the NTP option in the NetUtils menu bar:
RT-Thread online packages
  -> IoT - internet of things
    -> netutils: Networking utilities for RT-Thread
    [*] Enable NTP(Network Time Protocol) client
Access UTC.
UTC also known as world-uniform time, world standard time, and international coordination time. Beijing time is 8 hours earlier than UTC.
The UTC function prototype is time_t time_t ntp_get_time(void), if the return value is greater than 0, time successfully accessed, if the return value is equal to 0, time failed accessed.
Example code:
#include <ntp.h>

void main(void)
{
    time_t cur_time;

    cur_time = ntp_get_time();

    if (cur_time)
    {
        rt_kprintf("NTP Server Time: %s", ctime((const time_t*) &cur_time));
    }
}
Access Local Time
Local time has time zone concept.
The local time function prototype is time_t ntp_get_local_time(void), and if the return value is greater than 0, time successfully accessed, if the return value is equal to 0, time failed accessed. The API is used in a similar way of ntp_get_time().
Sync Local Time to RTC
If enable RTC device, you can also use the following commands and APIs to sync NTP local time to the RTC device.
The Finsh/MSH command works as follows:
msh />ntp_sync
Get local time from NTP server: Sat Feb 10 15:22:33 2018
The system time is updated. Timezone is 8.
msh />
The prototype function for sync local time to RTC function is: time_t ntp_sync_to_rtc(void), if the return value is greater than 0, time successfully accessed, if the return value is equal to 0, time failed accessed.
Notes
- The NTP APIs consume a lot of stack space during invocation, so it's important to make sure there is enough free space (not less than 1.5KB) in stack.
The NTP APIs are not reentrant, whose invocation must be serialized with locks.
TFTP
TFTP (Trivial File Transfer Protocol) is used in the TCP/IP protocol suite for trivial file transfer between clients and servers, providing a simple and low-cost file transfer service, the port number is 69, much lighter than traditional FTP protocols, and which is more suitable for small embedded products.
RT-Thread currently supports TFTP servers.
The TFTP tool relies on lwIP and needs to enable the lwIP dependency in the RT-Thread Env tool before it can be seen, as shown as follows:
-> RT-Thread Components
  -> Network stack
    -> light weight TCP/IP stack
      -> Enable lwIP stack
Enable the TFTP option in the NetUtils menu bar:
RT-Thread online packages
  -> IoT - internet of things
    -> netutils: Networking utilities for RT-Thread
    [*] Enable TFTP(Trivial File Transfer Protocol) server
- Install the TFTP client.
The installation file is located in netutils/tools/Tftpd64-4.60-setup.exe, please install the software before using TFTP.
- Start the TFTP server.
Before transferring files, you need to start the TFTP server using the Finsh/MSH command on RT-Thread, as follows:
msh />tftp_server
TFTP server start successfully.
msh />
Transfer File
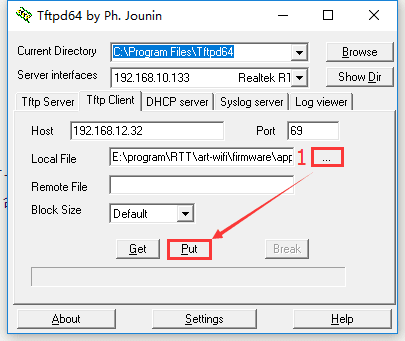
Open the installed Tftpd64 and configure it as shown as follows:
Choose
Tftp Client;Pull down
Server interfacesto select the same network segment of the network interface card as RT-Thread;Fill in the IP address of the TFTP server. The IP address can be viewed by entering the
ifconfigcommand;Fill in the port number of TFTP server with
69.

Send File to RT-Thread
Select the file to be sent in
Tftpd64;Remote Fileis the path to save files on the server side (including file names), the options support relative and absolute paths. Since RT-Thread enable theDFS_USING_WORKDIRoption by default at this point the relative path is based on the Finsh/MSH entered directory. Therefore, when using relative paths, it is important to switch directories in advance;click on the
Putbutton.
As shown in the following image, the file is sent to the Finsh/MSH entered directory, where the relative path is used:
Notes
If DFS_USING_WORKDIR is not enabled and Remote File is empty, the file will be saved under the root path.
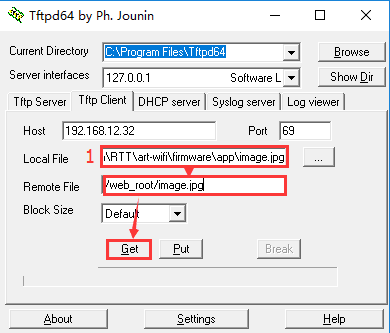
Receive File From RT-Thread
Fill in the file path in
Tftpd64to receive the saved file(including file name);Remote Fileis the file path to be received back on the server side (including file names), the options support relative and absolute paths. Since RT-Thread enable theDFS_USING_WORKDIRoption by default at this point the relative path is based on the Finsh/MSH entered directory. Therefore, when using relative paths, it is important to switch directories in advance;Click on the
Getbutton.
Save /web_root/image.jpg to the local, here we are using absolute path, as shown below:
msh /web_root>ls           ## Check out if file exsits
Directory /web_root:
image.jpg           10559
msh /web_root>
Iperf
Iperf is a network performance testing tool. Iperf can test the maximum bandwidth performance of TCP and UDP with a variety of parameters and UDP characteristics that can be adjusted as needed, and it can report bandwidth, delay jitter, and packet loss.
Enable the Iperf option in the NetUtils menu bar:
RT-Thread online packages
  -> IoT - internet of things
    -> netutils: Networking utilities for RT-Thread
    [*] Enable iperf-liked network performance tool
Iperf uses a client–server model, with servers at one end and clients at the other, and the Iperf package RT-Thread provided that implements TCP server mode and client mode, we will give an introduction about these 2 modes.
Iperf Server Mode
Obtain IP address.
You'll need to use the Finsh/MSH command on RT-Thread to obtain an IP address, as shown as follows:
msh />ifconfig
network interface: e0 (Default)
MTU: 1500
MAC: 00 04 9f 05 44 e5
FLAGS: UP LINK_UP ETHARP
ip address: 192.168.12.71
gw address: 192.168.10.1
net mask  : 255.255.0.0
dns server #0: 192.168.10.1
dns server #1: 223.5.5.5
Enable Iperf Server
You'll need to use the Finsh/MSH command on RT-Thread to enable the Iperf server, as shown as follows:
msh />iperf -s -p 5001
-s Starting the server
-p Monitoring the 5001 port.
- Install the JPerf test software.
The installation file is located in netutils/tools/jperf.rar which is a portable application. the installation actually is the process of decompression to the new folder.
- jperf test.
Open jperf.bat and configure it according to the following steps:
Choose
Clientmode;Enter the IP address that you obtained;
Modify the port number to 5001;
Click
run Lperf!to start the test;Wait for the test to finish. During testing, the test data is displayed on the shell interface and JPerf software.

Iperf Mode
- Obtain IP address of the PC.
Use the ipconfig command on the PC's command prompt window to obtain the IP address of PC.
- Install the JPerf test software.
The installation file is located in netutils/tools/jperf.rar which is a portable application. the installation actually is the process of decompression to the new folder.
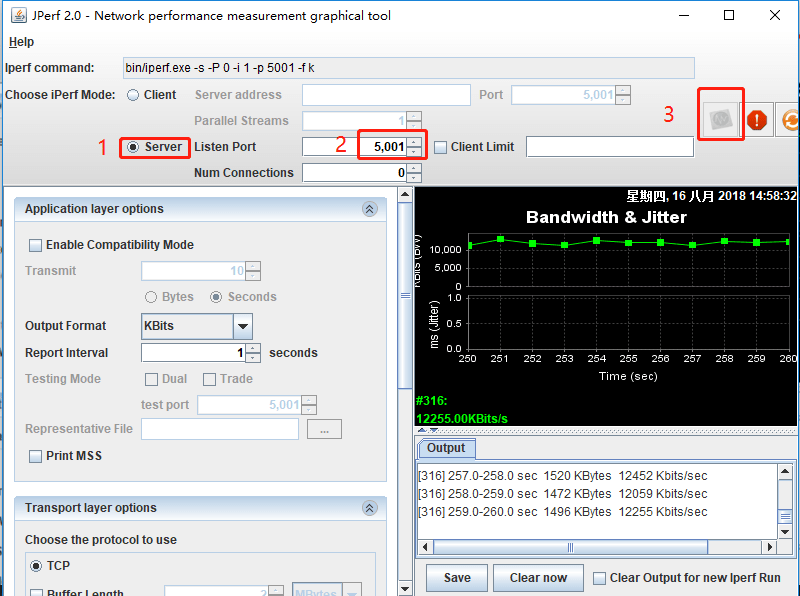
- Enable the jperf server.
Open jperf.bat and configure it according to the following steps:
- Choose
Servermode; - Modify the port number to 5001;
- Click
run Lperf!to start the server;
- Start the Iperf client.
You'll need to use the Finsh/MSH command on RT-Thread to start the Iperf client, as shown as follows:
msh />iperf -c 192.168.12.45 -p 5001
-c Run as a client, connect to the specified server IP.
-p Specify the TCP port of the server.
During testing, the test data is displayed on the shell interface and JPerf software.
Others
NetIO
NetIO is a tool for network performance testing on OS/2 2.x, Windows, Linux, and Unix. It uses packets of different sizes for network net throughput testing via TCP/UDP.
RT-Thread currently supports NetIO TCP servers.
Telnet
Telnet Protocol is an application layer protocol, used in the Internet and local area networks with the form of virtual terminals, to provide two-way, text string-based interaction, it is part of the TCP/IP protocol suite and it is the standard protocol and primary method of Internet remote login service, which is often used for remote control of web servers and allows users to run the remote hosts on local hosts.
RT-Thread currently supports the Telnet server, which, when successfully connected, will be remotely connected to the Finsh/MSH of device to remote control the device.
tcpdump
tcpdump is an RT-Thread-based gadget for capturing IP messages, and the data captured by packet can be saved through a file system or imported into a PC via a rdb tool, and parsed using wireshark software.
RT-Thread Contact Info:

Top comments (0)