
We Web3 Developers are facing, once in a lifetime tragedy. Tragedy, none of us think we will ever face. Saying Good Bye to our favorite and most popular Testnetwork Rinkeby. During this period of Grief. We have to handle, one more humongous task of Migrating our dApps from rinkeby to another testnet. This article will not take away your sorrows of losing Rinkeby but will help you migrate your dApp.
Steps Involve in Migrating
- Update the RPC Node
- Re-Deploy the Smart Contract
- Make adjustments in frontend
1. Update the RPC Node
The first task for migrating your dapp is to get RPC Node of the new Testnetwork, for our example, we will be using Mumbai Testnetwork. You can use any Node Provider to get Mumbai testnetwork RPC Node. I will use Ankr.
Go to their RPC Service section by clicking on this link.
Now Search for Polygon Network in Ankr Endpoint. Click on the "More" Button to view Polygon Mainnet and Polygon Mumbai Testnetwork.

Select Testnet on the network section and Copy the Public RPC Key.
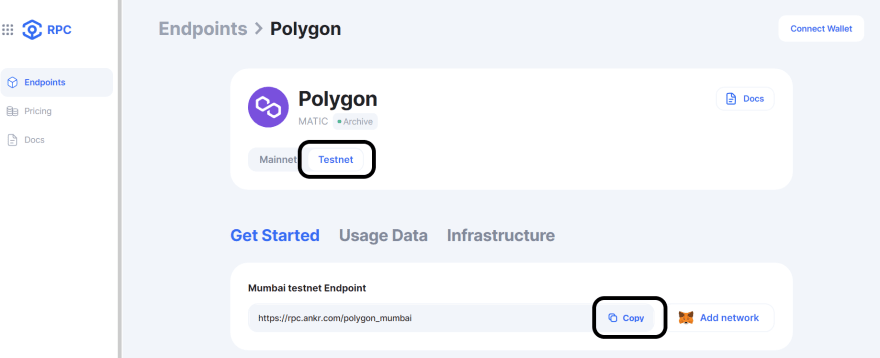
That's it. You get the RPC node. Now that we have RPC Node, we will replace our new Mumbai RPC Node key with old Rinkeby RPC in our dapp. Let's Go.
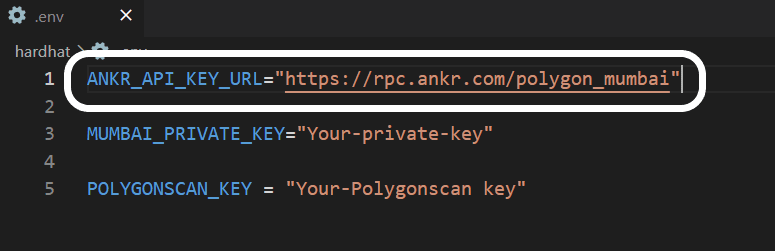
I am assuming you are using "Hardhat" as a Solidity Development Framework. Most probably if you are following any quality tutorial or documentation. You probably store your RPC Key in .env file. You need to replace it with a new Mumbai RPC node.
As we are using Public RPC Node. You can also simply put your RPC key in your hardhat.config.js.

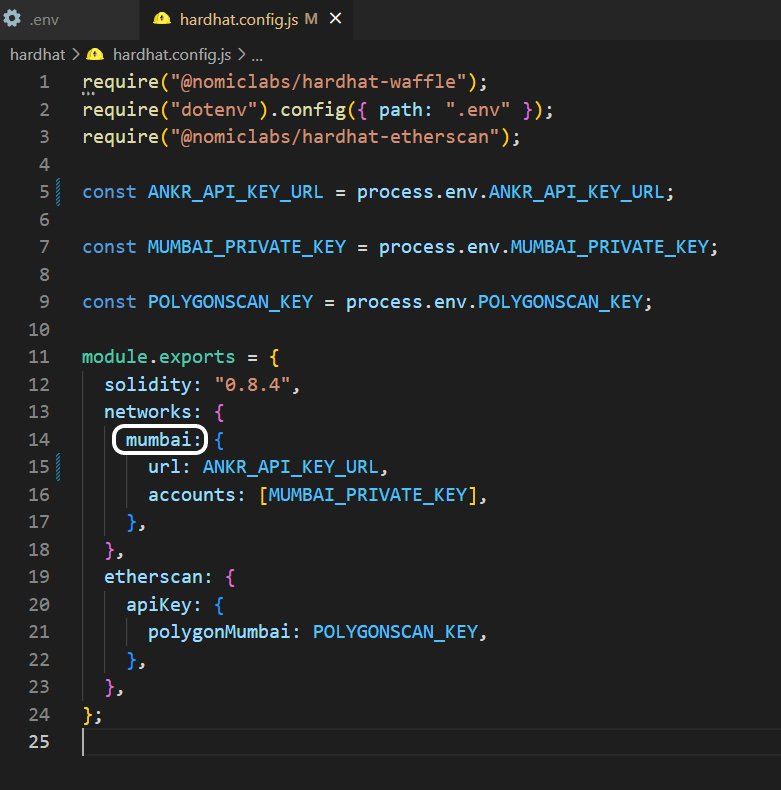
You can also use this preferred method of storing all your keys like Private Key, PolygonScan key, and RPC key in the .env file and importing them in the hardhat.config.js file. Now in your hardhat.config.js file. Replace rinkeby with mumbai inside the networks section.
2. Re-Deploy the Contract
First, make sure you have some test Matic in our wallet, which you are using for deploying the smart contract. You can use this Mumbai Faucet to get some test Matic. Mumbai Faucet
Run this command to deploy your smart contract.
npx hardhat run scripts/deploy.js --network mumbai
or
npx hardhat run <location of your deploy script> --network mumbai
If everything works according to plan, you will get an updated "Contract Address". If you added console.log in your deploy script, which you should. You will get output like this.

3. Make adjustments in frontend
Update your smart contract address in your Frontend folder or index file.
Set chainId to 80001 like chainId == 80001 and replace the word 'Rinkeby' with 'Mumbai'.

Rinkeby will always be remembered in our hearts and in the stories, we will tell to our future generation.
Don't forget to push your code to GitHub so all the world can see your amazing work.
I hope you learned something new and solved the problem. Thanks for reading. Have fun!
You can follow me on Twitter, GitHub and Linkedin. Keep your suggestions and comments coming!

Oldest comments (2)
Love this Aayush....short and concise 👍
this is really helpful!