
In this tutorial, we are building a JAMstack website with Cosmic JS. Let's first define our JAMstack: 'J' stands for JavaScript, our application uses Vue.js. 'A' stands for APIs, and we are using the powerful APIs of Cosmic JS. 'M' stands for Markup, which is Nuxt.js in this example. For this tutorial, we will be building a simple fitness studio website. In the end, we will deploy it on Netlify which gives serverless backend services and hosting. Let's get started.
TL;DR
Introduction
We are building a JAMstack website with the powerful APIs of Cosmic JS. This website is about fitness and the body. The first page is dynamic with some navigations provided by Vue.js. On the left side navigation, you will find the link to the blog, whose data is also coming from the Cosmic JS via the Cosmic JS APIs. Let's start now with the requirements.
Requirements
The one and the only requirement is Node.js. Install it on your system to run npm commands.
Getting Started
Here we are using npm but you can also use yarn to install packages. So if you have installed above software, run the following command to a quick start:
npx create-nuxt-app jamstack_app
Here jamstack_app is your desired name of the app. Now go to the root of the created folder, and run the following command to run it in development:
npm run dev
Now visit: http://localhost:3000/ to view the project in development mode.
Learn more about Nuxt.js quick starter kit here: Nuxt.js Starter Kit
Folder Structure
After creating the app, you will get the same folder structure as given in the picture:
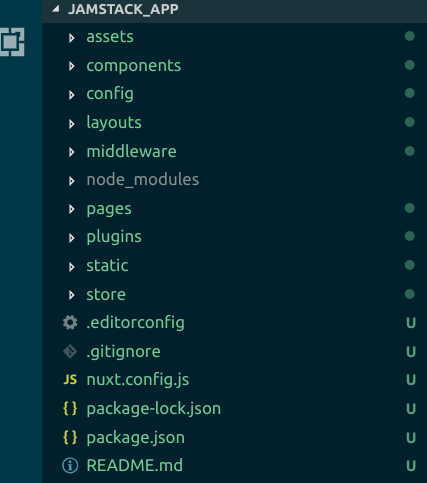
Let's explain the main folders and files of this structure. package.json file contains the record of all modules installed in your project. Static folder contains the static files used in the project like logo and images. Pages folder contains the pages like home page and blog etc. node_modules has all modules installed and layout contains styling of the project. Config folder is created by us to save the config.js file which will be used at the time dynamic requests to the Cosmic JS server.
Configuration
We have generated the Nuxt.js app with the app generator but the main configuration is pending to make our app a complete JAMstack app. With the creation of the app, JavaScript and Markup part of the app completed. Now we are configuring the API part of the app that means the Cosmic JS part.
For this, you need a Cosmic JS account. Sign up for Cosmic JS official website, it is totally free. Then create a free bucket and create your first object type: 'blogs'. Or you can import a built-in bucket, way to import it is given in the below heading.
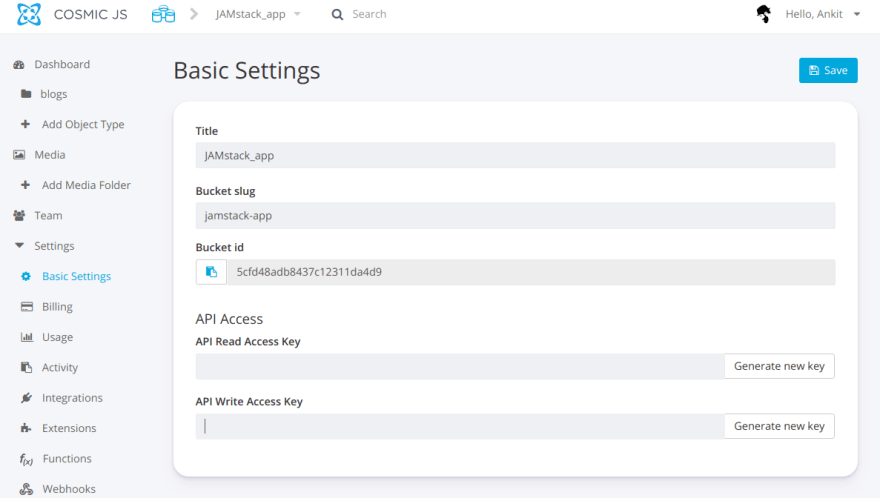
Now click the basic setting option in your dashboard, it will open your basic setting page as shown above. Note down your bucket slug, bucket_id. Now generate the read and write keys and save them on your computer. Now save them in your project also. For this create a config folder and create a config.js file in it and save as given below:
In-built Bucket
If you don't want to create a new bucket, then you have an option to import a readymade bucket. For this, download the bucket.json file from our Git codebase and import it from your dashboard from the Import/Export option, check below image for visual help:

Home Page
Let's get started with the first page that is the home page. In this we will render the dynamic data from Cosmic JS server with APIs, it will show you the Vue.js part of the website. Here we are going to write the detail of our website and will implement navigation in the header of the website as well as in the bottom part will give a button to navigate to blog. Check out the code of homepage at location: pages/index.vue
This page is a template plus vue.js code and pure dynamic in nature. Here we applied a link at the bottom which navigates to the blog page and this blog page is also pure dynamic in nature.
The Layout of the Website
The complete layout of the app is coded in a single file for good structure. Here we are customizing the header, footer and other color schemes of the app. Check out the code for layout layouts/default.vue
Here we defined the body color of the website along with the header, footer, and navigational effects. In the navigation, we have given route to blog page and route to the home page as well. In the header of the app, we have given navigation to home to the title of the website.
Blog Page
This is the second page of our website, it handles the dynamic fetching of the data from Cosmic JS server with the help of Cosmic JS APIs. First of all, check the code and then we will explain it. Code is placed at the location: pages/blog.vue
There are two part of the page, first is template and second if JavaScript part. In the template, we have given the route to the home page with the back button and rendered the title and body of the blog.
In JavaScript part, we have made of a GET request to the Cosmic JS server with the help of Cosmic JS API. This API is the combination of the static URL, bucket slug and object type. In GET request, read key is necessary to get the data from the server. After a successful request, we manipulated the data and passed to variables as shown in the code.

Static Folder
In the codebase, check out the static folder. As the name describes, it contains the static data and in our case, it contains the static images of our project. As you know our front page id totally static, image shown on the front page resides in this folder. In the same way, any static image or logo which will be used in the project must be placed here.
What Have We Built?
We have built a JAMstack website with the powerful APIs of Cosmic JS. In JAMstack:
'J' stands for JavaScript and here Vue.js used as JavaScript part of JAM,
'A 'stands for API, here Cosmic JS used as the API part of JAM,
Meaning of 'M' is Markup, here Nuxt.js is used as the markup.
Here the main part is the API part, we have made a GET request with the help of which and got the quick response. This request made with the help of axios module and then JSON data manipulated easily. Format of the Cosmic JS API response is very simple to handle.
Deployment to Netlify
We have built an app with Vue.js, Nuxt.js, and Cosmic JS, but it is not a pure JAMstack app until we can deploy the static assets to a CDN. For this example, we will deploy it to the serverless backend service provider Netlify.
Install the Netlify CLI and Nuxt CLI:
npm i -g netlify-cli
npm i -g nuxt
Build the static files
npm run build
Then deploy to Netlify. You will be prompted to select the folder. Type dist to deploy the dist folder.
netlify deploy
Conclusion
With the help of Cosmic JS you can create powerful applications. In this example, we were able to build a JAMstack application with the API power of Cosmic JS. If you have any comments or questions about building apps with Cosmic JS, reach out to us on Twitter and join the conversation on Slack.


Top comments (0)