Introduction
In this tutorial, we'll setup FreeIPA server on Oracle Linux 9. FreeIPA is an open-source identity and authentication management system for Linux networked environments. Then we will install FreeIPA client on Ubuntu 22.04 and set up 2FA for SSH. We also create a bind user to be able to integrate LDAP enabled applications with the LDAP server.
Installing FreeIPA server
Preparing the Server
Set the hostname (FQDN):
sudo hostnamectl set-hostname ipa.example.com
Get the IP address the server:
ip -br a
Example output:
lo               UNKNOWN        127.0.0.1/8
ens160           UP             192.168.136.134/24
Edit the hosts file:
sudo vim /etc/hosts
Example:
192.168.136.134 ipa.example.com
Open the required ports:
sudo firewall-cmd --permanent --add-service=freeipa-4
sudo firewall-cmd --reload
Install and Configure the FreeIPA Server
Install the required packages:
sudo dnf install -y ipa-server
Start the installation and configuration by running the following command:
sudo ipa-server-install
Example output:
This program will set up the IPA Server.
Version 4.10.2
This includes:
  * Configure a stand-alone CA (dogtag) for certificate management
  * Configure the NTP client (chronyd)
  * Create and configure an instance of Directory Server
  * Create and configure a Kerberos Key Distribution Center (KDC)
  * Configure Apache (httpd)
  * Configure SID generation
  * Configure the KDC to enable PKINIT
To accept the default shown in brackets, press the Enter key.
...
Select the default response of no when asked to configure the integrated DNS.
Do you want to configure integrated DNS (BIND)? [no]:
Accept the default FQDN.
Enter the fully qualified domain name of the computer
on which you're setting up server software. Using the form
<hostname>.<domainname>
Example: master.example.com


Server host name [ipa.example.com]:
Accept the default domain name.
The domain name has been determined based on the host name.

Please confirm the domain name [example.com]:
Accept the default realm name.
The kerberos protocol requires a Realm name to be defined.
This is typically the domain name converted to uppercase.

Please provide a realm name [EXAMPLE.COM]:
Choose a secure password for the Directory Manager user and confirm it.
Certain directory server operations require an administrative user.
This user is referred to as the Directory Manager and has full access
to the Directory for system management tasks and will be added to the
instance of directory server created for IPA.
The password must be at least 8 characters long.

Directory Manager password:
Password (confirm):
Choose a secure password for the admin user and confirm it.
The IPA server requires an administrative user, named 'admin'.
This user is a regular system account used for IPA server administration.

IPA admin password:
Password (confirm):
Accept the default NETBIOS domain name.
Trust is configured but no NetBIOS domain name found, setting it now.
Enter the NetBIOS name for the IPA domain.
Only up to 15 uppercase ASCII letters, digits and dashes are allowed.
Example: EXAMPLE.


NetBIOS domain name [EXAMPLE]:
Accept the default response of no for configuring chrony.
Do you want to configure chrony with NTP server or pool address? [no]:
Finally the script displays a summary of the configuration. To proceed with the installation enter yes.
The IPA Master Server will be configured with:
Hostname:       ipa.example.com
IP address(es): 192.168.136.134
Domain name:    example.com
Realm name:     EXAMPLE.COM

The CA will be configured with:
Subject DN:   CN=Certificate Authority,O=EXAMPLE.COM
Subject base: O=EXAMPLE.COM
Chaining:     self-signed

Continue to configure the system with these values? [no]:
The script needs several minutes to configure the server. Upon completion, it displays some information including a file containing a list of records to add to the DNS system.
Please add records in this file to your DNS system: /tmp/ipa.system.records.7hnslqjy.db
==============================================================================
Setup complete

Next steps:
        1. You must make sure these network ports are open:
                TCP Ports:
                  * 80, 443: HTTP/HTTPS
                  * 389, 636: LDAP/LDAPS
                  * 88, 464: kerberos
                UDP Ports:
                  * 88, 464: kerberos
                  * 123: ntp

        2. You can now obtain a kerberos ticket using the command: 'kinit admin'
           This ticket will allow you to use the IPA tools (e.g., ipa user-add)
           and the web user interface.

Be sure to back up the CA certificates stored in /root/cacert.p12
These files are required to create replicas. The password for these
files is the Directory Manager password
The ipa-server-install command was successful
Here are the contents of the /tmp/ipa.system.records.7hnslqjy.db file generated at the end of this installation:
_kerberos-master._tcp.example.com. 3600 IN SRV 0 100 88 ipa.example.com.
_kerberos-master._udp.example.com. 3600 IN SRV 0 100 88 ipa.example.com.
_kerberos._tcp.example.com. 3600 IN SRV 0 100 88 ipa.example.com.
_kerberos._udp.example.com. 3600 IN SRV 0 100 88 ipa.example.com.
_kerberos.example.com. 3600 IN TXT "EXAMPLE.COM"
_kerberos.example.com. 3600 IN URI 0 100 "krb5srv:m:tcp:ipa.example.com."
_kerberos.example.com. 3600 IN URI 0 100 "krb5srv:m:udp:ipa.example.com."
_kpasswd._tcp.example.com. 3600 IN SRV 0 100 464 ipa.example.com.
_kpasswd._udp.example.com. 3600 IN SRV 0 100 464 ipa.example.com.
_kpasswd.example.com. 3600 IN URI 0 100 "krb5srv:m:tcp:ipa.example.com."
_kpasswd.example.com. 3600 IN URI 0 100 "krb5srv:m:udp:ipa.example.com."
_ldap._tcp.example.com. 3600 IN SRV 0 100 389 ipa.example.com.
ipa-ca.example.com. 3600 IN A 192.168.136.134
Test the Server
Authenticate as the admin user. The kinit command obtains and caches a Kerberos ticket-granting ticket.
kinit admin
You can list the ticket's information with:
klist
Example output:
Ticket cache: KCM:1000
Default principal: admin@EXAMPLE.COM
Valid starting       Expires              Service principal
11/17/2023 13:37:44  11/18/2023 12:41:14  krbtgt/EXAMPLE.COM@EXAMPLE.COM
Get a list of the users with:
ipa user-find
Example output:
--------------
1 user matched
--------------
  User login: admin
  Last name: Administrator
  Home directory: /home/admin
  Login shell: /bin/bash
  Principal alias: admin@EXAMPLE.COM, root@EXAMPLE.COM
  UID: 487800000
  GID: 487800000
  Account disabled: False
----------------------------
Number of entries returned 1
Disable anonymous binds
Create a file containing the required configuration:
cat > ~/disable.ldif <<EOF
dn: cn=config
changetype: modify
replace: nsslapd-allow-anonymous-access
nsslapd-allow-anonymous-access: rootdse
EOF
Apply the changes.
ldapmodify -x -D "cn=Directory Manager" -W -h ipa.example.com -p 389 -f ~/disable.ldif
Restart the 389 Directory Server instance.
sudo systemctl restart dirsrv.target
Verify the modification.
ldapsearch -x -D "cn=Directory Manager" -b cn=config -W -h ipa.example.com -p 389 nsslapd-allow-anonymous-access | grep nsslapd-allow-anonymous-access
Expected output:
Enter LDAP Password:
# requesting: nsslapd-allow-anonymous-access
nsslapd-allow-anonymous-access: rootdse
Creating a Bind User
We need to create a read-only on our LDAP server. Other applications use this user to query the LDAP server. We can use Apache Directory Studio to create the user. First we need to connect to the server using the admin account.

Now we need to create a new entry:

Configure a uid:
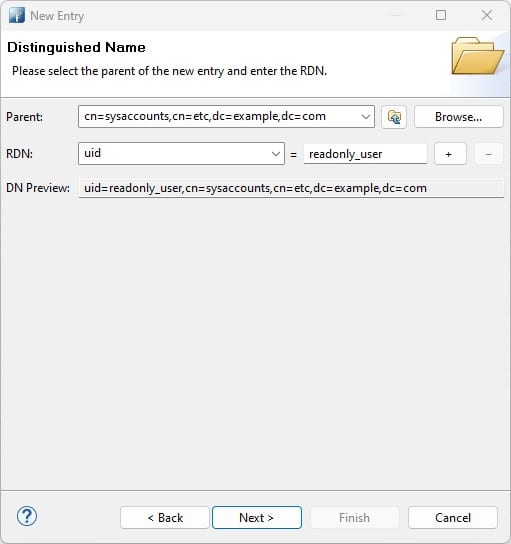
Add a userPassword attribute.
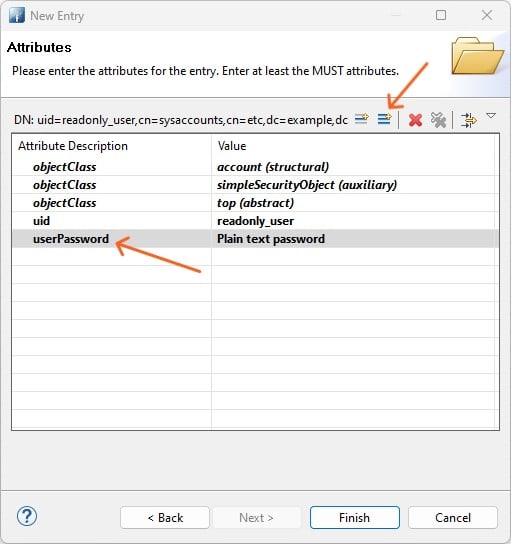
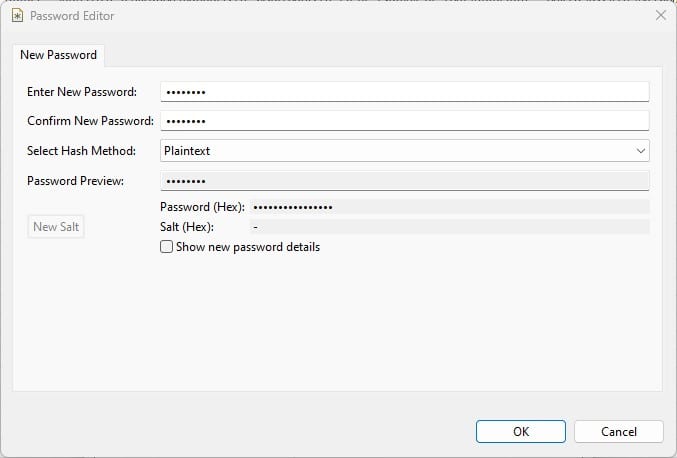
And set a plain text password (pre-hashed passwords are not valid).
Click finish. You can use the readonly_user to integrate LDAP enabled application with the LDAP server.
Installing FreeIPA client
Set the hostname (FQDN):
sudo hostnamectl set-hostname client.example.com
Modify the hosts file.
sudo vim /etc/hosts
Example:
192.168.136.134 ipa.example.com ipa
192.168.136.135 client.example.com client
Install the required packages.
sudo apt install freeipa-client
During installation you'll be prompted with several times. When asked to enter default Kerberos realm, accept the default EXAMPLE.COM.
When asked to enter Kerberos servers for your realm, hit Ok to skip.

When asked to enter administrative server for your Kerberos realm, hit Ok to skip.

Hit Ok again to finish the installation.

Configure the IPA client.
sudo ipa-client-install --hostname=$(hostname -f) --mkhomedir --server=ipa.example.com --domain example.com --realm EXAMPLE.COM
The script is interactive and uses several prompts. When asked about no DNS discovery, choose yes.
Autodiscovery of servers for failover cannot work with this configuration.
If you proceed with the installation, services will be configured to always access the discovered server for all operations and will not fail over to other servers in case of failure.
Proceed with fixed values and no DNS discovery? [no]: yes
Enter yes if you want to configure chrony with NTP server.
Do you want to configure chrony with NTP server or pool address? [no]: yes
Enter a NTP server address, if you have entered yes in the previous step.
Enter NTP source server addresses separated by comma, or press Enter to skip: time.cloudflare.com
Press enter whenever you have provided all the servers you want to proceed to the next step.
Enter a NTP source pool address, or press Enter to skip:
At this point the script displays a summary of the configuration. Enter yes if you want to continue with the displayed configuration.
Client hostname: client.example.com
Realm: EXAMPLE.COM
DNS Domain: example.com
IPA Server: ipa.example.com
BaseDN: dc=example,dc=com
NTP server: time.cloudflare.com

Continue to configure the system with these values? [no]: yes
The script continues to configure the client.
Synchronizing time
Configuration of chrony was changed by installer.
Attempting to sync time with chronyc.
Time synchronization was successful.
User authorized to enroll computers: admin
Password for admin@EXAMPLE.COM:
Successfully retrieved CA cert
    Subject:     CN=Certificate Authority,O=EXAMPLE.COM
    Issuer:      CN=Certificate Authority,O=EXAMPLE.COM
    Valid From:  2023-11-17 13:23:41
    Valid Until: 2043-11-17 13:23:41

Enrolled in IPA realm EXAMPLE.COM
Created /etc/ipa/default.conf
Configured /etc/sssd/sssd.conf
Configured /etc/krb5.conf for IPA realm EXAMPLE.COM
Systemwide CA database updated.
Adding SSH public key from /etc/ssh/ssh_host_rsa_key.pub
Adding SSH public key from /etc/ssh/ssh_host_ed25519_key.pub
Adding SSH public key from /etc/ssh/ssh_host_dsa_key.pub
Adding SSH public key from /etc/ssh/ssh_host_ecdsa_key.pub
Could not update DNS SSHFP records.
SSSD enabled
Configured /etc/openldap/ldap.conf
Configured /etc/ssh/ssh_config
Configured /etc/ssh/sshd_config.d/04-ipa.conf
Configuring example.com as NIS domain.
Client configuration complete.
The ipa-client-install command was successful
On Ubuntu user's home directory won't be created automatically. To fix that, open /usr/share/pam-configs/mkhomedir file for editing.
sudo vim /usr/share/pam-configs/mkhomedir
And replace its contents by the following:
Name: Create home directory on login - FreeIPA
Default: yes
Priority: 900
Session-Type: Additional
Session:
    required pam_mkhomedir.so umask=0027 skel=/etc/skel
Now run the following command.
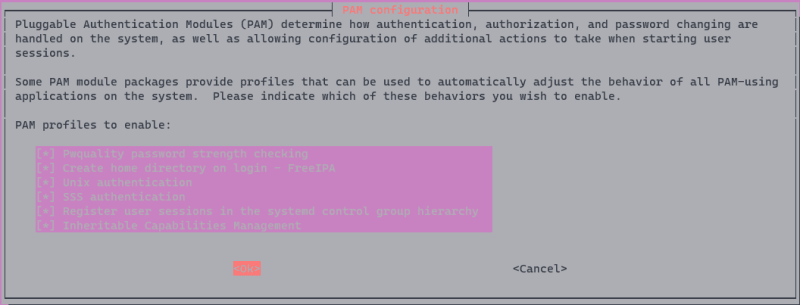
sudo pam-auth-update
When prompted to select PAM profiles, make sure Create home directory on login - FreeIPA is selected and then hit Ok.
Now on the FreeIPA server, add the client to the hosts file.
sudo bash -c 'echo 192.168.136.135 client.example.com client >> /etc/hosts'
Adding a User
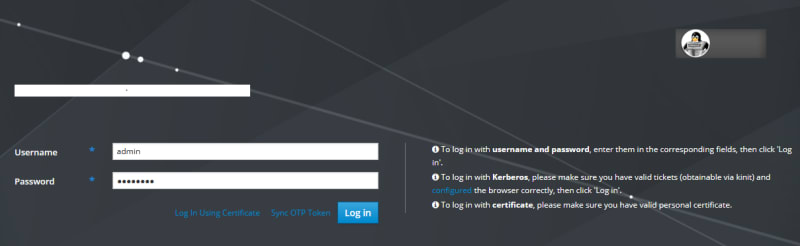
We will use the web UI to add a new user. The UI is accessible through https://ipa.example.com/ipa/ui/ address. Log in as admin user.
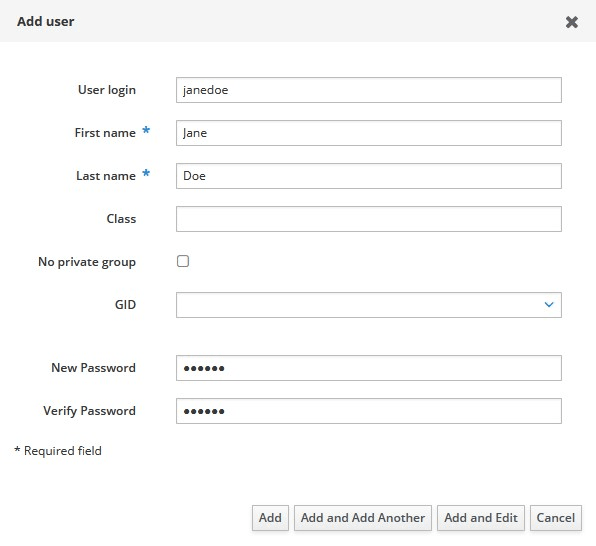
Click on Add button.

Fill in the required fields and press Add button.
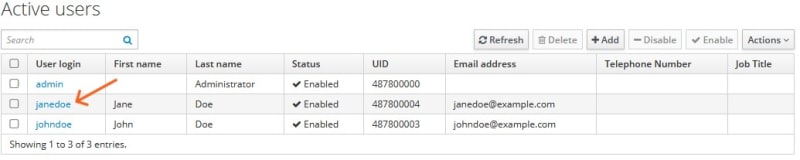
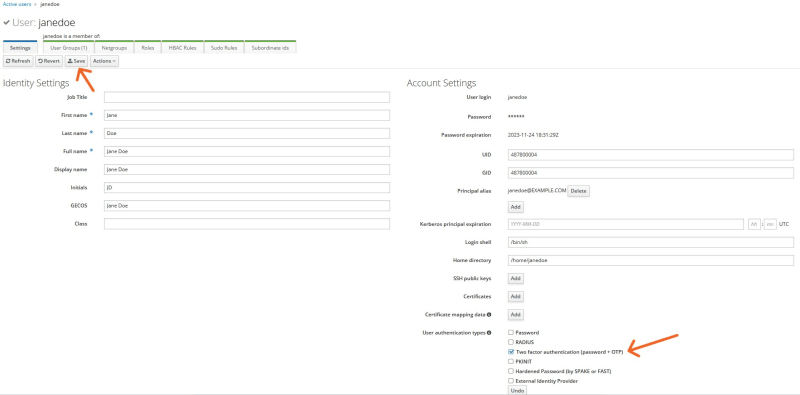
After adding the user, you'll see a list of active users. Click on the new user's login name.
To enable 2FA, select Two factor authentication (password + OTP) and then click the Save button.
Setting up 2FA
Now the newly added user is able to use the web UI and create a TOTP token for herself.

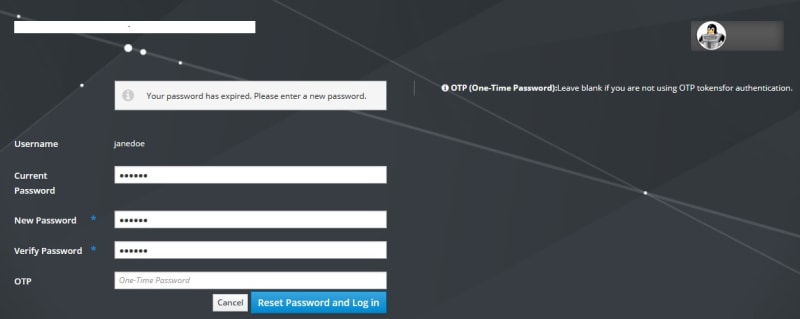
At first login the user must change the password provided by the administrator.
To generate the OTP token, the user must navigate to OTP Tokens tab.

Here the user needs to click on the Add button.

The user must select the type of the token.

A QR code will be displayed. The user should scan the code using an application like Google Authenticator.

At the end the list of all the tokens will be displyed.

Now, Jane Doe can log in to client.example.com via SSH. When prompted to enter the password, she should enter the password she selected earlier, followed by the one-time password displayed by the authenticator app.

References and Further Reading
- https://docs.oracle.com/en/learn/ol-freeipa/index.html
- https://access.redhat.com/documentation/en-us/red_hat_enterprise_linux/9/html-single/installing_identity_management/index
- https://access.redhat.com/documentation/en-us/red_hat_enterprise_linux/9/html-single/managing_idm_users_groups_hosts_and_access_control_rules/index
- https://access.redhat.com/documentation/en-us/red_hat_enterprise_linux/9/html-single/accessing_identity_management_services/index
- https://luna.oracle.com/lab/a03cfc90-4c3c-488d-9e66-ba514e00b619/steps
- https://www.linuxtechi.com/configure-freeipa-client-on-ubuntu/
- https://computingforgeeks.com/how-to-configure-freeipa-client-on-ubuntu-centos/
- https://www.howtoforge.com/how-to-install-freeipa-client-on-ubuntu-server-1804/
- https://www.tenable.com/audits/items/CIS_Debian_Linux_8_Server_v2.0.2_L1.audit:632ea5de5002b78e71581003f107448a

Top comments (0)