
For all the people who do not know what jenkins is , let me explain it to you
Jenkins is a CI/CD tool that you can use on any project of yours or your companies to make your lives a little easier .
What it does for you is a whole lot of things
just for example
- lets just say you want that whenever a team member pushes anything to a specific branch of your project all unit and integration tests should run first hand .
You can do that with jenkins .
- You want that everytime a push is made to the repo it gets re build , jenkins got you .
CI/CD is very powerful tool for any developer to have in this era and there are many tools that let you do this , Jenkins being one of them.
Ok , so now you understood what jenkins is , lets just use it in our project and try to create a pipeline.
- Go ahead and download jenkins.
- Once downloaded go to the directory using your terminal
- once inside the terminal , type the command
Java -jar jenkins.war - This will start the jenkins on localhost:8080 and will also give you the password autogenerated

- copy this password and go to localhost:8080 and you will be greeted by this screen
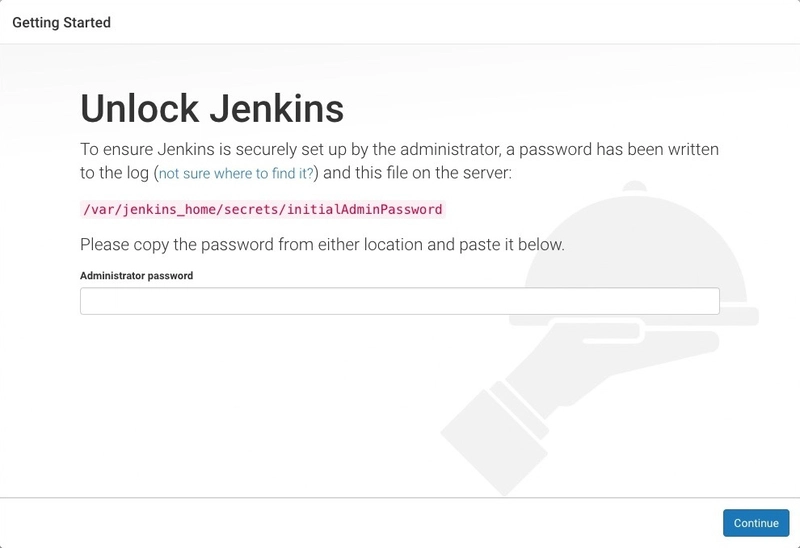
- Use the password you just copied from the terminal here
- If you want you can also create a user (we are not going to do that here).
- so every thing set up this page will appear in front of you(you wont be having the multitesting in front of you )

- Here what you can do is click on new item and this screen will be visible to you

- Here give your project a name and click on multipipeline and click ok
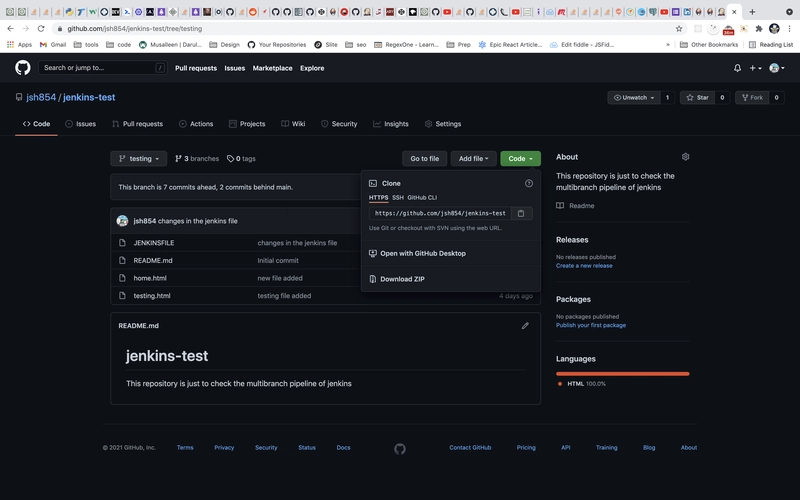
- You will be greeted with a new screen here , that has a bunch of options to configure but what we want is we want to hook it up with our github repo . So first of all create a create a new github repo and make sure you create a file namely
Jenkinsfilein it . - Inside that file paste this code
pipeline {
    agent any

    stages {
        stage('Build') {
            steps {
                echo 'Building..'
            }
        }
        stage('Test') {
            steps {
                echo 'Testing..'
            }
        }
        stage('Deploy') {
            steps {
                echo 'Deploying....'
            }
        }
    }
}
- Once this is done take the https github url from the clone like this
- Ok perfect , now go back to your jenkins local host and from all those options find Branches > Click on Add Source and click on git

Now paste your github url that you copied over here like this

-
perfect 👌 , now click on save .
What it will do is it will scan your branches by itself and run the tests for you .
By this point of time you are basically done but just to make it a little interesting what you can do is push anything to your code base and then come to your github and click on scan multibranch pipeline now .
This will force it to rescan the code and in any branch where it see the change it will re build that branch (On a real life scenario you dont have to do it manually , it will do it yourself via a github hook that will be made inside of the github , but since its on localhost git hub wont allow that )
Ok perfect you are done and can go ahead and learn more about the code in the jenkins file here .
You can do a lot of cool stuff with it , run cron jobs , run tests etc which is outside of the scope of this tutorial.
Ok , i hope you guys have learnt anything new from this tutorial .
Feel free to reach me at my Linkedin
Want to encourage me to create posts like this more
Buy me a coffee

Top comments (0)