
There is nothing like testing alpha or beta frameworks and getting excited about the possibilities of Open Source. So today I decided to play around with FeatherHTTP the brainchild of David Fowler - yes, that David (.NET Core, SignalR, Channels etc etc)!
Chances are you've never heard of FeatherHTTP so here's an explanation from the man himself:
A lightweight low ceremony APIs for .NET Core applications.
- Built on the same primitives as .NET Core
- Optimized for building HTTP APIs quickly
- Take advantage of existing .NET Core middleware and frameworks
I really like how minimalist the framework is for creating APIs. With a shiny new tool in my hands, there was only one thing I could do: build something and slap some authentication and authorization to it while we're at it :)
Let's get started then...
Create a new FeatherHTTP project
To be able to work with FeatherHTTP, we need to add the necessary template to the .NET Core CLI - CLI only for now
dotnet new -i FeatherHttp.Templates::0.1.67-alpha.g69b43bed72 --nuget-source https://f.feedz.io/featherhttp/framework/nuget/index.json
Upon installing this template, you can use the dotnet new command to create a new project. Navigate to a new directory and run dotnet new feather. This should generate 2 files only. When we say lightweight, we mean lightweight!

The default code is very simple:
So far so good. Now, let's add a couple of methods to make it look more like a proper API. You will have to forgive me but I'm going to go with the standard ToDo list example but I promise to add some spice later on when we add a call to MS Graph. But baby steps first. Let's update the code to the following
We also need a ToDo class. Let's add a TodoItem.cs file to our project and add the following code:
using System.Text.Json.Serialization;

 public class TodoItem
 {
     [JsonPropertyName("id")]
     public int Id { get; set; }

     [JsonPropertyName("name")]
     public string Name { get; set; }

     [JsonPropertyName("isComplete")]
     public bool IsComplete { get; set; }
}
At this point we have a GET and a POST method to retrieve and create new ToDo items. We can test our API by launching it with dotnet run or the VS Code debugger and using Postman to make the necessary calls to http://localhost/api/todos
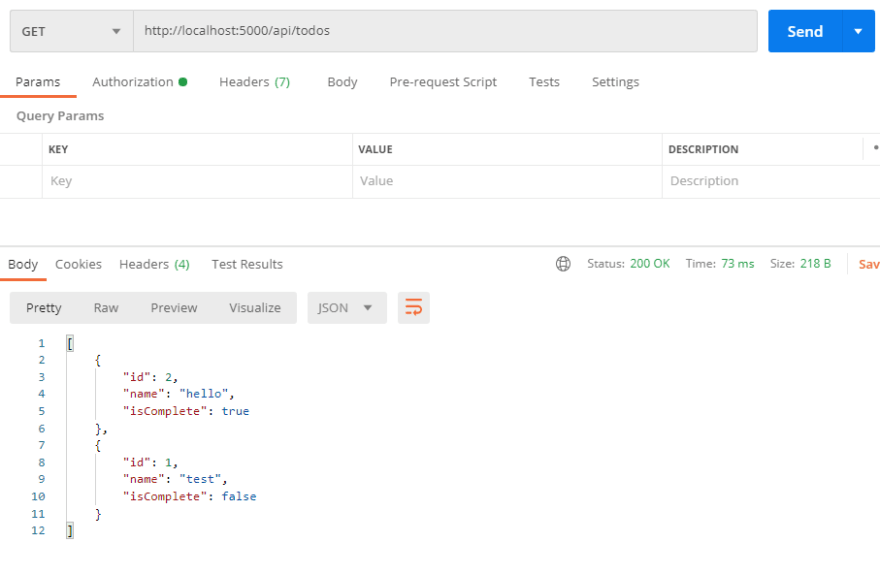
We have a lift off!!!
Create the Azure AD app registrations
For our API and API clients to be able to authenticate users and get the appropriate access tokens from Azure AD, we need to register 2 apps.
API App Registration
Go to the Azure Portal > Azure AD > App Registrations and Register a new app

Go to the API Permissions tab and click on the Add a Permission
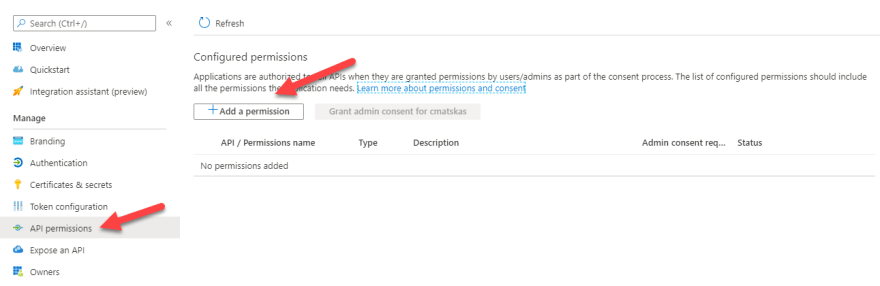
Select Microsoft Graph and then, under Delegated permissions add the User.Read permission and press the Add permissions button

Ensure that you Grant admin consent as the API wont' be able to consent to these permissions - there is no user interaction, remember?

For the API to be accessible by other apps we need to go to the Expose our API tab and add a scope. Click on Add a scope and accept the default Application ID URI - although you can always edit this to a more readable format
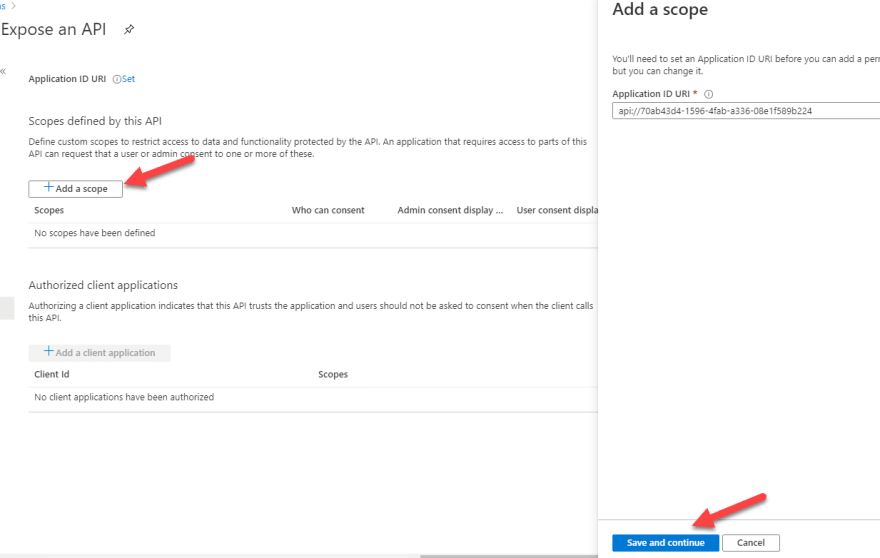
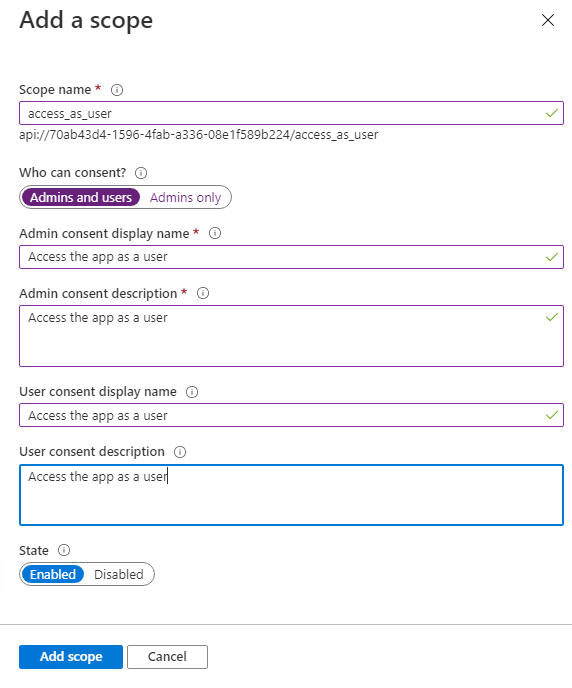
And let's add a scope that the API client app will request when acquiring a token from Azure AD. In this instance, we will name the scope access_as_user
Finally, we need to create a new secret that our API will use to validate tokens and execute the On Behalf Of (the user) flow to call into MS Graph.
Go to the Certificates & Secrets tab and add a new secret

Make sure to copy the secret value as it's not accessible once you navigate away from this tab/page.
Client App Registration
We also need a client app that, most likely, will be one that our users can interact with (desktop app, web app etc) in order to authenticate and call the API. In the Azure Portal > Azure AD > App Registrations create a new app registration
In the Authentication tab, press the Add a platform button to configure how your app should receive the tokens from Azure AD. I will be using Postman to test my API so I chose Web and then I set the Redirect URI to: https://www.postman.com/oauth2/callback and press Save to persist my changes.
Note: We can have multiple redirect URIs so if later we decide to implement a nice front-end app, we can add the new app URIs in this space.
Finally, in API permissions, we need to configure the permission to our own API. Press the Add a permission button and select the My APIs*. Then find the one that you just created for your API and check the right permissions before you press the **Add Permissions button

At this point we're all set with Azure AD

Let's make our API secure
What could go wrong combining a beta library with an alpha version of a very promising framework? Let's find out.
To secure our API, we are going to use the new Microsoft.Identity.Web library. This library is going to GA very soon and is designed to make authentication and authorization for .NET Core web apps and apis a breeze. Let's see how we to implement this with our FeatherHTTP API.
Note: Since Microsoft.Identity.Web is still in preview, there may be some API changes coming before it hits GA
First, we need to add a reference to the Microsoft.Identity.Web NuGet package. In the *.csproj file we add the following package reference:
<PackageReference Include="Microsoft.Identity.Web" Version="0.2.1-preview" />
In addition, we need to add an appsettings.json file to store the AzureAD configuration settings as per the example below:
{
    "AzureAd": {
      "Instance": "https://login.microsoftonline.com/",
      "ClientId": "<your API app client id>",
      "ClientSecret": "<your API app secret>",
      "Domain": "cmatskas.onmicrosoft.com",
      "TenantId": "b55f0c51-61a7-45c3-84df-33569b247796"
    }
}
We are now able to integrate Microsoft.Identity.Web with our FeatherHTTP middleware as per the code below:
Making GET and POST calls from our client apps to the API will now fail unless we present a valid token with the right scopes. If no Bearer token is present, you'll get a 401 error whereas if you have the wrong scopes, you'll get a 403
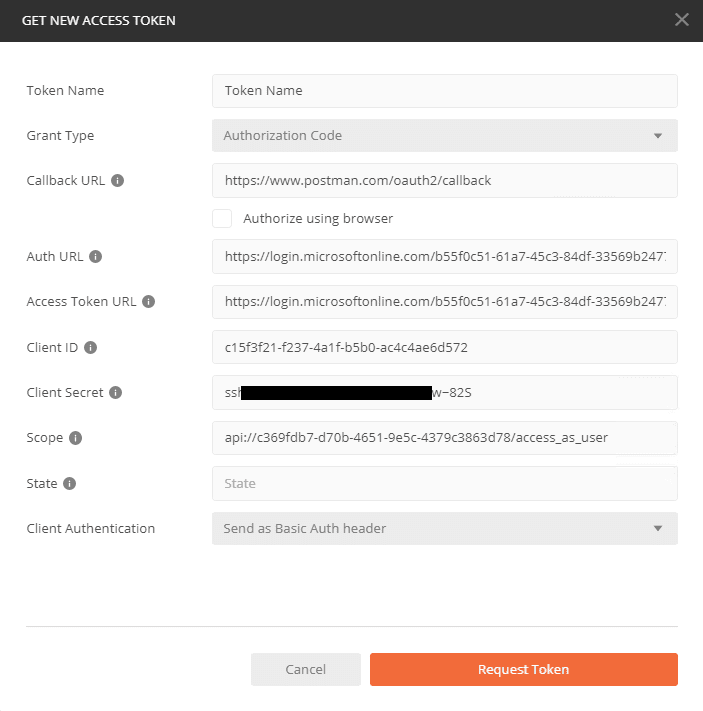
If you are using Postman, then this is how you should set up your API calls to have the right token and scopes:
And if we want to confirm that all is OK, i.e we have the right audience and scope, we can check our acquired token with jwt.ms

Adding MS Graph
To make this app a bit more realistic, I thought it would be nice to add a call to MS Graph. Again, Microsoft.Identity.Web makes it extremely straightforward to add calls to a downstream API such as MS Graph.
To interact with MS Graph, I like to use the MS Graph SDK for .NET. We could roll out our own HTTP calls but the SDK comes with a lot of goodies. Open your *.csproj file and add the Graph NuGet package:
<PackageReference Include="Microsoft.Graph.Beta" Version="0.20.0-preview" />
We then need to update our bootstrap code to add the downstream authentication like the code below:
builder.Services.AddMicrosoftWebApiAuthentication(builder.Configuration)
              .AddMicrosoftWebApiCallsWebApi(builder.Configuration)
              .AddInMemoryTokenCaches();
...
app.MapGet("/api/me", GetGraphData).RequireAuthorization();
And the API method call to MS Graph:
static async Task GetGraphData(HttpContext http)
        {
            http.VerifyUserHasAnyAcceptedScope(new string[]{"access_as_user"});

            var tokenAcquisition = http.RequestServices.GetRequiredService<ITokenAcquisition>();

            var authProvider = new DelegateAuthenticationProvider(async x => {
                var accessToken = await tokenAcquisition.GetAccessTokenForUserAsync(new string[] {"User.Read"});
                x.Headers.Authorization = new AuthenticationHeaderValue("Bearer", accessToken);
            });
            var graphClient = new GraphServiceClient(authProvider);
            var me = await graphClient.Me.Request().GetAsync();

            await http.Response.WriteJsonAsync(new {Name = me.GivenName, Email= me.Mail});
        }
Using Postman to make a GET call to the /api/me endpoint gives us the data we need from MS Graph

Summary
It was truly fun and refreshing working with the FeatherHTTP framework. I have to admit that the documentation is currently fairly "thin" and it's still early days but I have high hopes for this project. In the end, it was a great experiment to see what I can do with this early version of the framework and integrate authentication to make it more secure.
You can find the complete implementation on GitHub

Top comments (0)