It provide ready made starter for jdbc , for connecting to the database , for hosting web project etc.
It contains all the jar files needed for an application .

Question arises why do we need spring boot if we already have spring framework ?
See first of all it is based on spring framework only It is just an extension of spring framework .So as a java Developer if you want to use spring framework for building something one has to add so many configurations to work with whereas spring boot came up with the idea that developer should focus on problem solving not on adding configurations to the project . Therefore it provides dependencies , configuration but most importantly it provides production ready application.
So it provide a tool known as Spring Initializer[https://start.spring.io/] which provide starter template for your next spring boot project and user can add dependencies according to their needs.
Rest Api Using Spring Boot
Firstly will create the starter template using Spring Initializer
Once user visit the page let the project details as default and in dependency add the following dependencies

- Spring Web pulls out the all configuration required for web development .
- H2 database is a in-memory relational database management system .
- Spring Data JPA is used for managing relational data in java applications.
Once all the dependencies added user can click on GENERATE button which will download the starter template .
You can open your project in the IDE of your choice , for this tutorial I will be using Intellij IDE.
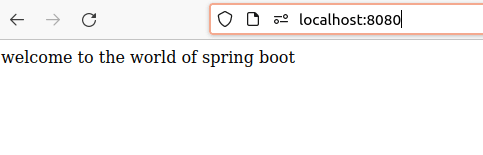
Once you have opened your project run the demo application to check everything is going fine up till now , so if you get to see what shown in the below Image that means you are good to go forward and it also shows that your project is running on port 8080 .

Now before moving to rest api let’s make a simple get request which will just return a string .
Now under the com.example.demo make a package Controller and under this package create a class HelloController .

In class HelloController create a function which will return a String as shown below
package com.example.demo.controller;

public class HelloController {
    public String hello(){
        return "welcome to the world of spring boot";
    }

}
So user needs to understand that while working with Spring boot we have to play around with the annotations .
Firstly will pass @RestController annotation to the class HelloController which will make this class a request Handler and in order to serve the Hello() function as a get request we will annotate it with the @RequestMapping it takes value and method as argument ,value takes the routes and in method we have to specify the type of request being made . After applying annotation the code looks like as shown below
package com.example.demo.controller;
import org.springframework.web.bind.annotation.RequestMapping;
import org.springframework.web.bind.annotation.RestController;
@RestController
public class HelloController {
    @RequestMapping(value = "/",method = RequestMethod.GET)
    public String hello(){
        return "welcome to the world of spring boot";
    }
}
Once all this is done user can run the project and head over to the link http://localhost:8080/
to see the desired result .
If you are able to see this result then congratulations now lets move to the next step of creating a Rest api for that first I will be adding H2 database configuration in the application.properties page .

spring.h2.console.enabled=true
spring.datasource.url=jdbc:h2:mem:dcbapp
spring.datasource.driverClassName=org.h2.Driver
spring.datasource.username=devyank
spring.datasource.password=password
spring.jpa.database-platform=org.hibernate.dialect.H2Dialect
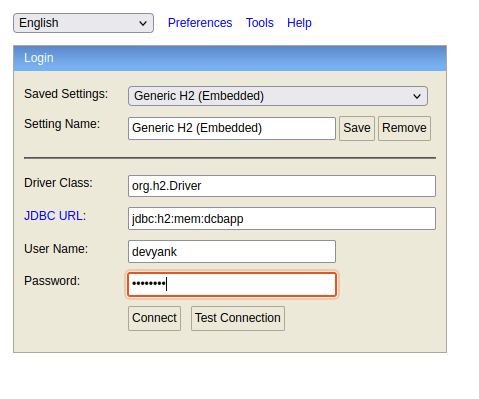
After adding theses configuration rerun your project and head over to http://localhost:8080/h2-console/ there you would see this form as shown below just add your name and password and then click on connect .
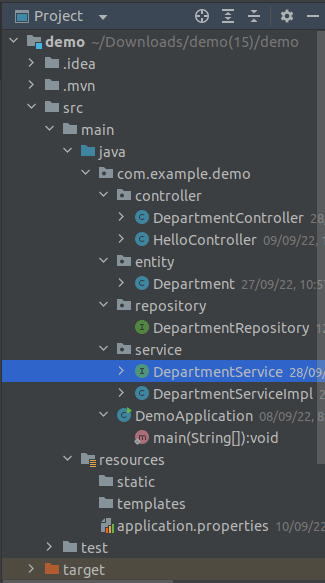
Once done with this let’s add other element of rest api in our application , in com.example.demo package create packages named entity , repository and service . In package entity create a class Department , in package service create a interface DepartmentService and create a class DepartmentServiceImpl , in package repository create a interface DepartmentRepository and in the package controller add a class DepartmentController . Now your working directory should look like this
Working logic of Rest API

Let’s move to the code part
Entity
package com.example.demo.entity;
import javax.persistence.Entity;
import javax.persistence.GeneratedValue;
import javax.persistence.GenerationType;
import javax.persistence.Id;

@Entity
public class Department {
    @Id
    @GeneratedValue(strategy = GenerationType.AUTO)
    private Long departmentId;
    private String departmentNAme;
    private String departmentAddress;
    private String departmentCode;
}
The Department class is annotated with @Entity annotation which specifies that this class is an entity and it is mapped to the database table . Variable passed in this class act as the table column.
As seen in the code part variable departmentId is annotated with @id which shows this is going to be a primary key and by passing @GeneratedValue annotation we are making sure that this value is auto generated .
We also have to generate Getter and Setter , constructors and toString() method for all the variable of this class.
Repository
package com.example.demo.repository;
import com.example.demo.entity.Department;
import org.springframework.data.jpa.repository.JpaRepository;
import org.springframework.stereotype.Repository;

@Repository
public interface DepartmentRepository extends JpaRepository<Department,Long> {
}
The DepartmentRepository class extend the JpaRepository which provide the inbuilt methods for basic crud operations and this class is annotated with @Repository which indicate that this class provide the mechanism for update , delete , storage , search operation .
Service
DepartmentService
package com.example.demo.service;
import com.example.demo.entity.Department;
import java.util.List;
public interface DepartmentService {

   public Department saveDepartment(Department department);
   public List<Department> fetchDepartmentList();
   public void deleteDepartmentById(Long departmentId);
   public Department updateDepartment(Long departmentId, Department department);
}
DepartmentServiceImpl
import org.springframework.stereotype.Service;
import java.util.List;
import java.util.Objects;
@Service
public class DepartmentServiceImpl implements DepartmentService {
    @Autowired
    private DepartmentRepository departmentRepository;
    @Override
    public Department saveDepartment(Department department) {
      return departmentRepository.save(department);
    }
    @Override
    public List<Department> fetchDepartmentList() {
        return departmentRepository.findAll();
    }
    @Override
    public void deleteDepartmentById(Long departmentId) {
        departmentRepository.deleteById(departmentId);
    }
    @Override
    public Department updateDepartment(Long departmentId, Department department) {
        Department depDb=departmentRepository.findById(departmentId).get();

        if(Objects.nonNull(department.getDepartmentNAme())&&
        !"".equalsIgnoreCase(department.getDepartmentNAme())){
            depDb.setDepartmentNAme(department.getDepartmentNAme());
        }
        if(Objects.nonNull(department.getDepartmentCode())&&
                !"".equalsIgnoreCase(department.getDepartmentCode())){
            depDb.setDepartmentCode(department.getDepartmentCode());
        }
        if(Objects.nonNull(department.getDepartmentAddress())&&
                !"".equalsIgnoreCase(department.getDepartmentAddress())){
            depDb.setDepartmentAddress(department.getDepartmentAddress());
        }
        return departmentRepository.save(depDb);
    }
}
DepartmentServiceImpl implements the function of interface DepartmentService and I have annotated this class with @Service annotation because it provide functionality for creating, deleting , updating and reading data from database .
In this class I have made an object of class DepartmentRepository by annotating it with @Autowired so that I can access all the methods from repository .
@Autowired enable us to create a object of class which is part of spring bean .
Also we can observe that all the functions are annotated with the @Override as we are over riding the function from DepartmentService interface.
DepartmentController
package com.example.demo.controller;
import com.example.demo.entity.Department;
import com.example.demo.service.DepartmentService;
import org.springframework.beans.factory.annotation.Autowired;
import org.springframework.web.bind.annotation.*;
import java.util.List;
@RestController
public class DepartmentController {
    @Autowired
    private DepartmentService departmentService;

    @PostMapping("/department")
    public Department saveDepartment(@RequestBody Department department){
    return departmentService.saveDepartment(department);
    }

    @GetMapping("/department")
    public List<Department> fetchDepartmentList(){
        return departmentService.fetchDepartmentList();
    }

    @DeleteMapping("/departments/{id}")
    public String deleteDepartmentById(@PathVariable("id") Long departmentId){
    departmentService.deleteDepartmentById(departmentId);
    return "deleted successfully";
    }

    @PutMapping("/departments/{id}")
    public Department updateDepartment(@PathVariable("id") Long departmentId,
                                      @RequestBody  Department department){
    return departmentService.updateDepartment(departmentId,department);
    }
}
This class handle all the requests and in this class I have created an object of DepartmentService so that I can access all the function from service layer.
Post Request
Function saveDepartment is annotated with @Postmapping as it is used to make post request.
It takes Department as argument and it is annotated along with @RequestBody because it is accepted in json format.
Earlier in this tutorial I had make use of @Requestmapping where we have to specify value and type of request , @Postmapping is more specific for only creating post request and it take route as an argument .
Get Request
Function fetchDepartmentList is annotated with @GetMapping as it is used to make get request.
Delete Request
Function deleteDepartment is annotated with @DeleteMapping as it is used to make delete request.
this function takes departmentId as argument in order to delete particular department based on its Id and it is annotated with @PathVariable which takes Id as argument because we are accessing the parameter value from route .
Update Request
Function updateDepartment is annotated with @PutMapping as it is used to make update request.
It take departmentId and Department as argument in order to update depratemtn with particular Id .


Latest comments (0)