
So, you want to establish real-time audio and video in your Flutter app. This is a common requirement for app developers, especially post-pandemic, since everyone wants to interact online almost as easily as they do in real life.
This content was originally published - HERE
One of the most effective ways to go about this is to use WebRTC.
This article will demonstrate how to use WebRTC and implement real-time audio-video communication in a Flutter app.
Note: This piece assumes that you are already familiar with app development in Flutter and will focus on WebRTC integration with a Flutter app.
How to build a Flutter WebRTC app
We’ll start by building a new Flutter project and then go deeper into how WebRTC works. But first, let’s take a moment to answer the question: “What is WebRTC?”
WebRTC is an HTML specification that enables real-time, audio-video communication between websites and devices. It comprises networking, audio, and video components standardized by the Internet Engineering Task Force and the World Wide Web Consortium.
Simply put, WebRTC is an open-source project that allows direct P2P communication without installing additional programs or plugins. It can be used on all modern browsers to establish peer-to-peer communication and can also be embedded into native applications using available libraries.
We’ll discuss WebRTC in more detail later in the article. For now, let’s start building a Flutter WebRTC app.
First of all, let’s create a new Flutter project
flutter create webrtc_flutter
We’ll refactor some code and get rid of the comments.
The first step is to add the Flutter WebRTC plugin based on Google WebRTC. Using this, we can develop the app in Flutter for mobile, desktop, and the web.
Run the following code in the terminal to add flutter_webrtc as a dependency in your pubspec.yaml file:
flutter pub add flutter_webrtc
Access Camera and Microphone on iOS
Add the following permission entry to your Info.plist file, located in <project root>/ios/Runner/Info.plist:
<key>NSCameraUsageDescription</key>
<string>$(PRODUCT_NAME) Camera Usage!</string>
<key>NSMicrophoneUsageDescription</key>
<string>$(PRODUCT_NAME) Microphone Usage!</string>
This entry allows your app to access the device’s camera and microphone.
Android Manifest File Changes
To enable user permissions on Android, add the following to the Android Manifest file, located in <project root>/android/app/src/main/AndroidManifest.xml:
<uses-feature android:name="android.hardware.camera" />
<uses-feature android:name="android.hardware.camera.autofocus" />
<uses-permission android:name="android.permission.CAMERA" />
<uses-permission android:name="android.permission.RECORD_AUDIO" />
<uses-permission android:name="android.permission.ACCESS_NETWORK_STATE" />
<uses-permission android:name="android.permission.CHANGE_NETWORK_STATE" />
<uses-permission android:name="android.permission.MODIFY_AUDIO_SETTINGS" />
Add the following if you wish to use a Bluetooth device:
<uses-permission android:name="android.permission.BLUETOOTH" />
<uses-permission android:name="android.permission.BLUETOOTH_ADMIN" />
build.gradle Changes
Currently, the official WebRTC jar uses static methods in the EglBase interface. So, you will need to change your build settings to Java 8. To do so, add the following code to app-level build.gradle:
android {
    //...
    compileOptions {
        sourceCompatibility JavaVersion.VERSION_1_8
        targetCompatibility JavaVersion.VERSION_1_8
    }
}
If necessary, in the same build.gradle, you may need to increase the minSdkVersion of defaultConfig to 23 (currently, the default Flutter generator has set it to 16).
Our initial objective is to show the local user's video in the app. We’ll start from there and go on to connect to a remote user and establish a P2P connection using WebRTC.
Let’s start by writing the Dart code.
Rendering a Local User
Inside the stateful MyHomePage() widget, we’ll initialize a localVideoRenderer for the same.
The RTCVideoRenderer lets us play video frames obtained from the WebRTC video track. Depending on the video track source, it can play videos from a local peer or a remote one.
final _localVideoRenderer = RTCVideoRenderer();

  void initRenderers() async {
    await _localVideoRenderer.initialize();
  }
The initRenderers function should now be called in the initState() of the stateful widget.
@override
  void initState() {
    initRenderers();
    super.initState();
  }
It also needs to be disposed of. Disposing of the renderer stops the video and releases the resources associated with it.
@override
  void dispose() async {
    await _localVideoRenderer.dispose();
    super.dispose();
  }
The next step is to get the user media as a stream.
The getUserMedia() function will prompt the user to allow an input device to be used. The said device will generate a Media Stream with the requested media types. This stream will have an audio track generated from an audio source such as a microphone (or others) and a video track from a camera, recording device, etc.
Moving on, we create a new function named getUserMedia() and call it in initState() as shown below:
_getUserMedia() async {
    final Map<String, dynamic> mediaConstraints = {
      'audio': true,
      'video': {
        'facingMode': 'user',
      }
    };

    MediaStream stream =
        await navigator.mediaDevices.getUserMedia(mediaConstraints);
    _localVideoRenderer.srcObject = stream;
  }

  @override
  void initState() {
    initRenderers();
    _getUserMedia();
    super.initState();
  }
The last step is to complete our initial objective: use this local renderer in the UI to display the user’s video.
Let us modify the build method of the stateful widget as:
@override
  Widget build(BuildContext context) {
    return Scaffold(
      appBar: AppBar(
        title: Text(widget.title),
      ),
      body: Stack(
        children: [
          Positioned(
              top: 0.0,
              right: 0.0,
              left: 0.0,
              bottom: 0.0,
              child: RTCVideoView(_localVideoRenderer))
        ],
      ),
    );
  }
With that done, we can now run the app to check if the local video is being rendered.
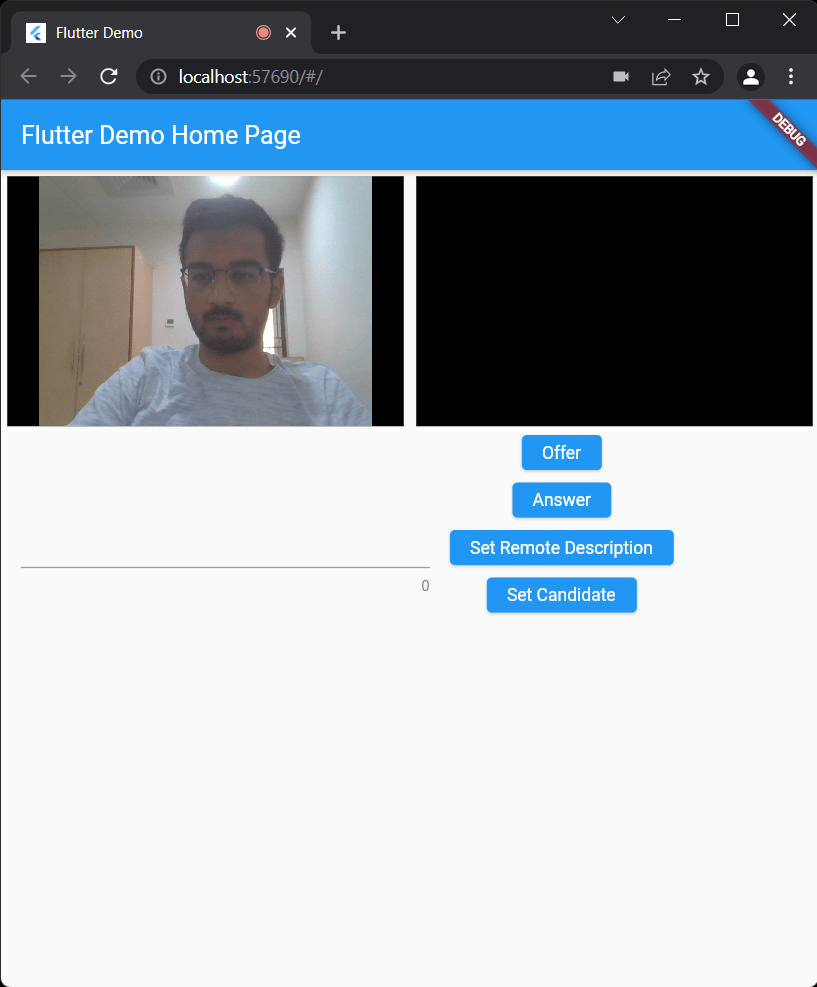
Flutter WebRTC demo
First of all, the app will ask for permission when we first run it.

Once loading is complete, the following screen should show up:

And now, you have successfully rendered the local video of the user on-screen. The next step is to render a remote user. But first, we need to understand connection and communication using WebRTC.
How WebRTC works
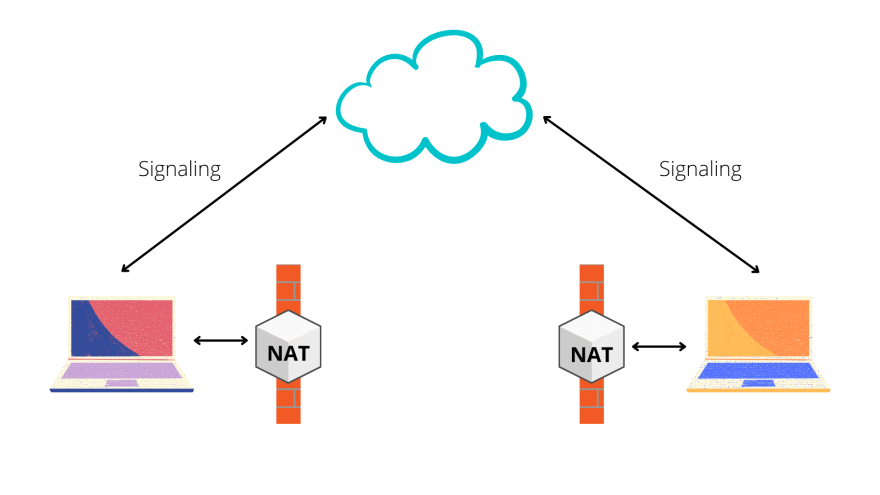
WebRTC allows peer-to-peer communication over websites, apps, and devices, even though a peer may initially have no idea where the other peers are or how to connect or communicate with them.
To establish a connection, WebRTC needs clients to exchange metadata in order to coordinate with them - which is done by a process called signaling. Signaling is also required to bypass firewalls and work with network address translators (NATs).
Let’s dive a little further into the process.
NAT (Network Address Translation)
All devices have a unique IP address. WebRTC uses this unique address to connect two peers.
Due to the large number of connected devices in the modern world, unallocated IPv4 addresses are depleting. This has led to the deployment of a successor protocol, IPv6. But, because of classful network addressing to Classless Inter-Domain Routing, the exhaustion of these IPv4 addresses was substantially delayed.
In addition, NAT or Network Address Translation helps with this. Instead of allocating public addresses to each network device, it allows Internet service providers and enterprises to masquerade as private network address space. Hence they have only one publicly routable IPv4 address on the Internet interface of the main Internet router.
Because of NAT, we have two IP addresses. One is public, associated with the router, visible only from the outside. The other is a private address visible only to those connected to the same router.
NAT mapping is what makes the connectivity of WebRTC possible. WebRTC leverages it to allow two peers in completely different subnets to communicate.
Interactive Connectivity Establishment (ICE)
Now, it is not possible to connect two peers with just their IP addresses. To establish a connection, we’d have to first pass in the unique address to locate the peer on the internet. We’d also need a relay server for sharing media (if P2P connection is not allowed by the router), and finally, we’d have to get through the firewall.
A framework called Interactive Connectivity Establishment (ICE) is used to solve this.
ICE is used to find the optimum path for connecting the peers. It examines the different ways to do so and chooses the best one.
About the Flutter WebRTC Server
The ICE protocol tries to connect using the host address obtained from a device’s OS and network card. If that fails (which it will for devices behind NATs), ICE tries to get an external address using a STUN server. If that fails, it uses a TURN relay server to route traffic. Fundamentally, a TURN server is a STUN server with additional built-in relaying functionality.
But, let’s look a bit further into them.
STUN (Session Traversal Utilities for NAT)
An endpoint under a NAT with a local address is not reachable for other endpoints outside the local network. Hence a connection cannot be established. When this occurs, the endpoint can request a public IP address from a STUN server. Other endpoints can use this publicly reachable IP to establish a connection.
TURN (Traversal Using Relays around NAT)
As the name suggests, a TURN server is used as a relay or intermediate server to exchange data. If any endpoint under Symmetric NAT can contact a server on the public internet to establish a connection with another endpoint, it is called a TURN client.
But, a disadvantage of using a TURN server is that it is required throughout the whole session, unlike the STUN server, which is not needed after the connection is established. Therefore, in the ICE technique, STUN is used as default.
In other words, a STUN server is used to get an external network address. TURN servers are used to relay traffic if a direct (peer-to-peer) connection fails.
Connecting to a Remote User

To connect to a remote user, we’d have to make an offer from a local to a remote user and receive an answer to establish a connection.
First, we ascertain media conditions, such as resolution and codec capabilities, locally. The metadata obtained will be used for the offer-and-answer mechanism. We’ll also get potential network addresses, known as candidates, for the app’s host.
This local data then needs to be shared with the remote user. Following this, the steps below are executed to initiate a connection:
- The local user creates an offer which is essentially an SDP session description.
- This offer is stringified and sent over to a remote user.
- The remote user sets its remote description to the obtained offer and sends back an answer.
- The answer is used to set a remote description of the local user.
- Connection is established between the local and the remote user.
Networking information also needs to be exchanged between the two parties. The ICE framework is used to find network interfaces and ports.
As we go along with the tutorial, we’ll understand this part better.
Let’s start the process by modifying the code in the build method of the stateful widget to create a UI for the remote user.
@override
  Widget build(BuildContext context) {
    return Scaffold(
        appBar: AppBar(
          title: Text(widget.title),
        ),
        body: Column(
          children: [
            videoRenderers(),
          ],
        ));
  }
The videoRenderers() function would render the media of both the local and the remote user.
SizedBox videoRenderers() => SizedBox(
        height: 210,
        child: Row(children: [
          Flexible(
            child: Container(
              key: Key('local'),
              margin: EdgeInsets.fromLTRB(5.0, 5.0, 5.0, 5.0),
              decoration: BoxDecoration(color: Colors.black),
              child: RTCVideoView(_localVideoRenderer),
            ),
          ),
          Flexible(
            child: Container(
              key: Key('remote'),
              margin: EdgeInsets.fromLTRB(5.0, 5.0, 5.0, 5.0),
              decoration: BoxDecoration(color: Colors.black),
              child: RTCVideoView(_remoteVideoRenderer),
            ),
          ),
        ]),
      );
Initialise a _remoteVideoRenderer as we did a _localVideoRenderer.
final _remoteVideoRenderer = RTCVideoRenderer();
We also need a few local variables and TextEditingController to be used later.
final sdpController = TextEditingController();
bool _offer = false;

RTCPeerConnection? _peerConnection;
MediaStream? _localStream;
Note: The TextEditingController needs to be disposed of. Therefore we modify the dispose() of the stateful widget as:
  @override
  void dispose() async {
    await _localVideoRenderer.dispose();
    sdpController.dispose();
    super.dispose();
  }
To connect with the peer, we create a new function named _createPeerConnection(). Inside this function, we’ll first add the configuration as shown below:
Map<String, dynamic> configuration = {
      "iceServers": [
        {"url": "stun:stun.l.google.com:19302"},
      ]
    };
The configuration has the URL to the STUN server. In our example, we’ve used a free one made available by Google. You can check out a list of options for STUN servers here.
Next, we add the SDP Constraints with the mandatory offer to receive audio/video set to true.
final Map<String, dynamic> offerSdpConstraints = {
      "mandatory": {
        "OfferToReceiveAudio": true,
        "OfferToReceiveVideo": true,
      },
      "optional": [],
    };
We need to create a late variable named _localStream of type MediaStream inside our widget.
late MediaStream _localStream;
Set this to the _getUserMedia() function we had created earlier.
_localStream = await _getUserMedia();
With that done, we create an RTC peer connection with the configuration and SDP constraints as parameters and then add the local stream.
    RTCPeerConnection pc =
        await createPeerConnection(configuration, offerSdpConstraints);

    pc.addStream(_localStream);

    pc.onIceCandidate = (e) {
      if (e.candidate != null) {
        print(json.encode({
          'candidate': e.candidate,
          'sdpMid': e.sdpMid,
          'sdpMlineIndex': e.sdpMLineIndex
        }));
      }
    };

    pc.onIceConnectionState = (e) {
      print(e);
    };

    pc.onAddStream = (stream) {
      print('addStream: ' + stream.id);
      _remoteVideoRenderer.srcObject = stream;
    };

 return pc;
Lastly, we set the remoteVideoRenderer source object to the stream obtained and return pc.
Moving ahead, we make a createOffer function to generate an offer and set the local description to it.
  void _createOffer() async {
    RTCSessionDescription description =
        await _peerConnection!.createOffer({'offerToReceiveVideo': 1});
    var session = parse(description.sdp.toString());
    print(json.encode(session));
    _offer = true;

    _peerConnection!.setLocalDescription(description);
  }
Also, we create a createAnswer function.
  void _createAnswer() async {
    RTCSessionDescription description =
        await _peerConnection!.createAnswer({'offerToReceiveVideo': 1});

    var session = parse(description.sdp.toString());
    print(json.encode(session));

    _peerConnection!.setLocalDescription(description);
  }
We add the function to set a remote description and add a candidate.
  void _setRemoteDescription() async {
    String jsonString = sdpController.text;
    dynamic session = await jsonDecode('$jsonString');

    String sdp = write(session, null);

    RTCSessionDescription description =
        new RTCSessionDescription(sdp, _offer ? 'answer' : 'offer');
    print(description.toMap());

    await _peerConnection!.setRemoteDescription(description);
  }

  void _addCandidate() async {
    String jsonString = sdpController.text;
    dynamic session = await jsonDecode('$jsonString');
    print(session['candidate']);
    dynamic candidate = new RTCIceCandidate(
        session['candidate'], session['sdpMid'], session['sdpMlineIndex']);
    await _peerConnection!.addCandidate(candidate);
  }
The only thing left now is to create a user interface to call the above functions. We make a basic layout using a Row and a Column to arrange a TextField for input and buttons to call functions.
Modify the build function as shown below:
@override
  Widget build(BuildContext context) {
    return Scaffold(
        appBar: AppBar(
          title: Text(widget.title),
        ),
        body: Column(
          children: [
            videoRenderers(),
            Row(
              children: [
                Padding(
                  padding: const EdgeInsets.all(16.0),
                  child: SizedBox(
                    width: MediaQuery.of(context).size.width * 0.5,
                    child: TextField(
                      controller: sdpController,
                      keyboardType: TextInputType.multiline,
                      maxLines: 4,
                      maxLength: TextField.noMaxLength,
                    ),
                  ),
                ),
                Column(
                  crossAxisAlignment: CrossAxisAlignment.center,
                  children: [
                    ElevatedButton(
                      onPressed: _createOffer,
                      child: const Text("Offer"),
                    ),
                    const SizedBox(
                      height: 10,
                    ),
                    ElevatedButton(
                      onPressed: _createAnswer,
                      child: const Text("Answer"),
                    ),
                    const SizedBox(
                      height: 10,
                    ),
                    ElevatedButton(
                      onPressed: _setRemoteDescription,
                      child: const Text("Set Remote Description"),
                    ),
                    const SizedBox(
                      height: 10,
                    ),
                    ElevatedButton(
                      onPressed: _addCandidate,
                      child: const Text("Set Candidate"),
                    ),
                  ],
                )
              ],
            ),
          ],
        ));
  }
You’ll notice we have created elevated buttons to generate an offer, answer, set remote description, and set candidate.
Final Flutter WebRTC Project Demo
Now, we can go ahead and test our app features.
Refer to the complete code here.
Run the Flutter project. It should show up as seen below:
We can copy the URL and paste it into a new browser window to create two peers.

Click on the ‘Offer’ button in window 1 to generate an offer. This should output the offer to the console accessible using developer tools on Chrome.

Copy-paste this offer into the TextField of window 2 and click on the ‘Set Remote Description’ button. That should set the remote description by calling the underlying function.
Now, click on ‘Answer’ to generate an answer and copy-paste it in the TextField of window 1.

Lastly, copy a candidate from window 2, paste it in the window 1 TextField, and click on the ‘Set Candidate’ button.

This should create the WebRTC connection, and the remote video should show up as seen below:
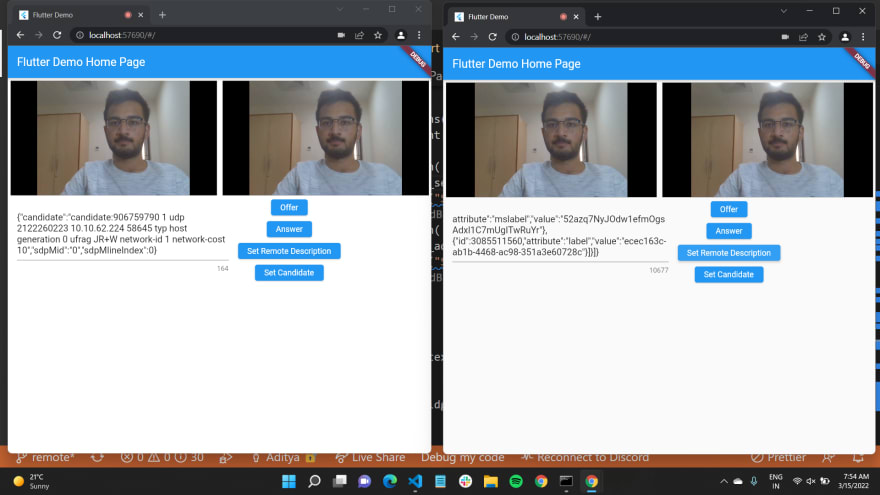
And, that’s it. We have successfully created an application using the WebRTC plugin for Flutter. As you can see, the process of setting up a Flutter WebRTC app may seem a little complicated, but once you get the hang of it, it’s not too difficult to accomplish.
Using a Signaling Server
You must’ve noticed we had to manually copy and paste the offer and answer in the app. Alternatively, you can use a Signaling Server to help communicate between the parties and establish a connection.
A signaling server helps coordinate communication by exchanging information. WebRTC needs some exchange of information for clients to set up calls. Signaling allows clients to pass messages between each other.
The exchanged information is then used to overcome challenges in communication. WebRTC uses the ICE Framework to cope with NATs and firewalls, but the information of candidates, the offer, and the answer need to be exchanged via signaling.
For our example, we demonstrated a simple Flutter app using a free STUN Server and manual signaling by copying-pasting the offer, answer, and a candidate. In production, you may want to set up your own Flutter WebRTC servers, but scaling and maintaining them can get tedious really fast.
As a developer, I would not want to deal with the intricacies of server-side code. It’s extra effort, and I’d rather focus on what I do best - building UIs with Flutter and providing my users with a better experience. That is what 100ms helps me with.
Integrate WebRTC with Flutter via 100ms
100ms makes it really easy to integrate audio/video into my Flutter app without sacrificing the customization that’d I have with WebRTC. I can continue building my apps without worrying about scalability or having to set up or manage servers of my own.
The 100ms SDK helps make app development more efficient and requires far less coding effort than usual. If you’re curious, use the 100ms plugin instead of the Flutter WebRTC plugin, and you’ll see how it makes your life easier.
Or, you could also try this quickstart guide on creating a Demo Flutter Project with the 100ms SDK.

Top comments (0)