
Deploying an application is never easy! If you’ve ever tried it for yourself, you know things actually never come as simple and easy as it may sound on paper.
It’s also quite common that only one person, or a small team, is responsible for deployment, making this a stricter knowdlege that teams fail to share among it’s peers, leading to some unexpected application behavior, as the dev team didn’t prepare the code for deployment, or because the ops team didn’t know a feature would impose deployment restrictions.
TL;DR 📄
A reverse proxy helps offloading responsabilities from the main server while using a simple abstraction.
- Simple Abstraction. The reverse proxy abstraction is conceptually easy to understand and execute, requiring little effort for being adopted on existing web based systems.
- Battle-tested. You probably already use a reverse proxy for common operations, such as globally distributed content delivery and communication encryption.
- Deal with differences. At the architecture level, different applications may behave like a single unit for the end user, providing flexibility for teams to test different solutions.
One neat trick we’ve been using here at ZRP is to put most of the strangeness of application behavior behind a predictable configurable layer. This is what we call a reverse proxy server. There are different kinds of servers that behave like proxies, so this article explains what is a reverse proxy, why it exists, it’s usefulness and how to deploy a single page application written on Angular using the concepts we will estabilish.
So what is a reverse proxy and how we might use this concept on our infrastructure?
What is a reverse proxy?
Reverse proxy is a computer networks technique that masks your resource server, a single page application, an API, a traditional web app, with an intermediary, known as the proxy server, so when a user requests a specific resource, e.g. an image located at /assets/images/logo.png, the proxy server calls the resource server and serves the content as if the content was originated from the proxy server itself.
The main difference here is that the proxy is not configured on the client, therefore the “reverse”. The principles are the same regarding forward proxy, it helps the proxied location, client or server, to conceal their location and other critical information that we may want to hidden from attackers or untrusted traffic while applying different rules to the traffic.
This technique also provides a way for your infrastructure to decouple your application and static assets from the proxied server, responsible for distributing the content or implementing your business logic. It allows application servers to mainly focus on a single task, delegating important activities to the proxy server, like authentication, compression, load balancing and security when the proxied server does not have the requirements to do so, shielding it from the outside world.
Although application servers nowadays usually have handled all of the activities above, out of the box, or through simple extensions, this doesn’t mean we can’t use a proxy server. Another benefit of using a proxy server is the reduced computational cost of common server-side operations on the application server. Take compression, for example, which may take a while on your application due to the nature of compression algorithms that are usually CPU bounded. By delegating the operation to the proxy server you can free your application resources faster, reducing the memory footprint and the allocated CPU resources, thus improving the end-user experience with a faster response and reducing your computational cost.
Use cases and benefits of reverse proxy
Reverse proxies may be used in a variety of contexts, but they are mainly used to hide the existence of an origin server or servers, while hiding some characteristics that may be undesirable to be public available. Some use cases are:
- Conceal the Existence of a Server: Using a reverse proxy you can hide an application server on a private network.
- Decoupling: Using a reverse proxy you can decouple your application into multiple systems, following a service-oriented architecture (SOA), the conciliation process happens on the proxy server, that can forward requests to the correct application.
- Traffic Control: A reverse proxy allows you to build a Web Application Firewall (WAF) between the proxy server and the application server, allowing us to control which traffic can go in and out from the application server, which can mitigate common attacks like CSRF and XSS.
- SSL/TLS Encryption: Using a reverse proxy you can delegate the encryption to a single server, offloading the task to the proxy server. This is particularly useful on container environments, where the application services receive incoming traffic from the proxy server without any encryption, but clients send data encrypted over the wire to the proxy server.
- Load Balancing: Using a reverse proxy enables you to distribute and manage traffic to multiple application servers, which is good both for availability and scalability, while also enabling blue / green deployments with ease.
- Compression: Using a reverse proxy enables your application server to return plain-text results, delegating compression to the proxy server. The compression greatly reduces the payload size, giving end-users better load-times and responsiveness. Also, by delegating the task to the proxy server you effectively reduce the load on your application server because compression algorithms are usually CPU bounded.
- Reducing Application Server Load: Using a reverse proxy we can effectively reduce the load on the application server for dynamically generated content by rapidly processing the request on the server and thus delegating the transmission of data over the network to the proxy server, releasing threads from the application server for new incoming requests. This technique, also known as spoon feed, helps popular websites to process all incoming traffic while reducing server overload.
- A/B Testing: Using a reverse proxy we can distribute content from different sources without the client even noticing. This allows us to distribute a different version of the same page, for example, and measure how well they perform over-time.
- IP Conciliation: Using a reverse proxy we can conciliate applications that make one system, but lives on different addresses, to a single address. For example, your new company institutional page could be a static website, and your blog could be powered by WordPress, and you want to allow users to navigate between the two as if they were in the same ecosystem. Using a reverse proxy, you can achieve this without the user ever noticing.
- Authentication: Using a reverse proxy we can add some basic HTTP authentication to an application server that has none, protecting resources from unwanted users.
- Caching: Using a reverse proxy you can cache resources from the application server, thus offloading the server. The proxy is responsible for serving the content to end-users, releasing resources to process important requests that the proxy server could not handle by itself.
- Geographically Reduced Latency: Using a reverse proxy you can delegate incoming requests to the nearest server, reducing the latency to the end-user.
- Geographically Dynamic Content: Using a reverse proxy you can distribute content based on the user’s current location (location accuracy may be limited), which allows websites to be automatically translated and display different content. It’s also an important point since regulations may be different depending on the users location. This is now a very hot subject because of the recent GDPR movements and in Brazil our own regulatory policy called LGPD.
Deployment and Configuration
Now that we’ve listed the main use cases for reverse proxy, let’s deploy a very simple Angular application using Amazon S3 and Amazon CloudFront.
First of all, we must create our Angular App. In these initial steps we will install the @angular/cli package using NPM and create our awesome project, change directory to our project and run it to check if everything is fine.
npm install --global @angular/cli
ng new reverse-proxy-demo --defaults

cd ./reverse-proxy-demo
npx ng serve
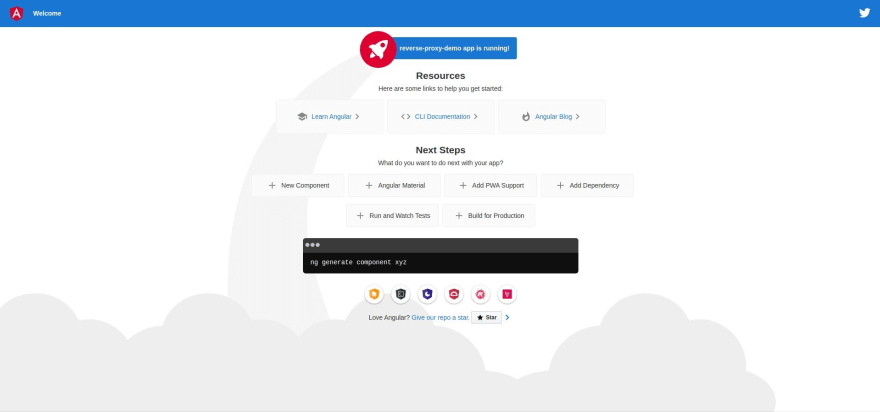
After a few moments our app should have successfully compiled and be available at http://localhost:4200, and we’re ready to deploy our app;
First we need a place to store our static assets like images, fonts, style sheets and JavaScript code into the cloud, so we can start serving our SPA to our users. To do it we will be using Amazon S3 through the AWS CLI. For instructions on how to install the AWS CLI click here.
S3 is an object storage service provided by AWS that has a decent service-level agreement (SLA) and costs very little per GB of data. S3 also charges users for requests and transfers, which we should take into account when deploying a static website, though for the average website this cost can be neglected. For a more detailed overview into their pricing model you can click here.
Before we upload our assets, let’s create a bucket. Bucket names are globally unique, so define a name for your bucket and also where do you want to have it created. My bucket name is zrp-tech-reverse-proxy-demo and I created a bucket in N. Virginia (us-east-1). We’ve also set our access control list (ACL) to private, which is not recommended anymore, but it will be enough in our use case. A private ACL on bucket creation basically makes all objects private, so we will be unable to download them directly from S3. In the terminal, type the following:
aws s3api create-bucket \
          --bucket <YOUR_BUCKET_NAME> \
          --acl private \
          --region <YOUR_AWS_REGION>
Now that our bucket is ready, let’s compile our app and upload it to our freshly created bucket. To do so we must run the build procedure from the Angular CLI, which will output our 3rd party licenses, our index.html file, our application code and our application styles, alongside the angular runtime and polyfills for older browsers. Let’s compile our application.
# Build the application
npx ng build --prod

# You can check the results listing the dist/<APP_NAME> contents
ls -als ./dist/reverse-proxy-demo

# We can also test locally using http-server
# and opening localhost:8080
npx http-server dist/reverse-proxy-demo

After we’ve builded our application, we can sync it with our S3 bucket. We can already leverage HTTP Caching by setting, alongside every file, a Cache-Control metadata key with a max-age value. We will use 86400 seconds as our max-age value, which translates to 24 hours.
# Upload the dist/reverse-proxy-demo folder to
# an app folder inside the bucket
aws s3 sync \
       ./dist/reverse-proxy-demo s3://<YOUR_BUCKET_NAME>/ \
       --cache-control max-age=86400

# We can then list the uploaded files
aws s3 ls s3://<YOUR_BUCKET_NAME>/

# We can try to download our file, but it will return 403
# Because our ACL was set to private by default
curl -v https://<YOUR_BUCKET_NAME>.s3.amazonaws.com/index.html

# We could actually presign the file for
# a minute and enable access to it.
# This will return a 200 status code
curl -v $(aws s3 presign s3://<YOUR_BUCKET_NAME>/index.html --expires-in 60)
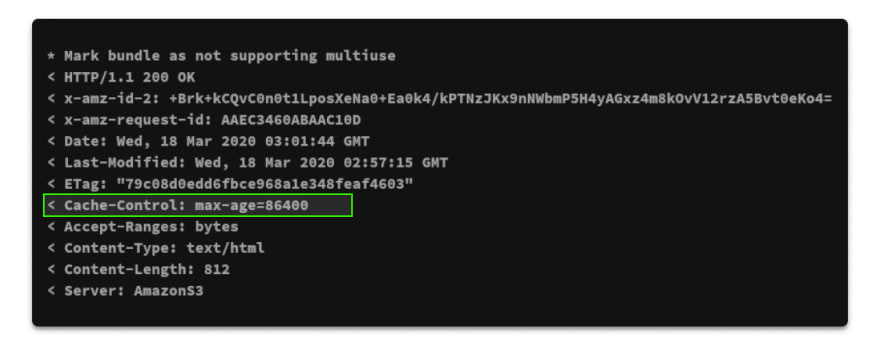
If you pay attention to the last request to the presigned url, using the verbose flag, you should notice that our Cache-Control header correctly returns, as expected.
Now that our files are uploaded, we will create our reverse proxy using AWS CloudFront. To do this, we will use the AWS Web Interface. On the CloudFront Console click “Create Distribution” and in web click “Get Started”, this will redirect us to a form where we can configure our reverse proxy;
From there first let’s setup our origin. Our origin will be our proxied server, in this particular case, Amazon S3, which follows the format <YOUR_BUCKET_NAME>.s3.amazonaws.com.
We also need to specify the path from our origin from which the resources may be loaded, the origin path field, in our case /, so we leave it blank. Our Origin ID is an arbitrary string to identify the proxied server. A reverse proxy can hide many servers, so we could have an arbitrary number of origins configured. In this case we will call it Angular App.
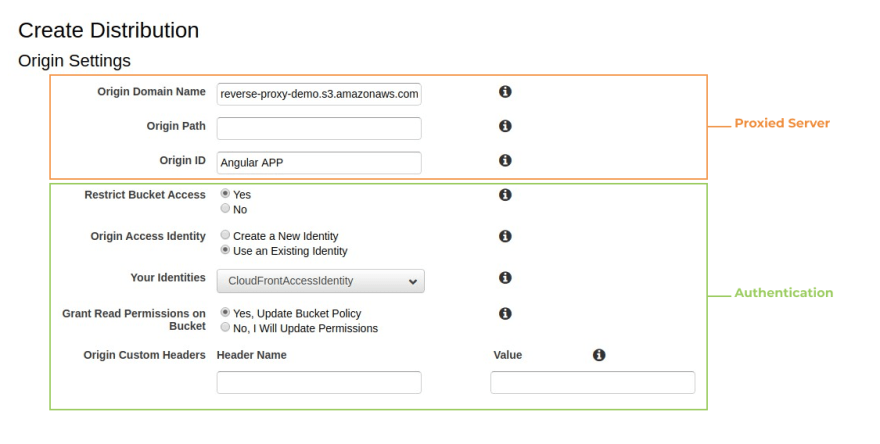
To ensure that the bucket contents will only be served through CloudFront, we can restrict the bucket access. This will automatically create an AWS Policy for our bucket, allowing our principal, the CloudFront Distribution, to read data from the bucket, but denying the possibility for third parties to directly read the bucket contents (Our use case for Authentication). To do so, set “Restrict Bucket Access” to “Yes”, Origin Access Identity to “Create a New Identity”, Comment to “CloudFrontAccessIdentity” and “Grant Read Permissions on Bucket” to “Yes, Update Bucket Policy”, which will automatically update the bucket policy to enforce our security policy. When using an origin different than S3, for example, an API that requires a X-Api-Key header, we could provide Origin Custom Headers, but we will not use this option for now.

Now we must configure our default cache behavior. The default cache behavior is applied to all objects served by our reverse proxy. After we create the distribution, we can provide different behaviors for different objects, e.g. we want images to be cached for extended periods of time, but we will not do it here because we want to apply the same policy for all static assets generated by our application (enforcing our Caching use case). We can also compress objects (enforcing our Compression use case), so content will be digested directly from S3 without compression, but served compressed for clients.
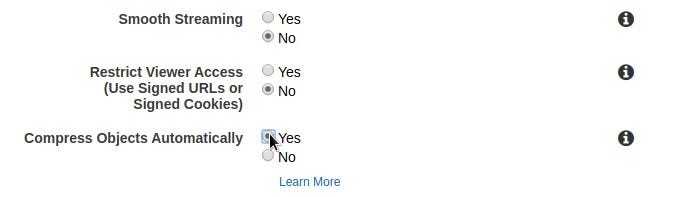
We can configure our CloudFront Distribution to only serve assets through HTTPS (enforcing our SSL/TLS Encryption policy), redirecting HTTP content to HTTPS. We can also only allow methods like GET and HEAD, since we just want to serve the content, not perform any kind of server side operation on the proxied server. Another interesting option is to define how Object Caching within the proxy server is performed. We will use the incoming Cache-Control header from the proxied server. We will not forward cookies, neither the query string.
Now we can finally launch our Cloudfront Distribution. The distribution settings are not important in the scope of this article, but you can set different regional placements for your distribution (our use case of Geographically Reduced Latency), SSL/TLS version restrictions, HTTP2 and IPv6 support. You should definitely check it out.
For now, the only parameter we should set in this particular case is the Default Root Object. The default root object is the object returned by the Cloudfront Distribution if no object is specified in the request, therefore, in the request path. In our case, our application must serve the index.html file, and so our default root object is index.html. Now just click Create Distribution and wait a few minutes.

Testing
Now that our application is deployed, we can access the distribution using the url described in the domain name, and voilá.
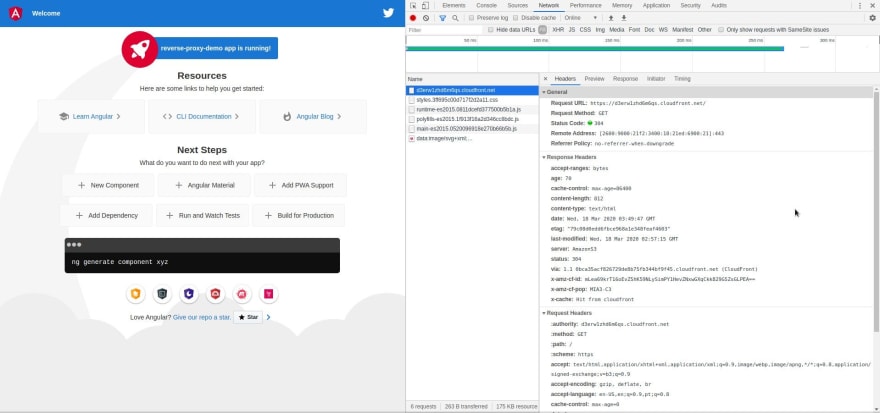
If we pay close attention to the styles.css file, we can notice the effect of our caching policy, alongside some information regarding the proxy server.
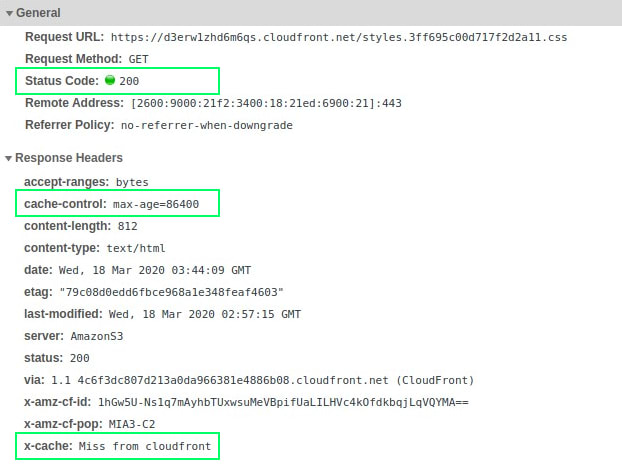
First of all, our first request had a x-cache header with Miss from cloudfront, which indicates that the requested object wasn’t cached yet on the distribution. Second, we could check that our cache-control header was correctly processed, seting our max-age to a day, and that the content returned a 200 status code, as expected. Now, if we made a second request, things start to get a little bit more interesting.
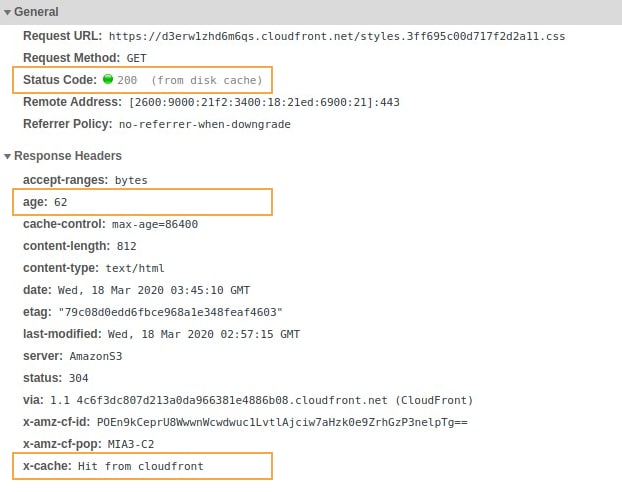
Our second request was a hit (no pun intended). Our distribution cached the content, and so did the browser. The styles.css file is loaded directly from the browser cache, and was in the proxy server for ~62 seconds. The content will be cached until the cache expires, when the browser will try to fetch the content again from the distribution.
Conclusion
So in conclusion, a reverse proxy is a powerful tool that you already (probably) use. They are easy to configure and can take away much of the pain from your application.
Nowadays most of the reverse proxy technology is based on software and runs on commodity hardware. Also, there are a lot of cloud providers in the market offering solutions based on this concept, so you should check them out to see the benefits and costs associated with each implementation.
It’s easier than ever to find a solution that fits your problem, so try a lot before you try to tape every piece of your deployment together.
If you have any questions, feel free to contact me at any time.
I hope you liked this introduction, until next time. 🚀


Top comments (0)