
Just recently I've discovered TensorFlow Lite and how machine learning models can be deployed directly onto microcontrollers. Needless to say, I was hooked immediately, especially after I saw the getting started with machine learning on Arduino tutorial.

As I was waving my hands around and collecting the training data, I got annoyed pretty quickly of copy/pasting that data from serial output. The whole process just became tiresome. I figured, since my Arduino board already had Bluetooth module, I could use it to send those training samples somewhere. And this is where Web Bluetooth came into play.
Web Bluetooth you say? 🤔
When we're talking about the Bluetooth itself, every device can be one of the following:
- Central device - a device that can initiate communication and can only talk to peripherals, but it can't connect to nor talk to other central devices
- Peripheral device - a device that can't initiate communication and can only talk to one central device at a time, but it can't talk to other peripheral devices
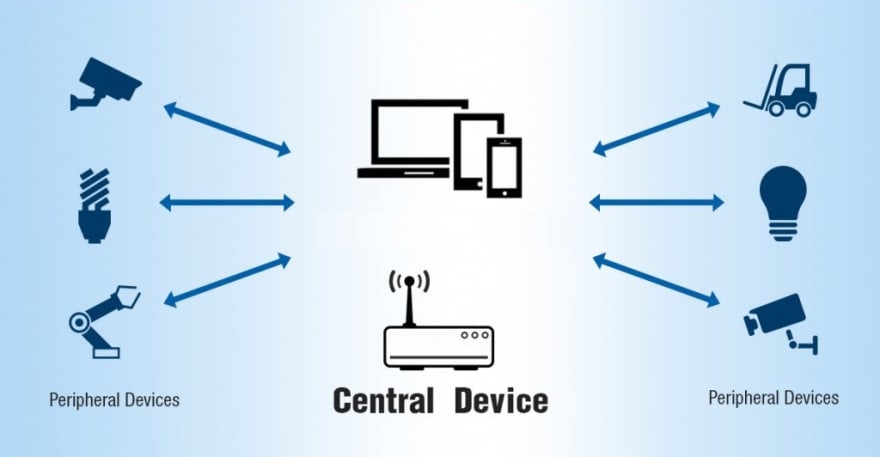
Web Bluetooth is a part of Bluetooth specification, called General Attribute Profile (GATT). In that context, the central device becomes a client (Web app) and the peripheral device becomes a server (Arduino). That may sound a bit weird, but it kinda makes sense and here's why.
Every server can offer different kinds of services. In this case, Arduino can offer services of providing acceleration data, gyroscope data, gesture data, etc. The client then connects to the server and retrieves data from those services. So, our web app initiates the connection, connects to Arduino and subscribes to services to retrieve e.g. acceleration data. It seems simple enough. 🤷♀️
So we have a server, which can provide one or more services. Some of them are officially defined by the standard, but you can also define your own. Each service then can provide one or more characteristics. Each characteristic then has a value, which can be written or read. To put that into the context of the code, you can think of the server being an array of objects, which are services. Every object has some properties, which are characteristics and every property has values, which are arrays of bytes.
Each service and characteristic is defined by a unique UUID or a service name and in order to connect to the device and it's services, we need to know those.
Currently, Web Bluetooth is fully supported only in Chrome and Opera.
Figuring out the server part 🧮
This part consists of writing the code for Arduino, to provide Bluetooth services and characteristics on the device. I won't go into detail about how that's implemented, but for the reference you can have a look at this sketch I've created, for sending acceleration and gyroscope data via Bluetooth.
The following information can be extracted from the sketch, which will be needed in order for us to connect to this device and retrieve acceleration and gyroscope data:
- Service UUID:
992c0325-0000-4e93-9659-e66dd8104f31 - Acceleration characteristic UUID:
992c0325-2001-4e93-9659-e66dd8104f31 - Gyroscope characteristic UUID:
992c0325-2002-4e93-9659-e66dd8104f31 - Data type sent for each acceleration/gyroscope sample: 3 floats
- Format of that data for each acceleration/gyroscope sample:
[xValue, yValue, zValue]
Let's get that data 📈
Alright, now that we got that, we can jump into writing code to get those training samples.
First, we'll need to connect our app to a device. Since we know the UUID of our service, we set the filter to find only that device:
const device = await navigator.bluetooth.requestDevice({
  filters: [{
    services: ['992c0325-0000-4e93-9659-e66dd8104f31'],
  }],
});
You can also search by other filters, e.g. name of the device or without any filter at all.
When this is called, a window pops up with the list of devices that correspond to the given filter. Now, this part is completely manual and requires user interaction. From the privacy and security point of view, this is essential and gives a user full control over whether the web app is allowed to connect and to which devices it's allowed to connect.

After device is selected, we can connect to the server:
const server = await device.gatt.connect();
And then connect to the service we want to use:
const bleService = await server.getPrimaryService('992c0325-0000-4e93-9659-e66dd8104f31');
Here is an example of that function.
Now that we have the service, we can subscribe to characteristicvaluechanged event on characteristics and get notified every time new data is being sent:
// Acceleration
let characteristic = await bleService.getCharacteristic('992c0325-2001-4e93-9659-e66dd8104f31');
characteristic.addEventListener('characteristicvaluechanged', (event) => {
  const receivedData = event.target.value;
  // Read sensor output value
  // Float32 has 4 bytes so the offset for each next value is +4
  // true => Little Endian
  aX = receivedData.getFloat32(0, true);
  aY = receivedData.getFloat32(4, true);
  aZ = receivedData.getFloat32(8, true);

  // Do something with data
  console.log('Acceleration: ', aX, aY, aZ);
});
await characteristic.startNotifications();

// Gyroscope
characteristic = await bleService.getCharacteristic('992c0325-2002-4e93-9659-e66dd8104f31');
characteristic.addEventListener('characteristicvaluechanged', (event) => {
  const receivedData = event.target.value;
  gX = receivedData.getFloat32(0, true);
  gY = receivedData.getFloat32(4, true);
  gZ = receivedData.getFloat32(8, true);

  // Do something with data
  console.log('Gyroscope: ', gX, gY, gZ);
});
await characteristic.startNotifications();
The recievedData in both cases is an array of bytes. But we know that we're sending 3 floats, so we can get the data by calling getFloat32 with the corresponding offset for each value.
Great, that's it! We've connected to our device, got our acceleration and gyroscope characteristics and subscribed to get notifications when new data is sent for each.
Now action 🎬
Coming back to the motivation for doing this, for that I've made a simple BLE Sample Collector app in React, to visualize received data and make it downloadable in CSV format.
To initiate the connection and retrieve the service, I've used an async callback, which is triggered by button click in this component.
After that, I have acceleration and gyroscope components individually subscribing to their corresponding characteristics, upon their first render, to retrieve data and visualize it. Here's an example of the component.
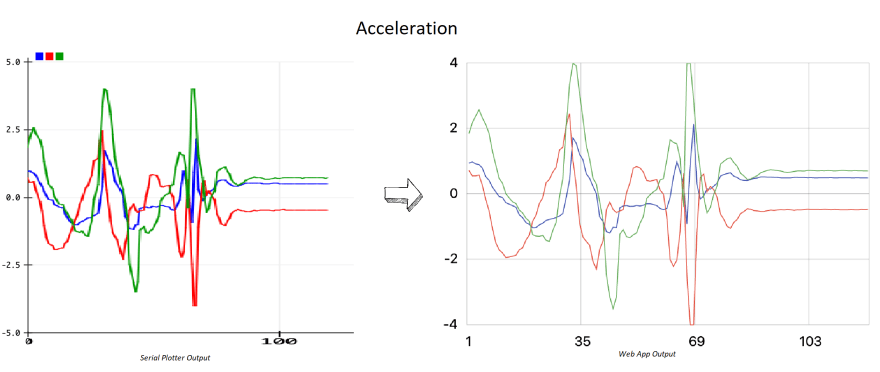
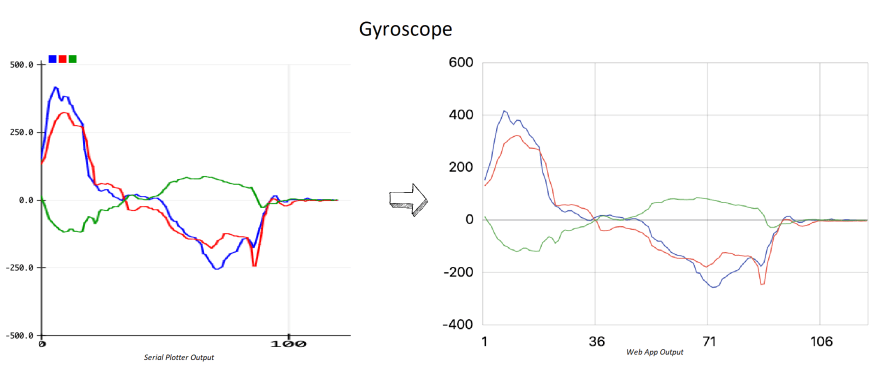
And here are results of the acceleration and gyroscope from the Arduino serial plotter and the web app:
Final thoughts ⚖️
All training samples are now just one click away, which is exactly what I wanted! 🎉
When you're writing both server and client-side code, you have the freedom of defining your own protocol and format of sending data between them. One thing to bear in mind with this is that we can only send up to 512 bytes at once. If more is needed to be sent, the data should be separated and sent in smaller chunks.


Latest comments (0)