
This is part three in my “Functionality in Under 60 Seconds” blog series. These walkthroughs are meant to highlight how easy it is to add interactivity and functionality to ZingGrid data grids and tables.
Watch the short video below to see how easy it is to add videos to ZingGrid data grids, or scroll further to read a short summary covering the basics.
The first thing you’ll want to do is follow this checklist to make sure you’ve set up ZingGrid properly in preparation for implementing this feature:
- Make sure the videos you want to embed are already hosted online, and that you have permission to use them
- Update your JSON dataset to include the URLs to the videos you'd like to embed. Make sure to include the video embed URL in your dataset, not the direct video URL.
- Make sure you've set up a basic grid by referencing the ZingGrid library in your development environment using either the CDN or self-hosted options
As a quick refresher, if you're using ZingGrid in a basic HTML page, this is what your code should look like before starting this tutorial:
<!DOCTYPE html>
<html>
    <head>
        <meta charset="utf-8">
        <title></title>
        <script src="https://cdn.zinggrid.com/zinggrid.min.js" defer></script>
    </head>
    <body>
        <zing-grid></zing-grid>
    </body>
</html>
From here, it's just a matter of adding your data to your grid, and adding columns so you can specify the column type for your embedded media.
Embedding Videos in Under a Minute
Let's say you have a basic dataset featuring videos of classical musical compositions dedicated to each planet in our solar system. This dataset will yield two columns of data when rendered in ZingGrid, the last of which contains videos.
As I mentioned at the beginning of this post, it's important that you use the embed URL for videos, as opposed to the direct URL. In the case of YouTube videos, this is what the difference between those two types of URLs looks like:
Embed URL: https://www.youtube.com/embed/RkiiAloL6aE
Direct URL: https://www.youtube.com/watch?v=RkiiAloL6aE
Your JSON dataset will probably look something like this once you've added your video URLs to it:
[
    {
        "planet": "Mercury",
        "video": "https://www.youtube.com/embed/RkiiAloL6aE"
    },
    {
        "planet": "Venus",
        "video": "https://www.youtube.com/embed/EE6_PacCnRw"
    },
    {
        "planet": "Earth",
        "video": "https://www.youtube.com/embed/MbHQ6eWANIo"
    },
    {
        "planet": "Mars",
        "video": "https://www.youtube.com/embed/Jmk5frp6-3Q"
    },
    {
        "planet": "Jupiter",
        "video": "https://www.youtube.com/embed/Gu77Vtja30c"
    },
    {
        "planet": "Saturn",
        "video": "https://www.youtube.com/embed/MO5sB56rfzA"
    },
    {
        "planet": "Uranus",
        "video": "https://www.youtube.com/embed/aDFGmiXnLjU"
    },
    {
        "planet": "Neptune",
        "video": "https://www.youtube.com/embed/v4wuV14QlNM"
    },
    {
        "planet": "Pluto",
        "video": "https://www.youtube.com/embed/N_v8G0fo4Ws"
    }
]
This is what your code would look like if you were to add this data inline to your grid:
<!DOCTYPE html>
<html>
    <head>
    <meta charset="utf-8">
        <title></title>
        <script src="https://cdn.zinggrid.com/zinggrid.min.js" defer></script>
    </head>
    <body>
        <zing-grid
        data='[
    {
        "planet": "Mercury",
        "video": "https://www.youtube.com/embed/RkiiAloL6aE"
    },
    {
        "planet": "Venus",
        "video": "https://www.youtube.com/embed/EE6_PacCnRw"
    },
    {
        "planet": "Earth",
        "video": "https://www.youtube.com/embed/MbHQ6eWANIo"
    },
    {
        "planet": "Mars",
        "video": "https://www.youtube.com/embed/Jmk5frp6-3Q"
    },
    {
        "planet": "Jupiter",
        "video": "https://www.youtube.com/embed/Gu77Vtja30c"
    },
    {
        "planet": "Saturn",
        "video": "https://www.youtube.com/embed/MO5sB56rfzA"
    },
    {
        "planet": "Uranus",
        "video": "https://www.youtube.com/embed/aDFGmiXnLjU"
    },
    {
        "planet": "Neptune",
        "video": "https://www.youtube.com/embed/v4wuV14QlNM"
    },
    {
        "planet": "Pluto",
        "video": "https://www.youtube.com/embed/N_v8G0fo4Ws"
    }
]'>
        </zing-grid>
    </body>
</html>
At this point, your grid should look something like this when rendered – but don't worry, it's not a mistake:
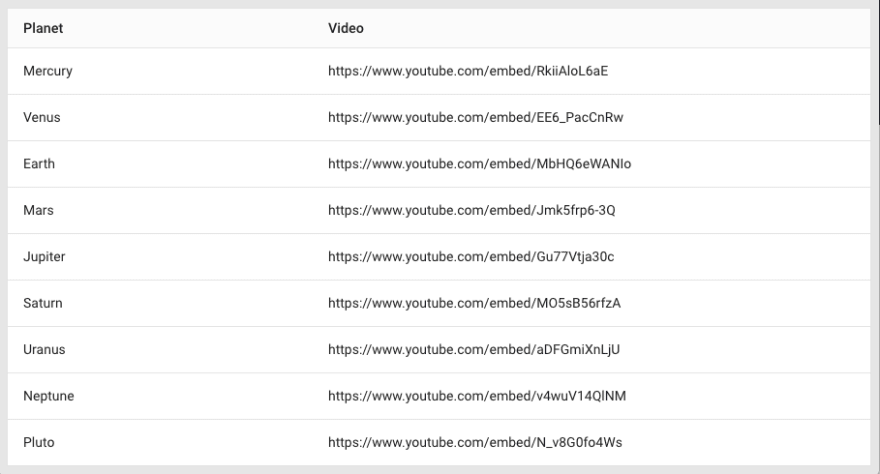
To render the last column in your dataset as a video instead of a string containing the video URL, you'll need to manually specify the columns in your grid so you can change the last column's column type.
To do this, add two <zg-column></zg-column> tags inside the <zing-grid></zing-grid> tag – one for each unique key in your JSON data. In our case, our sample dataset has two unique JSON keys, so we'll add two <zg-column></zg-column> tags inside the <zing-grid></zing-grid> tag.
Within each set of <zg-column></zg-column> tags, we'll add index="" and fill in each JSON key name in the order we'd like the columns to appear. In the zg-column tag for video, we'll add the type="" attribute with a value of iframe to specify that the column should render iframe content instead of strings of text.
If you're using the sample data from this tutorial, your column tags should look like this:
<zg-colgroup>
    <zg-column index="planet"></zg-column>
    <zg-column index="photo" type="iframe"></zg-column>
</zg-colgroup>
You don't need to specify the column type for the planet column because ZingGrid's default column type is set to text.
If you're following along, your code should look like this (focus on the code below the inline data):
<!DOCTYPE html>
 <html>
  <head>
   <meta charset="utf-8">
   <title></title>
   <script src="https://cdn.zinggrid.com/zinggrid.min.js" defer></script>
  </head>
  <body>
   <zing-grid
     data='[
      {
      "planet": "Mercury",
      "video": "https://www.youtube.com/embed/RkiiAloL6aE"
     },
     {
      "planet": "Venus",
      "video": "https://www.youtube.com/embed/EE6_PacCnRw"
     },
     {
      "planet": "Earth",
      "video": "https://www.youtube.com/embed/MbHQ6eWANIo"
     },
     {
      "planet": "Mars",
      "video": "https://www.youtube.com/embed/Jmk5frp6-3Q"
     },
     {
      "planet": "Jupiter",
      "video": "https://www.youtube.com/embed/Gu77Vtja30c"
     },
     {
      "planet": "Saturn",
      "video": "https://www.youtube.com/embed/MO5sB56rfzA"
     },
     {
      "planet": "Uranus",
      "video": "https://www.youtube.com/embed/aDFGmiXnLjU"
     },
     {
      "planet": "Neptune",
      "video": "https://www.youtube.com/embed/v4wuV14QlNM"
     },
     {
      "planet": "Pluto",
      "video": "https://www.youtube.com/embed/N_v8G0fo4Ws"
     }
    ]'>
    <zg-colgroup>
     <zg-column index="planet"></zg-column>
     <zg-column index="video" type="iframe"></zg-column>
    </zg-colgroup>
   </zing-grid>
  </body>
 </html>
That's all you need to do to render videos in your ZingGrid data grid! The above code will yield the following result.
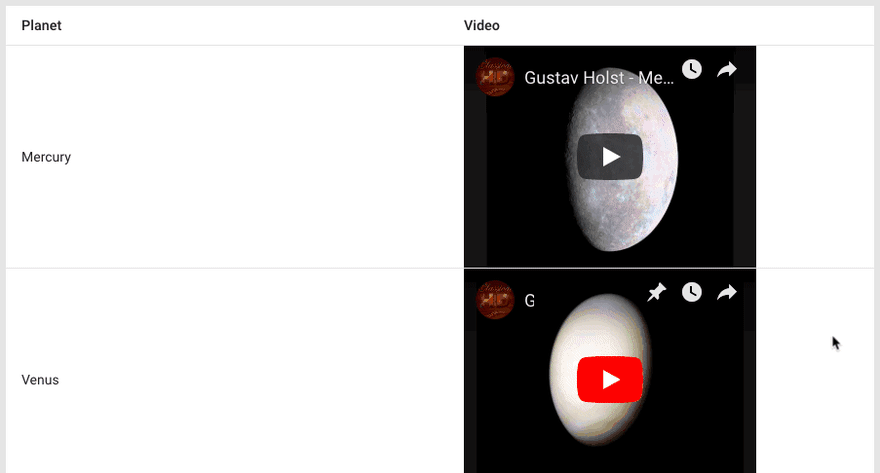
And those are the basics of adding video embeds in your ZingGrid data tables & grids. View the live demo in our Studio playground to see how it works, and to play around with the final result.


Oldest comments (0)