Here is a full info page with code and ZIP file:
Interactive Animation
And a full article on Medium:
What is an Interactive Animation and how to make one
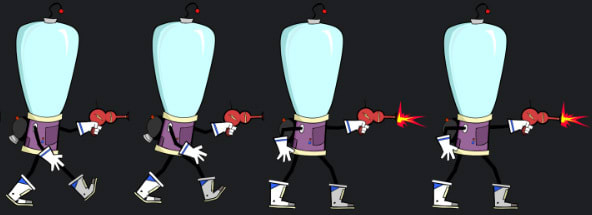
SPRITES
Image animations can be made with Sprites. A Sprite is created using a SpriteSheet which is an image that holds pictures of all the frames. Animators make animations and can export the images. These can then be packed onto a SpriteSheet using a tool such as TexturePacker. Here is a FREE VERSION.
We use the ZIM JavaScript Canvas Framework to show the Sprite. Here is some sample code to add a Sprite to an HTML page:
<html>
<head>
<title>Sprite on Canvas</title>

<script type=module>

import zim from "https://zimjs.org/cdn/01/zim";

// files from TexturePacker have been put in an assets/ folder
const assets = ["drabstract.png", "drabstract.json"];
const path = "assets/";

// See Docs under Frame for FIT, FILL, FULL, and TAG
new Frame(FIT, 1024, 768, dark, light, ready, assets, path);
function ready() {

    new Sprite({json:"drabstract.json"})
        .center()
        .run({
            time:3.5,
            rewind:true,
            rewindWait:5,
            loop:true,
            loopWait:5
        });
}

</script>
<meta name="viewport" content="width=device-width, user-scalable=no" />
</head>
<body></body>
</html>
INTERACTIVITY
With ZIM, we can control the sprite with various events like: mousedown, mousemove, pressmove, keydown, gamestick or a change event from various components like sliders and dials.
ZIM gives us the following features that help with Interactive Animation:
- Sprite — the animation, usually runs at a specified speed
- Dynamo — makes the Sprite run at variable speeds
- Scroller — handles scrolling backgrounds
- Accelerator — runs all the animations at a percent speed
- MotionController — controls with mouse, key or gamepad
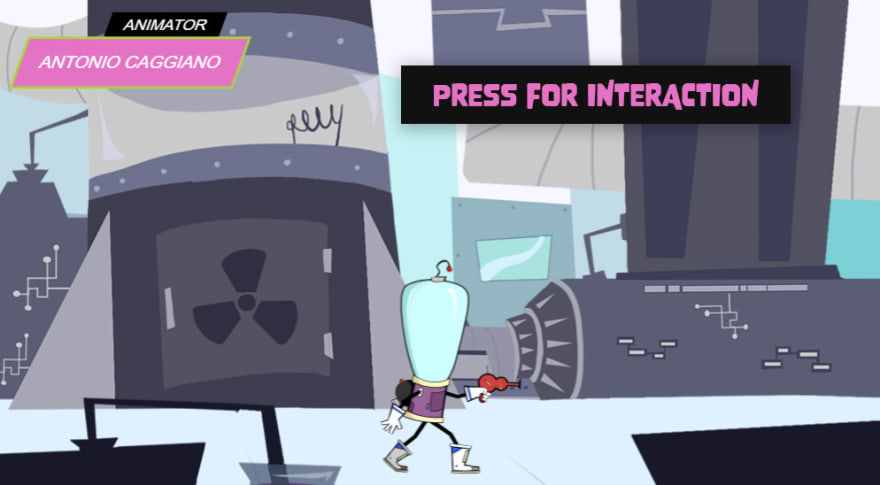
Here is an interactive animation scene that could be used in a portfolio piece or it might be a promo for a game or a little feature on the banner of a Website.
Use CTRL or ⌘ U to view the commented code. In the example:
- Moving the mouse moves the scene
- Pressing makes the space guy shoot
- Scrollers make the scene move in parallax
- A Dynamo allows the Sprite to vary speed
- An Accelerator provides percent speed
- A MotionController operates the Accelerator
- A Button toggles the background sound
Here is the code for the page with comments:
<script type=module>

import zim from "https://zimjs.org/cdn/01/zim";

// This is an array to list all the sprite, sprite data, pictures and sounds
const assets = [
    "spritesheet.png", "spritesheet.json",
    "ground.png", "foreground.png", "midground.png", "background.png",
    "shoot.mp3", "sneak.mp3"
];
const path = "assets/"; // this is the directory with all the assets

// If there are a few assets then use a Waiter() - moving dots
const progress = new Waiter({backgroundColor:blue, corner:0});

// If there are a lot of assets we might want a Progress bar - use this instead
// const progress = new ProgressBar({foregroundColor:blue});

// The first parameter is how to scale the stage into the browser window
// There is also FILL, FULL, and TAG - which would embed the animation in the HTML
// See https://zimjs.com/frame.html for more examples
// Then we have the color, outer color, the function to start the app,
// and the assets, path, and optional waiter (or progress bar)
new Frame(FIT, 1024, 618, lighter, darker, ready, assets, path, progress);
function ready() {

    // given F (Frame), S (Stage), W (width), H (height)

    // ~~~~~~~~  SPRITES  ~~~~~~~~
    // A Sprite is an animation made up of multiple pictures found in a SpriteSheet(s)
    // The Sprite images can be made in an image editor or animation software

    // SPRITE SHEETS
    // A SpriteSheet is a collection of images that make up the animation
    // We tend to use TexturePacker to pack the animation images into a SpriteSheet
    // https://www.codeandweb.com/texturepacker
    // Use the Basic Algorithm rather than MaxRects
    // TexturePacker has an "export data to CreateJS (EaselJS)" which is what ZIM is built with
    // The spritesheet.json file is an example of the output from TexturePacker
    // which tells ZIM the dimension and position of the frames on the SpriteSheet
    // We adjusted the data to include the local path: "assets/spritesheet.png"
    // We added optional custom animations to the bottom of the data
    // which have a label followed by the frame [number range] to run
    // In the code below we run() a label to animate those frames to "walk" or "shoot"
    // There are more options for animations than just frame ranges
    // see https://zimjs.com/docs.html?item=Sprite under Parameters > animations

    // DYNAMIC SPRITE CREATION
    // In this example, we control the speed of scene with the mouse position
    // We use a ZIM Dynamo to dynamically control the speed of a Sprite
    // We have backgrounds in a ZIM Scroller()
    // Each is set with a speed for parallax - distant ones slower, closer ones faster
    // We use a ZIM Accelerator to combine control of the Dynamo and the Scrollers
    // and the speed of the Accelerator is controlled by a ZIM MotionController
    // This can be set to keydown, gamestick, pressmove, mousemove, etc.

    const sprite = new Sprite({json:"spritesheet.json"})
        .centerReg() // centers on stage and also prepares it to flip about its center
        .mov(0, 110) // down is positive in Interactive Media

    // A Dynamo will allow a Sprite to run at varying speed
    // Give the dynamo a default speed and add the dynamo to the accelerator object
    // reversible would make the Sprite walk backwards with negative speed
    // we do not want that - we want to walk forwards but flip the Sprite
    // flip will automatically be true if reversible is false
    const dynamo = new Dynamo({sprite:sprite, speed:30, label:"walk", reversible:false});

    // An Accelerator will group all animations so we can control them with one percent speed
    const accelerator = new Accelerator().add(dynamo);

    // ~~~~~~~~  SCROLLERS  ~~~~~~~~
    // Scrollers animate the backgrounds
    // They add a second copy of the object being scrolled and swap them as needed
    // The second copy gets added to the scrolled object's Container as they are created
    // If the Sprite is on the stage, the copy may go overtop of the sprite
    // So we put any scrollers for objects behind the Sprite in a container behind the sprite
    // this prevents the copy from coming up above the Sprite
    // NOTE: we are adding the Scrollers to the Accelerator as well
    // so their percentSpeed will be controlled along with the Sprite's percentSpeed

    const backings = new Container(W, H).addTo(S,0); // add backings to stage at level 0
    accelerator.add([
        // a Scroller gets an image and a speed
        new Scroller(new Pic("background.png").addTo(backings), 1),
        new Scroller(new Pic("ground.png").addTo(backings).mov(0,-150), 3),
        new Scroller(new Pic("midground.png").addTo(backings), 2),
        // the foreground is in front of the Sprite, so it can just get added to the stage
        new zim.Scroller(new Pic("foreground.png").addTo().mov(0,-150), 5)
    ]);


    // ~~~~~~~~  MOTION CONTROLLER  ~~~~~~~~
    // The MotionController can alternatively use keydown, gamestick, pressmove, etc.
    // see https://zimjs.com/docs.html?item=MotionController

    const mc = new MotionController({
        target:accelerator,
        type:"mousemove",
        axis:"horizontal",
        speed:100,
        minPercentSpeed:-200,
        maxPercentSpeed:200
    })
    // MotionController would start a 0 speed if no mouse movement
    // so trick the MotionController to thing there is a value to start
    mc.x = 700;

    // ~~~~~~~~  SPRITE INTERACTION ANIMATION  ~~~~~~~~
    // We want to make the sprite shoot when we click on the stage or press the space bar
    // We will pause the Accelerator and not let them shoot again while they are currently shooting
    // We use the shooting check variable to handle this
    // See https://zimjs.com/zide for a more complex example
    // with code to make sure we go to the end of the walk cycle before we start shooting

    const shootSound = new Aud("shoot.mp3", .3); // .3 is optional volume

    // capture mousedown events on either the backings or the sprite
    backings.on("mousedown", shoot);
    sprite.on("mousedown", shoot);
    // or capture a key press on the Frame
    F.on("keydown", e => {if (e.keyCode==32) shoot();});

    let shooting = false;
    function shoot() {
        // only shoot if not shooting - the symbol for not is !
        if (!shooting) {
            shooting = true;
            accelerator.pause();
            shootSound.play();
            sprite.run({
                label:"shoot",
                time:.65,
                loop:true,
                loopCount:rand(1,3), // make sure this is non-zero - which would loop forever
                loopCall:() => { // play the sound as we loop
                    shootSound.play();
                },
                call:() => { // calls when animation done
                    shooting = false;
                    accelerator.pause(false);
                }
            });
        }
    }


    // ~~~~~~~~  CREDIT LABEL  ~~~~~~~~
    const credit = new Container()
        .loc(-500, 30)
        .animate({
            props:{x:150},
            time:.7,
            wait:1.3,
            ease:"backOut",
            rewind:true,
            rewindWait:5
        })
        .tap(() => {
            zgo("http://animation.sheridanc.on.ca/portfolio/2018/caggiano", "antonio");
        });

    STYLE = {align:CENTER, valign:CENTER, color:white};
    new Label({
        text:"ANIMATOR",
        backing:new Rectangle(130,30,"black"),
        size:18
    }).ske(20).addTo(credit).loc(40,0);
    new zim.Label({
        text:"ANTONIO CAGGIANO",
        backing:new Rectangle(250,60,pink,green,3),
        size:20
    }).ske(20).addTo(credit).loc(0,43);
    STYLE = {};


    // ~~~~~~~~  BACKGROUND SOUND  ~~~~~~~~
    // We can't play sounds until the app is interacted with (browser rule)
    // For a game we often make an intro pane they need to close to start
    // but for an animation demo we may want to start the animation
    // and provide a little sound toggle at bottom to turn the sound on

    const sound = new Aud("sneak.mp3"); // backing sound

    let backingSound;
    const toggle = new Toggle({
        label:"music",
        color:tin,
        backgroundColor:blue,
        toggleBackgroundColor:green,
        startToggled:false
    })
        .sca(.5)
        .pos(30,30,LEFT,BOTTOM)
        .change(() => {
            if (!backingSound) {
                backingSound = sound.play(.3, true); // volume and loop
            }
            backingSound.paused = !toggle.toggled;
        });
}
What you see may look like a lot of code but ZIM saves hundreds of lines of code and is actually very concise and fun to use! Here are some comparisons with other Frameworks.
We hope you have a look at the INFO SITE and the ARTICLE and are successful in making interactive animations! Please join us on SLACK or DISCORD if you have any questions.
Dr Abstract


Latest comments (0)