![Cover image for How Zenland Escrow Works [supports USDT, USDC, BUSD, DAI]](https://media.dev.to/cdn-cgi/image/width=1000,height=420,fit=cover,gravity=auto,format=auto/https%3A%2F%2Fdev-to-uploads.s3.amazonaws.com%2Fuploads%2Farticles%2F8a1k6itqwqaz1lfeyc98.jpg)
Think of selling a website, domain name, or freelance services.
Once the ad has been posted on niche forums or classified ads websites, potential buyers begin to emerge.
But your goal is to ensure secure transaction of digital goods or services sold or bought over the internet, right?
So, what do you do when you don't know the person you are dealing with? You check his/her posts, recent activity, social media accounts, reviews (if any), and sometimes location through the IP address. After all, you are trying to figure out if the person is real and can be trusted. This takes the energy and time and isn't always the most ethical thing to do in P2P trade.
Yet when the deal is risky but urgent, you may need a blockchain escrow to secure it. This is a type of escrow when the payment is sent and released from a programmable contract stored on the blockchain without a third party.
Today's post explains how one such blockchain escrow services, Zenland, works in detail. To better understand the escrow process and features, we have created a test case for you.
Blockchain Escrow Use Case [Website Ownership Transfer]
Below is one of our first use cases recorded in the Binance Smart Chain network. The current owner (the seller) is transferring a domain, hosting, website database, and the Instagram account associated with the website to a new owner (the buyer) through Zenland blockchain escrow service.
The nominal price is $1 BUSD and the service fee is $0.02.
The delivery is expected within 10 days.
The new owner has 2 days to check for any faults with the transfer and release payment from escrow contract.
It is a test case and was done for educational purposes only.
For clarity, let's say you are the current owner of the website.com (the seller).
Here's how the blockchain escrow process goes:
1. Buyer and Seller Agree on The Contract Terms.

You chat with the buyer about the deal (the price, how and when the payment is made, and how the ownership is transferred) and if the buyer agrees ask for his Metamask wallet address. You can find your own Metamask address right below your account name (it is in the format 0xbb23...552f82).
2. Seller logs into Zenland and creates a contract.
Then, you login to Zenland app via Metamask extension (no email or password required) to create a contract and enter the contact details. Connecting your wallet to Zenland is needed to create an anonymous profile with your crypto wallet address.

In the form, you first enter your and buyer's MetaMask wallet addresses. This is needed to transfer payment from the buyer's address into the contract and to your wallet address after the deal is complete. You may also name the contract and enter the website specifics like domain name, hosting location, database, website template, etc. in the contract details, or leave it blank since its optional.
Next, enter the date and time (can be on the same day) you think you will need to complete the contract requirements. Select the blockchain network (think of it as a payment method) and the currency you accept (USDT, BUSD, USDC, DAI).
Put in the buyer protection time. It's the time for a buyer to transfer website data to his hosting (usually takes between 3 and 5 hours). If you don't know how much time will be needed for website ownership transfer you may select days.
After, enter the price you agreed to sell your website for (let's say it's 1 BUSD just for the sake of this example). There is also a Zenland service fee that can be paid by you, by the buyer, or split in half.
3. Buyer Approves the Contract Terms, or Edits Them.

Once the contract has been created, the buyer has to approve its terms. Once he logs in, he should see a notification about a new contract created with him in the top right corner of the dashboard. If disagree with the contract terms, the buyer may edit the conditions before approving.
In this case, you, the seller, will see a notification asking you to approve the changes made by the buyer. If you disagree with some of its conditions, you can talk things over in the Contract Chat. It is a secure anonymous chat that automatically records and displays any changes made to the contract and is only seen by you and the seller.
4. Buyer Deploys the Contract to the Blockchain.
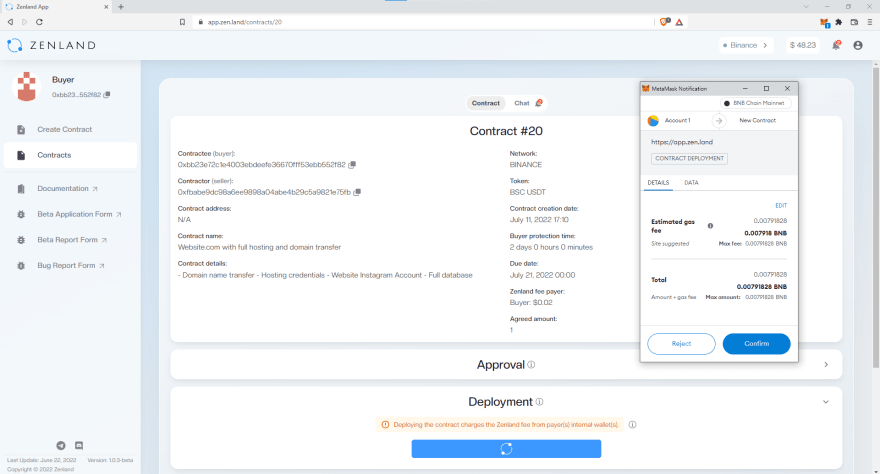
As soon as you both approve the contract, its conditions cannot be changed. The next step is to deploy (publish) the contract to the blockchain. This is done by the buyer. When he clicks the "Deploy" button, MetaMask window opens and the buyer must confirm the transaction.
But, just like any other operation, deployment has two conditions to happen:
1) a buyer must have money in his MetaMask wallet address to pay the deployment gas fee;
2) a buyer/seller (or both users) must have a positive balance on their internal wallet(s) to pay the service fee.
5. Buyer Sends Payment Into The Contract.
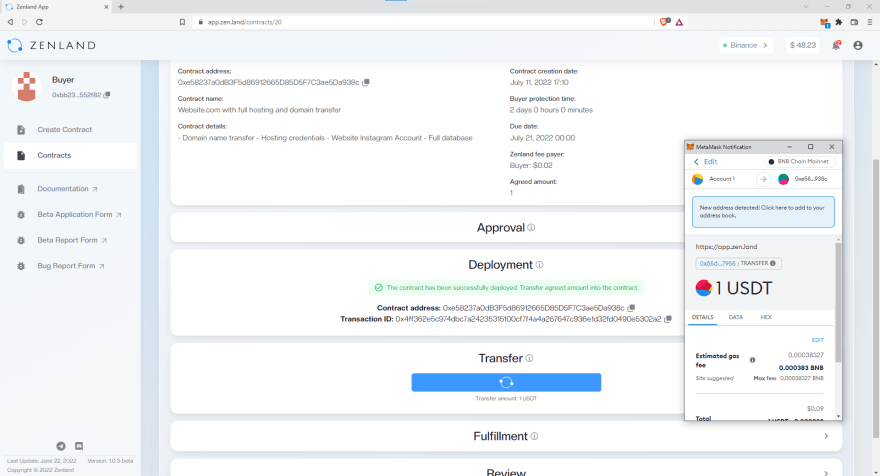
Alright, the buyer deployed the contract! Now is time to transfer the agreed payment of say $1 BUSD into the contract. For it, the buyer clicks the "Transfer" button and confirms the transaction in the opened Metamask window.
6. Seller Starts Working on The Order.
As you see the payment is inside the contract, you send the website login and password to the buyer and press the "Complete" button. It's a blockchain transaction and a gas fee will be paid from your Metamask wallet.
Tip: You can check payment by entering the contract address in the search bar on the official blockchain explorer site (Etherscan, BSCscan, and others).
7. Seller Completes The Website Ownership Transfer.

Remember that buyer protection time we've mentioned when filling out the contract form?
Once you hit the "Complete' button, the countdown will start. By the end of it if everything is okay with the transfer, the buyer must release the payment from the contract to your wallet address.
If he forgets to do so, or simply disappears, the "Release" button will become available to you and you can do it on your own. Think of this cool feature to protect sellers from scams that no other escrow have!
8. Payment Is Released From the Contract.

Finally, you check your Metamask wallet address specified in the contract to see if the payment sum has already been transferred to it. The amount will show up under assets. Alternatively, you can use a blockchain explorer to search for the contract address. You will see all its blockchain transactions including transfer and release.
Check out YouTube Tutorial to see the process in action
That's done!
Have you ever sold or bought anything using escrow service?
Feel free to suggest interesting cases you want us to review in detail, or share your thoughts on blockchain escrow and its future.


Latest comments (0)