Background
At the shift changeover in most hospitals, a paper form is completed to summarise the last shift and highlight key aspects of the upcoming shift. As an example, a completed form could look like below.

These completed forms are gathered together at a later point, and a person will go through each and manually enter the data on a computer. The recorded data can then be fed into an analytical system to generate insights.
The goal of the project
The main goal of this project is to streamline the data collection process by building a tool that,
- the users can use to take a picture of the completed forms using their smart phones,
- the tool then automatically extracts the data and pre-fills the form, and
- the user can review and save the data.
The user can choose to either take the picture and upload it immediately after completing the form, or take pictures of multiple completed forms at a later point.
A few other features include,
- providing a digital version of the form that the user can fill in directly on their phone/tablet,
- saving the original image along with the extracted data,
- linking data e.g. Unit, Users etc. to existing entities in the system.
Demo
At Riberry, we build a platform for collecting data and generating insights within hospital environments, as well as delivering clinical improvement programs. This article only focuses on extracting data from paper forms using OCR - a feature on the data collection side of things.
And below is a demo of how data is extracted from a paper form and entered into the system.

Architecture overview
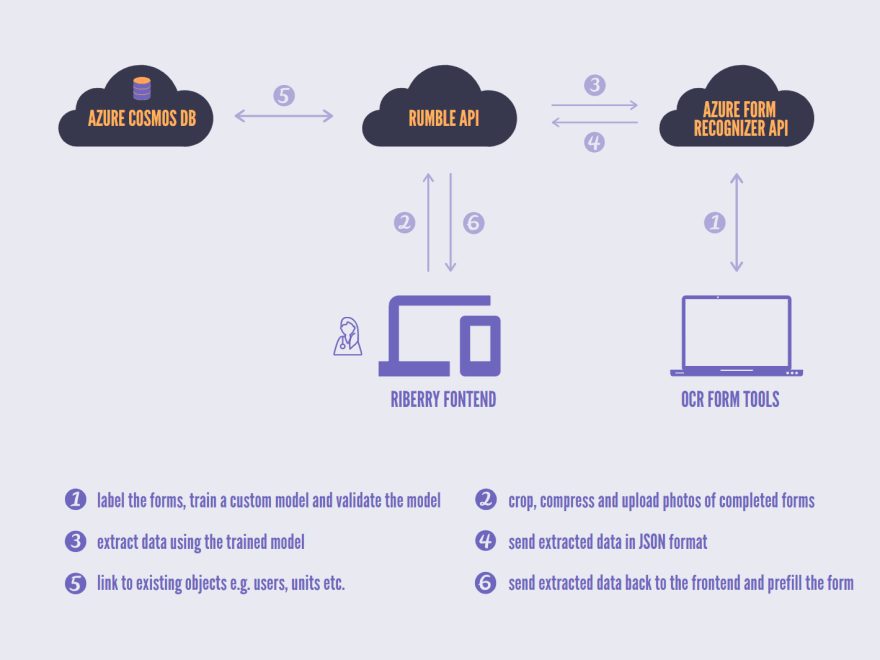
We're using the Form Recognizer service from Microsoft to extract data from the forms. More specifically, we've trained a custom model, instead of using the pre-built models, to better handle the structure of the forms that our clients use.
At the very high level, we will train a model first. The users can then upload photos of the filled forms via the frontend (a.k.a Riberry) to the API called Rumble. Rumble then uses the trained model to extract data from the form and transforms and cleans up the extracted data before sending it back to the user. The image below has a more detailed explanation of this process.
Train the model
Note: the focus of this article is to showcase the final product and to reflect on the lessons learnt in adding the OCR support, rather than a step-by-step guide on how to use the Azure Form Recognizer service. There is no point in writing a guide either; you can't really beat their documentation and examples.
If you're looking at learning how to use the Form Recognizer service, I highly recommend reading through their documentation - it's really the most effective way.
At the core of the Form Recognizer service is a set of REST APIs that allow you to train a model by using supervised/unsupervised machine learning, manage (e.g. list, delete, copy) models, and extract data using custom/pre-built models.
In addition, it also offers an open source tool (OCR-Form-Tools) that interacts with these REST APIs and provides an intuitive UI to label your data, train a model and validate the model by predicting a test document.
Tip: In their guide on setting up the sample labelling tool, they talk about running the tool via Docker.
Instead of using Docker, I find it's much easer to just check out a copy of the tool from GitHub and build/run it from source.
After having the tool up and running, I was able to label our sample data, train a model and test the model with ease.
Label the training data

Train a model

Validate the trained model

Miscellaneous Reflections
Now that the project has been deployed to production, it's a good time to look it retrospectively and reflect on various things/lessons that I learnt from doing it.
1. The training process
There should be 3 main stages in predicting the contents of a form using the supervised learning approach,
- detect the text elements (printed or handwritten) on the form and calculate their expected sizes and positions,
- extract the actual text content from each element,
- classify the elements, using their size and position info obtained from step 1, into the different labels specified.
Tip: With the supervised learning, we're fitting a model for classifying elements on the page into different labels based on the position info of these elements on the page.
And we're NOT training any NLP models to extract texts from the elements identified on the page. This part is handled internally by the Form Recognizer service.
The position and size of each text element is expressed by its bounding box which consists of 8 numbers. And these 8 numbers should be the main features for each training instance i.e. every text element.
There are also likely a lot of data argumentation and feature manipulation techniques applied on the training data to expand the dataset artificially, in order to improve the accuracy of the models. For example, they'll likely use some label-preserving transformation techniques such as denoising/sharpening, elastic distortion, affine transformation, dimensionality reduction etc.
But overall, the cost function should be relatively simple with just a few variables. And I'm not surprised that only 5 documents are required to get started with.
2. Adding support for checkbox/radio question
The Form Recognizer service doesn't officially support checkboxes or radio buttons, but I've been able to get around it easily by,
- applying a label for each option in a checkbox or radio question, and
- at prediction time, treating those labels with a value present as the options that the user has selected.
As an example, the form that the hospitals used contains a checkbox question with two options - AM or PM. During the training process, I'd set up the labels _Shift.9:00 and _Shift.17:00 for the AM and the PM option respectively (see below).

Hypothetically, if we fed the form above to the trained model, a string 'x' will be extracted for both _Shift.9:00 and _Shift.17:00. I'd consider both options checked if this was a checkbox question, and I'd consider the first option is checked if this was a radio question.
3. Extracting the data asynchronously and notifying the users when the result is ready
After POSTing a form to their endpoint to extract data from it, you get back an Operation-Location, which is a URL containing the resultId used to track the progress and obtain the result of the analyse operation. And we're meant to repeatedly check this URL for the result data.
Tip: I set the frequency of checking for the result to once per second. This seems to be the same frequency that their OCR tool uses for checking for the result.
Tip: If your users have to wait for the result before taking the next action, compress the image before POSTing it for analysis to shorten wait time.
The images taken on smartphones are fairly large these days, and I compress them down to <1MB before sending them for analysis.
If your users don't have to wait for the analyse result, I'd highly recommend uploading the files into a blob storage and running a background task to analyse these files asynchronously. Users can be notified after the result is ready, if needed.
We couldn't do it because one of the requirements is that users need to take a photo of the form, extract data from it in real-time and save it to generate insights. In practice, the process usually takes around 5 seconds.
4. Don't over-automate the data binding process
4.1 Background
The fields on the paper form don't match up exactly with those on the digital version - some data on the paper form is ignored while there are a couple of extra fields on the web version. In addition, while the paper form rarely changes, we keep updating the digital form slightly either by adding/removing questions or moving around the existing questions.
4.2 How we designed it
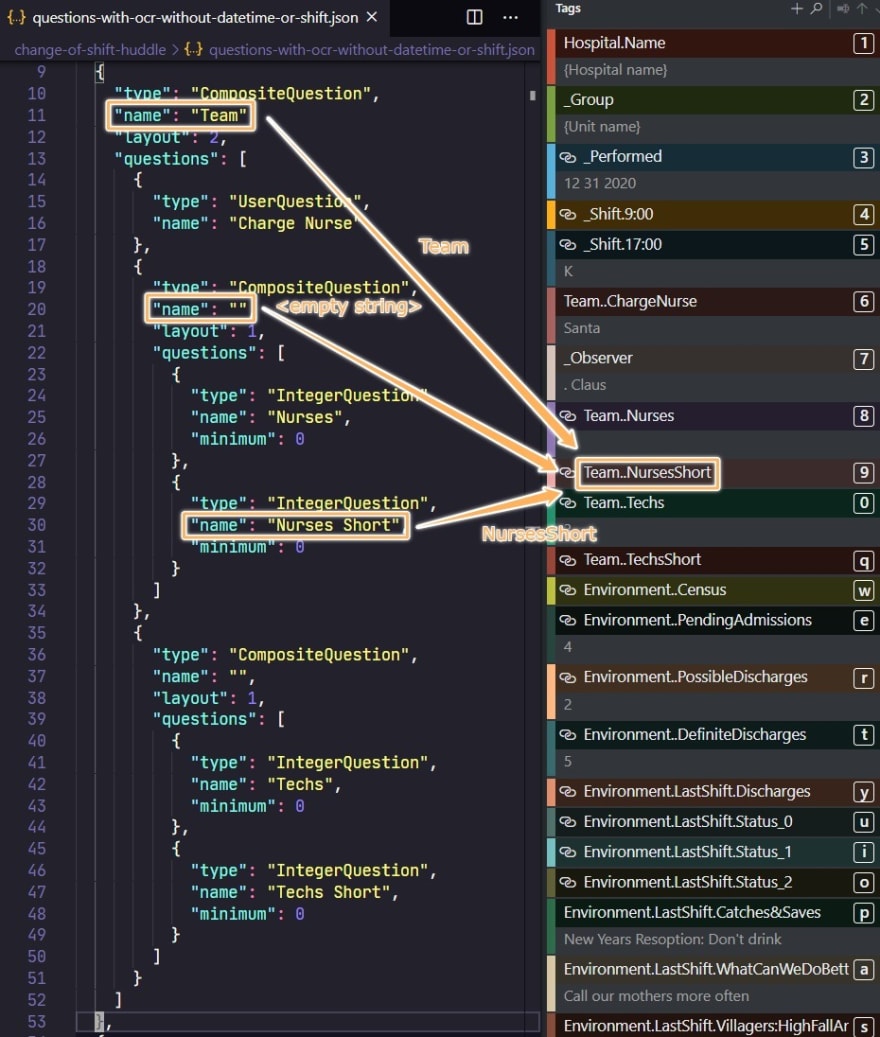
The questions and their layouts on the web form are defined using a JSON file. Without getting into the details, in the screenshot below, the JSON structure (right) defines the Team section (left) of the form.

However, we also use the names of the questions from the JSON file to automatically construct the label (used in OCR) for that question. For example, in the screenshot below, the label - Team..NursesShort - for the "Nurses Short" question is created by joining the names of all its ancestors and itself with a dot.
4.3 Problem with the design
This means that whenever we change the digital version of the form (e.g. adding/removing questions or re-arranging the fields on the form), a new set of labels will be generated. And we'd have to re-name the labels used in Form Recognizer, re-train the model, copy it to production etc. This is a really time consuming process.
4.4 What we should have done instead
We should have de-coupled the label generation from the JSON definition of a form.
Given that the paper form rarely changes, we should have just hardcoded a set of labels to be used in the Form Recognizer service. We could then expand the JSON definition to include a label property that specifies the label used for each question, if applicable.
This not only simplifies the code for binding the data (i.e. converting the extracted data into domain objects), but also means that we can freely re-arrange the questions on the form without having to re-train the model in Form Recognizer.
References
- Form Recognizer API (v2.0)
- Form Recognizer documentation
- OCR-Form-Tools
- Set up the sample labeling tool
Feedbacks
That's it! Let me know in the comment section below if you have any feedbacks.


Oldest comments (0)