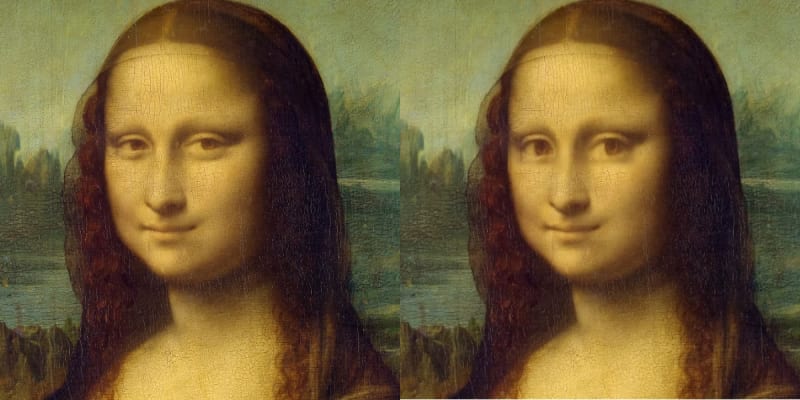
Hey guys, I have developed an application with Amazon Rekognition and OpenCV, that makes your eyes bigger in an image.

In this article, I will explain how to develop this application.
DEMO→https://eyedol.vercel.app/
github→https://github.com/yuikoito/eyedol
How to use
All you have to do is upload the image you want to make the eyes bigger and choose how big you want your eyes to be.
If you don't set it lower than "much" it will look very strange, so I don't recommend it.
If you choose "a little" or "some" you'll get a much better result.

Technology used
-
Frontend
- Next.js + TypeScript
- Chakra UI
-
Backend
- Python
- OpenCV
- Amazon Rekognition
-
Infrastructure
- AWS
The way to implement this is to use Amazon Rekognition to check where the eyes are, then use OpenCV to cut them out, expand them, composite them, and finally blur the boundaries.
So if you're looking sideways or wearing glasses, I don't think it will work very well.
This was the first time I used Amazon Rekognition, and it was easy to use.
However, the fee is much higher than I expected, so I added a Buy Me a Coffee link at the bottom right of the app.
link at the bottom right of the app.
If you can afford it, please buy me a coffee🙏.
I thought the same thing could be done with TensorFlow, so I'll try it with TensorFlow next time.
In order to make it as natural as possible, I adjusted the position of the eyes so that they were cropped as close to the edge as possible, and I also struggled a bit with the part where I blurred the border.
Implementation details
The implementation details are as follows
- Recognize eyes with Amazon Rekognition
- Crop the image using OpenCV, enlarge it, and composite it.
- Blur the boundary to make it look natural after merging.
Recognize eyes with Amazon Rekognition
The code for detecting the location of the eyes is as follows.
import cv2
import boto3
from botocore.config import Config

config = Config(
   retries = {
      'max_attempts': 10,
      'mode': 'standard'
   }
)

def rekog_eye(im):
    #post amazon_rekognition
    client = boto3.client('rekognition','ap-northeast-1',config=config)
    result, buf = cv2.imencode('.jpg', im)

    #get face information by rekognition_image
    faces = client.detect_faces(Image={'Bytes':buf.tobytes()}, Attributes=['ALL'])

    leftEyeLeft = faces['FaceDetails'][0]['Landmarks'][11]
    leftEyeRight = faces['FaceDetails'][0]['Landmarks'][12]
    leftEyeUp = faces['FaceDetails'][0]['Landmarks'][13]
    leftEyeDown = faces['FaceDetails'][0]['Landmarks'][14]
    rightEyeLeft = faces['FaceDetails'][0]['Landmarks'][15]
    rightEyeRight = faces['FaceDetails'][0]['Landmarks'][16]
    rightEyeUp = faces['FaceDetails'][0]['Landmarks'][17]
    rightEyeDown = faces['FaceDetails'][0]['Landmarks'][18]
    EyeList = [leftEyeLeft, leftEyeRight, leftEyeUp, leftEyeDown, rightEyeLeft, rightEyeRight, rightEyeUp, rightEyeDown]

    EyePoints = {}
    h, w, ch = im.shape
    for eyepoint in EyeList:
        EyePoints[eyepoint['Type']] = {'X': int(eyepoint['X']*w), 'Y': int(eyepoint['Y']*h)}

    return EyePoints
I used boto3, a library that makes it easy to use various AWS services.
Then create a boto3 client and specify the service to be used (in this case, rekognition) and select the region.
In config, I specify how many times I want to try. In this case, the number is 10, so even if Rekognition doesn't work properly on the first try due to server error or network error, it will try again on the second try, and so on up to 10 times.
client = boto3.client('rekognition','ap-northeast-1',config=config)
Then, post the image byte sequence to the detection_faces of rekognition to detect the face.
faces = client.detect_faces(Image={'Bytes':buf.tobytes()}, Attributes=['ALL'])
Name the necessary landmarks in a way that makes them easy to use.
For example, the left edge of the left eye is called leftEyeLeft, and the right edge of the left eye is called leftEyeRight here.
Since I want to cut and spread the image at the very edge, I detect four points for each eye.
The detected locations are put into an array for easier use.
EyeList = [leftEyeLeft, leftEyeRight, leftEyeUp, leftEyeDown, rightEyeLeft, rightEyeRight, rightEyeUp, rightEyeDown]
Finally return them.
    EyePoints = {}
    h, w, ch = im.shape
    for eyepoint in EyeList:
        EyePoints[eyepoint['Type']] = {'X': int(eyepoint['X']*w), 'Y': int(eyepoint['Y']*h)}
Crop the image using OpenCV, enlarge it, and composite it
First, prepare functions to convert images from base64 to cv2 and vice versa.
import numpy as np
import base64

def base64_to_cv2(image_base64):
    """base64 image to cv2"""
    image_bytes = base64.b64decode(image_base64)
    np_array = np.fromstring(image_bytes, np.uint8)
    image_cv2 = cv2.imdecode(np_array, cv2.IMREAD_COLOR)
    return image_cv2


def cv2_to_base64(image_cv2):
    """cv2 image to base64"""
    image_bytes = cv2.imencode('.jpg', image_cv2)[1].tostring()
    image_base64 = base64.b64encode(image_bytes).decode()
    return image_base64
The code for cutting and merging is as follows.
def handler(event, context):
    ##############Extracting the request body from the request payload############
    # convert event['body'] to dict
    try:
        base_64ed_image = event.get('myimg', 'none')
        magnification = float(event.get('magni', 1.4)
        blur_num = int(event.get('blur', 3)) ##for blur
        im = base64_to_cv2(base_64ed_image)
        EyePoints = rekog_eye(im)
        bityouseix = 20
        bityouseiy = 5
        leftTop = min([EyePoints['leftEyeUp']['Y'], EyePoints['leftEyeDown']['Y'], EyePoints['leftEyeRight']['Y'], EyePoints['leftEyeLeft']['Y']])
        leftBottom = max([EyePoints['leftEyeUp']['Y'], EyePoints['leftEyeDown']['Y'], EyePoints['leftEyeRight']['Y'], EyePoints['leftEyeLeft']['Y']])
        leftRight = max([EyePoints['leftEyeUp']['X'], EyePoints['leftEyeDown']['X'], EyePoints['leftEyeRight']['X'], EyePoints['leftEyeLeft']['X']])
        leftLeft = min([EyePoints['leftEyeUp']['X'], EyePoints['leftEyeDown']['X'], EyePoints['leftEyeRight']['X'], EyePoints['leftEyeLeft']['X']])
        rightTop = min([EyePoints['rightEyeUp']['Y'], EyePoints['rightEyeDown']['Y'], EyePoints['rightEyeRight']['Y'], EyePoints['rightEyeLeft']['Y']])
        rightBottom = max([EyePoints['rightEyeUp']['Y'], EyePoints['rightEyeDown']['Y'], EyePoints['rightEyeRight']['Y'], EyePoints['rightEyeLeft']['Y']])
        rightRight = max([EyePoints['rightEyeUp']['X'], EyePoints['rightEyeDown']['X'], EyePoints['rightEyeRight']['X'], EyePoints['rightEyeLeft']['X']])
        rightLeft = min([EyePoints['rightEyeUp']['X'], EyePoints['rightEyeDown']['X'], EyePoints['rightEyeRight']['X'], EyePoints['rightEyeLeft']['X']])

        leftEye = im[leftTop:leftBottom+bityouseiy, leftLeft-bityouseix:leftRight+bityouseix]
        leftEye = cv2.resize(leftEye, (leftEye.shape[1], int(leftEye.shape[0]*magnification)))
        rightEye = im[rightTop:rightBottom+bityouseiy, rightLeft-bityouseix:rightRight+bityouseix]
        rightEye = cv2.resize(rightEye, (rightEye.shape[1], int(rightEye.shape[0]*magnification)))

        im[leftTop:leftTop+leftEye.shape[0], leftLeft-bityouseix:leftLeft+leftEye.shape[1]-bityouseix] = leftEye
        im[rightTop:rightTop+rightEye.shape[0], rightLeft-bityouseix:rightLeft+rightEye.shape[1]-bityouseix] = rightEye


        return {'status':200, 'message':'OK', 'img': cv2_to_base64(im)}
    except Exception as e:
        return {'status':500, 'message':str(e)}
In the following section, the coordinates for cropping are calculated again.
The Y-coordinate of EyeUp is not directly used as the Top because it takes into account the case where the eye is slanted.
(However, since it is just stretched vertically after cropping, it will be distorted.)
So, if necessary, I think it would be more natural to stretch the image diagonally when the right side is the maximum value, but since this is a crappy application, I didn't go this far.
        leftTop = min([EyePoints['leftEyeUp']['Y'], EyePoints['leftEyeDown']['Y'], EyePoints['leftEyeRight']['Y'], EyePoints['leftEyeLeft']['Y']])
        leftBottom = max([EyePoints['leftEyeUp']['Y'], EyePoints['leftEyeDown']['Y'], EyePoints['leftEyeRight']['Y'], EyePoints['leftEyeLeft']['Y']])
        leftRight = max([EyePoints['leftEyeUp']['X'], EyePoints['leftEyeDown']['X'], EyePoints['leftEyeRight']['X'], EyePoints['leftEyeLeft']['X']])
        leftLeft = min([EyePoints['leftEyeUp']['X'], EyePoints['leftEyeDown']['X'], EyePoints['leftEyeRight']['X'], EyePoints['leftEyeLeft']['X']])
        rightTop = min([EyePoints['rightEyeUp']['Y'], EyePoints['rightEyeDown']['Y'], EyePoints['rightEyeRight']['Y'], EyePoints['rightEyeLeft']['Y']])
        rightBottom = max([EyePoints['rightEyeUp']['Y'], EyePoints['rightEyeDown']['Y'], EyePoints['rightEyeRight']['Y'], EyePoints['rightEyeLeft']['Y']])
        rightRight = max([EyePoints['rightEyeUp']['X'], EyePoints['rightEyeDown']['X'], EyePoints['rightEyeRight']['X'], EyePoints['rightEyeLeft']['X']])
        rightLeft = min([EyePoints['rightEyeUp']['X'], EyePoints['rightEyeDown']['X'], EyePoints['rightEyeRight']['X'], EyePoints['rightEyeLeft']['X']])
Then cut it out according to its coordinates.
        leftEye = im[leftTop:leftBottom+bityouseiy, leftLeft-bityouseix:leftRight+bityouseix]
        rightEye = im[rightTop:rightBottom+bityouseiy, rightLeft-bityouseix:rightRight+bityouseix]
Resize the cropped left eye and right eye.
        leftEye = cv2.resize(leftEye, (leftEye.shape[1], int(leftEye.shape[0]*magnification)))
        rightEye = cv2.resize(rightEye, (rightEye.shape[1], int(rightEye.shape[0]*magnification)))
Then synthesize it.
        im[leftTop:leftTop+leftEye.shape[0], leftLeft-bityouseix:leftLeft+leftEye.shape[1]-bityouseix] = leftEye
        im[rightTop:rightTop+rightEye.shape[0], rightLeft-bityouseix:rightLeft+rightEye.shape[1]-bityouseix] = rightEye
Blur the boundary to make it look natural after merging
To blur the boundaries, I used OpenCV's Gaussian filter.
Reference:
Specify the blur area (image), kernel size, and standard deviation.
def mosaic_area(src, x, y, width, height, blur_num):
    dst = src.copy()
    for i in range(blur_num):
        dst[y:y + height, x:x + width] = cv2.GaussianBlur(dst[y:y + height, x:x + width], (3,3),3)
    return dst
By the way, I wanted to control how much blur is applied from the client side, so I used blur_num to specify how many times this blur should be applied.
Then, incorporate the above function in the handler function above.
            im = mosaic_area(im, leftLeft-bityouseix-int(bityouseix/2), leftTop, bityouseix, leftEye.shape[0]+bityouseiy, blur_num)
            im = mosaic_area(im, leftRight+int(bityouseix/2), leftTop, bityouseix, leftEye.shape[0]+bityouseiy, blur_num)
            im = mosaic_area(im, leftLeft-bityouseix, leftTop+leftEye.shape[0]-int(bityouseiy/2), leftEye.shape[1], bityouseiy, blur_num)
            im = mosaic_area(im, rightLeft-bityouseix-int(bityouseix/2), rightTop, bityouseix, rightEye.shape[0]+bityouseiy, blur_num)
            im = mosaic_area(im, rightRight+int(bityouseix/2), rightTop, bityouseix, rightEye.shape[0]+bityouseiy, blur_num)
            im = mosaic_area(im, rightLeft-bityouseix, rightTop+rightEye.shape[0]-int(bityouseiy/2), rightEye.shape[1], bityouseiy, blur_num)
In this case, there is no need to blur the upper part of the eye because nothing has been changed, but the left, right, and lower parts of the eye have been widened and composited so that the boundaries are visible. Since we are performing blurring at each boundary, we are using the blur filter 6 times above to blur the (left, right, bottom) x both eye parts.
After deploying this to Lambda, you can use APIGateway to make it into an API and you are done.
There is a little trick to using OpenCV in Lambda, so if you need it, please read this.
That's it!
Then finish!
Thanks for reading.
This is my first time to use Amazon Rekognition, and I am happy to make such a funny API :D
Please send me a message if you need.
yuiko.dev@gmail.com
https://twitter.com/yui_active
If you think this article is useful, please buy me a coffee :)
https://www.buymeacoffee.com/yuikoito


Latest comments (0)