While video meetings make communication more personal, screen sharing makes it more collaborative. With businesses embracing remote and hybrid work where one-to-one and multiparty video calls are a norm, screen sharing becomes all the more crucial.
This post is for you if you’re looking to build a video calling application with screen sharing using React Native.
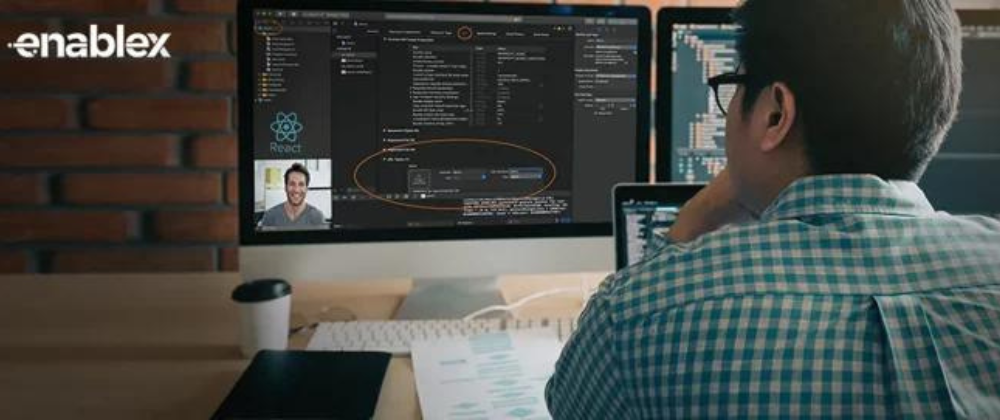
We have provided a detailed step-by-step guide to explain how you can embed the screen sharing feature in the existing application using EnableX React-Native toolkit.
Technical Pre-Requisites
- Nodejs framework
- JDK
- Android Studio (recommended to use LTS version)
What Is EnableX React Native SDK?
The EnableX-React Native SDK is used to build hybrid real-time communication applications for Android and iOS-based mobile devices.
Creating Project in EnableX
First, you need to create a project on the EnableX portal. Here are the steps are given below:
- Go to the EnableX portal. If you do not have an account, Signup here.
- Next, “Create Projects”, enter relevant information as required.
- You get the option to copy App ID & APP Key when you create the project the first time. In case the project has already been created, users need to go to the Video Project, then select the option: ‘I like to Code’ and then they can view App ID & App Key.
Creating a ReactNative Project
Now, you need to create a ReactNative project. Follow the steps given below:
1. Installing the EnableX React Native SDK
To install the EnableX-ReactNative SDK, open the project, navigate to the ReactNative Project directory and run the following command:

2. Importing the Reactive Native Class
Once the installation is done successfully, import ‘enx-rtc-react-native’ in the class where you want to access the EnableX capability.

3. How To Start And Stop Screen Sharing
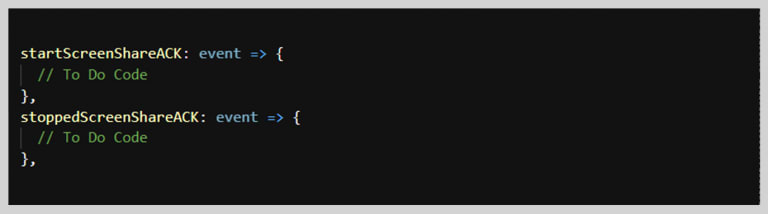
EnableX-ReactNative SDK is used to start and stop screen sharing, while events are used to handle acknowledgements. To start screen sharing, use the following function:

To stop screen sharing, use the following function:

Once the user starts or stops the screen sharing feature, EnableX-ReactNative SDK acknowledges the event by sending event notifications to other participants:
4. Installing Foreground Service
Foreground Service is required whenever an application needs to perform a task which is also noticeable by users even when they’re not directly interacting with the app.
Therefore, you need to install the Foreground Service. It is required to use the screen sharing feature in an app. Here are the steps you need to follow to start the foreground services:
A. Use the following command to add dependency in foreground services:

B. Add permissions in “AndroidManifest.xml File”:

C. Register for the Foreground Services in the AndroidManifest.xml File:

D. Go to the MainActivity class and add a variable:

E. Now, override onNewIntent and onStart function inside the MainActivity class.


F. MainActivty.java class is a vital component of an Android application through which activities are launched.
Here is how it’s used to add foregroundEmitter function.

5. Override onActivityResult
Next, you need to override the onActiveityResult function, which is inside the MainActivity class:

6. Inside the Color.xml file, set the notification color specified in AndroidManifest.xml file:

7. How to Start Foreground Service
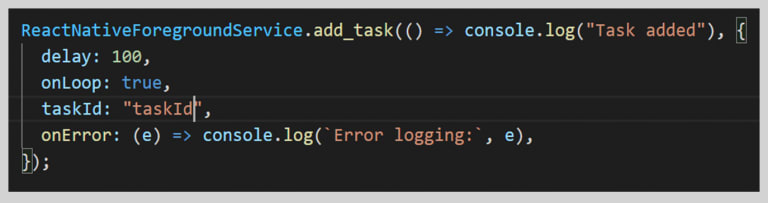
A. Register a Headless Task (a way to run JavaScript tasks in the background) using .js file:

B. Add a task as shown below:
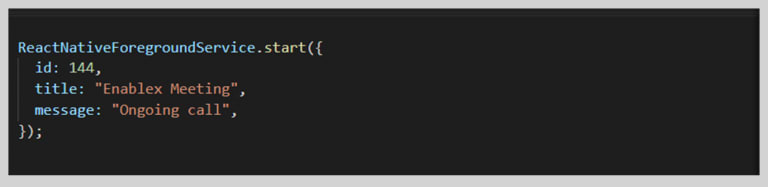
C. To start the Foreground Service class, use the function given below:
8. How to Stop The Foreground Service
A. To stop the Foreground Service, you’ll need to remove the task:

B. Now you can stop the Foreground Service:

Ahoy! you made it. You’re now ready to run the application with screen sharing.
To look at more examples & sample codes, visit our GitHub repository.
Build something exciting!


Latest comments (0)