
Introduction
The following article will cover how we can use Appwrite's Flutter SDK to build native applications. Appwrite is an end-to-end backend server that is aiming to abstract the complexity of common, complex, and repetitive tasks required for building a modern app.
Installation
Appwrite is a self-hosted backend server packaged as a set of Docker containers. You can install and run Appwrite on any operating system that can run a Docker CLI. You can use Appwrite on your local desktop or cloud provider of your choice.
System Requirement:
Appwrite was designed to run well on both small and large deployment. The minimum requirements to run Appwrite is as little as 1 CPU core and 2GB of RAM, and an operating system that supports Docker.
Install with Docker:
The easiest way to start running your Appwrite server is by running our Docker installer tool from your terminal. Before running the installation command, make sure you have Docker CLI installed on your host machine.
Unix:
docker run -it --rm \
    --volume /var/run/docker.sock:/var/run/docker.sock \
    --volume "$(pwd)"/appwrite:/usr/src/code/appwrite:rw \
    --entrypoint="install" \
    appwrite/appwrite:0.11.0
Windows:
Hyper-V and Containers Windows features must be enabled to run Appwrite on Windows with Docker. If you don't have these features available, you can install Docker Toolbox that uses Virtualbox to run Appwrite on a Virtual Machine.
docker run -it --rm ^
    --volume //var/run/docker.sock:/var/run/docker.sock ^
    --volume "%cd%"/appwrite:/usr/src/code/appwrite:rw ^
    --entrypoint="install" ^
    appwrite/appwrite:0.11.0
docker run -it --rm ,
    --volume /var/run/docker.sock:/var/run/docker.sock ,
    --volume ${pwd}/appwrite:/usr/src/code/appwrite:rw ,
    --entrypoint="install" ,
    appwrite/appwrite:0.11.0
Manual (using docker-compose.yml):
For advanced Docker users, the manual installation might seem more familiar. To setup Appwrite manually, download the Appwrite base docker-compose.yml and .env files. After the download completes, update the different environment variables as you wish in the .env file and start the Appwrite stack using the following Docker command:
docker-compose up -d --remove-orphans
Once the Docker installation completes, go to your machine hostname or IP address on your browser to access the Appwrite console. Please notice that on non-linux native hosts the server might take a few minutes to start after installation completes.
Overview
Appwrite is a development platform providing you an easy yet powerful API and management console to get your next project up and running quickly.
This tutorial will help you start using Appwrite products and build your next project. Before starting, make sure you have followed the Appwrite installation guide, and you have an Appwrite server instance up and running on your host machine or server.
Create Your First Appwrite Project
Go to your new Appwrite console, and once inside, click the + icon in the top navigation header or on the 'Create Project' button on your console homepage. Choose a name for your project and click create to get started.
Add your Flutter Platform
To init your SDK and start interacting with Appwrite services, you need to add a new Flutter platform to your project. To add a new platform, go to your Appwrite console, choose the project you created in the step before, and click the 'Add Platform' button.
From the options, choose to add a new Flutter platform and add your app credentials. Appwrite Flutter SDK currently supports building apps for Android, iOS, Linux, Mac OS, Web and Windows.
If you are building your Flutter application for multiple devices, you have to follow this process for each different device.
Android
For Android first add your app name and package name, Your package name is generally the applicationId in your app-level build.gradle file. By registering your new app platform, you are allowing your app to communicate with the Appwrite API.
In order to capture the Appwrite OAuth callback url, the following activity needs to be added inside the tag, along side the existing tags in your AndroidManifest.xml. Be sure to replace the [PROJECT_ID] string with your actual Appwrite project ID. You can find your Appwrite project ID in you project settings screen in your Appwrite console.
<manifest ...>
  ...
  <application ...>
    ...
    <!-- Add this inside the `<application>` tag, along side the existing `<activity>` tags -->
    <activity android:name="com.linusu.flutter_web_auth.CallbackActivity" >
      <intent-filter android:label="flutter_web_auth">
        <action android:name="android.intent.action.VIEW" />
        <category android:name="android.intent.category.DEFAULT" />
        <category android:name="android.intent.category.BROWSABLE" />
        <data android:scheme="appwrite-callback-[PROJECT_ID]" />
      </intent-filter>
    </activity>
  </application>
</manifest>
iOS
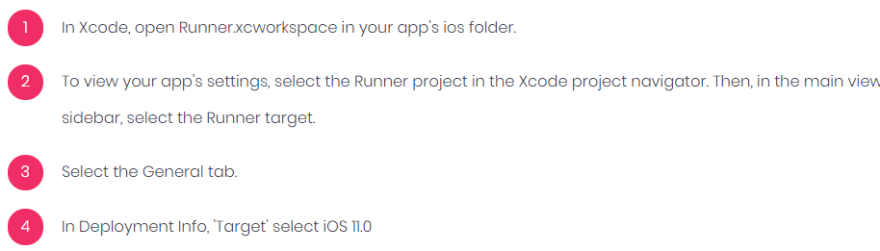
For iOS first add your app name and Bundle ID, You can find your Bundle Identifier in the General tab for your app's primary target in Xcode.
The Appwrite SDK uses ASWebAuthenticationSession on iOS 12+ and SFAuthenticationSession on iOS 11 to allow OAuth authentication. You have to change your iOS Deployment Target in Xcode to be iOS >= 11 to be able to build your app on an emulator or a real device.
Linux
For Linux add your app name and package name, Your package name is generally the name in your pubspec.yaml file. If you cannot find the correct package name, run the application in linux, and make any request with proper exception handling, you should get the application id needed to add in the received error message.
Mac OS
For Mac OS add your app name and Bundle ID, You can find your Bundle Identifier in the General tab for your app's primary target in Xcode.
Web
Appwrite 0.7, and the Appwrite Flutter SDK 0.3.0 have added support for Flutter Web. To build web apps that integrate with Appwrite successfully, all you have to do is add a web platform on your Appwrite project's dashboard and list the domain your website will use to allow communication to the Appwrite API.
Windows
For Windows add your app name and package name, Your package name is generally the name in your pubspec.yaml file. If you cannot find the correct package name, run the application in windows, and make any request with proper exception handling, you should get the application id needed to add in the received error message.
Get Appwrite Flutter SDK
Add Appwrite SDK to your package's pubspec.yaml file (view example):
dependencies:
  appwrite: ^2.0.3
You can also install the SDK using the Dart package manager from your terminal:
pub get appwrite
Init your SDK
Initialize your SDK code with your project ID, which can be found in your project settings page.
import 'package:appwrite/appwrite.dart';

Client client = Client();

client
    .setEndpoint('https://localhost/v1') // Your Appwrite Endpoint
    .setProject('5e8cf4f46b5e8') // Your project ID
    .setSelfSigned(status: true) // For self signed certificates, only use for development
;
Before starting to send any API calls to your new Appwrite instance, make sure your Android or iOS emulators has network access to the Appwrite server hostname or IP address.
When trying to connect to Appwrite from an emulator or a mobile device, localhost is the hostname for the device or emulator and not your local Appwrite instance. You should replace localhost with your private IP as the Appwrite endpoint's hostname. You can also use a service like ngrok to proxy the Appwrite API.
Make Your First Request
Once your SDK object is set, access any of the Appwrite services and choose any request to send. Full documentation for any service method you would like to use can be found in your SDK documentation or in the API References section.
// Register User
Account account = Account(client);

Response user = await account
    .create(
        email: 'me@appwrite.io',
        password: 'password',
        name: 'My Name'
    );
Listen to Changes
If you want to listen to changes in realtime from Appwrite, you can subscribe to a variety of channels and receive updates within milliseconds. Full documentation for Realtime can be found here.
// Subscribe to files channel
final realtime = Realtime(client);
final subscription = realtime.subscribe(['files']);

subscription.stream.listen((response) {
    if(response.event === 'storage.files.create') {
        // Log when a new file is uploaded
        print(response.payload);
    }
})
Full Example
import 'package:appwrite/appwrite.dart';

Client client = Client();

client
    .setEndpoint('https://localhost/v1') // Your Appwrite Endpoint
    .setProject('5e8cf4f46b5e8') // Your project ID
    .setSelfSigned(true) // For self signed certificates, only use for development
;

// Register User
Account account = Account(client);

Response user = await account
    .create(
        email: 'me@appwrite.io',
        password: 'password',
        name: 'My Name'
    );

// Subscribe to files channel
final realtime = Realtime(client);
final subscription = realtime.subscribe(['files']);

subscription.stream.listen((response) {
    if(response.event === 'storage.files.create') {
        // Log when a new file is uploaded
        print(response.payload);
    }
})


Top comments (1)
Would like to submit this to Google's Dev Library as well? devlibrary.withgoogle.com/