
You’ve probably had this situation at least once on your career: you join a new team and it takes you at least 10 days to finally get the build to succeed on your local machine, the tests to pass, the application to launch without issues, and for the debugger to work. There’s a document somewhere or in the projects wiki with a lot of steps, and the last person who walked through it did so 9 months ago. Situations like this cost precious time and are a big source of frustration.
Some companies solve this by having you work on a Virtual Machine, either locally on Hyper-V or remotely in a datacenter or the cloud. This solves quite a few problems, but the cost is often prohibitive, and I’ve personally never liked having to work inside a remote desktop, often on a machine that was shared with others, while my own desktop has twice the power.
GitHub Codespaces provides a solution for many of these issues.
What is Codespaces
For most people Codespaces can be described as Visual Studio Code in the browser. Yet, it’s much more. It’s a cloud-based container platform for developers to run their complete development environment.
When you launch Codespaces from an enabled repository or organization, by default it launches a version of Visual Studio Code with all the latest developer tools pre-installed for just about every popular programming language. And developers can write their code, run their tests, and even run and debug their application, inside the browser!
And while Codespaces runs in the cloud, your editor “runs” inside of your browser or inside of a local instance of Visual Studio Code.
Code Spaces are hosted in Azure and Visual Studio Code uses Remote Containers to connect. All changes made to the Codespace’s filesystem are automatically captured. Even when your Codespace is paused, it will resume right where you left off.
Interesting use-cases
In the past few months, we have used Codespaces to deliver online interactive workshops where participants could get started with new technology and tools they had never used before without installing anything to their local laptops. This greatly simplified the preparations for the workshop and completely took away the need for pre-provisioned workstations.
We’ve configured Codespaces for internal projects so that all it takes for a developer to contribute to the project is to start the Codespace and wait a few seconds for the Codespace to start. From this point forward, they can change the code, run the tests, and run a local instance without having to configure anything locally and without any interference with any of their ongoing projects.
I’m personally considering adding a Codespace configuration to most of my open-source projects to make it much easier for people to contribute.
We plan to leverage Codespaces for the upcoming Global DevOps Bootcamp so that every participant has access to a fast and pre-configured IDE in the cloud regardless of their own hardware and circumstances, hopefully enabling many more people to participate in the event.
Getting Started
To start using Codespaces, you don’t need to know how to create your own image. There is a large list of starter containers available, and the default container has tools for just about every popular programming language pre-installed. Just click the “New Codespace” button in your repository to open the repository in a new instance of Visual Studio Code inside your browser.

Creating a new Codespace
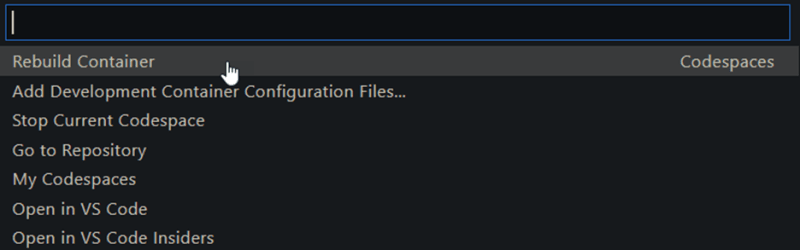
While the default image is convenient, it’s also a bit big and probably has many tools installed you’re unlikely to ever use. To pick one of the other available images, choose the “ Add Development Container Configuration Files… ” from the command palette

Add Development Container Configuration Files...
And choose the container image you want to use. When in doubt, pick the “GitHub Codespaces (Default)”. A complete overview of all the images and what’s installed on them can be found on GitHub.

Choose the container image matching your environment
Visual Studio Code will add several files to your repository and then prompts you to rebuild the Codespace:

Visual Studio Code will detect when the configuration for your codespace has been updated
Note : In case you missed the prompt, you can always manually trigger a rebuild from the command palette (
Ctrl+Shift+P). This can also be useful when you want to make multiple changes and then rebuild the Codespace.
Rebuild a Codespace after changing its configuration files
You’ll see a new folder in your repository containing these new files: .devcontainer/devcontainer.json and .devcontainer/DockerFile. These files are used to store most of the settings of your Codespace.
Anatomy of a Codespace
The configuration of your Codespace is stored in several places. You’ve already seen the first two in the .devcontainer folder. But there are more. Let’s go over them to see what they are:
.devcontainer/devcontainer.json
The devcontainer.json is the main configuration file for your Codespace. It contains environment variables, extensions, docker volume mounts and a few other settings. It also points to the container image used to run your development container. The default points to the DockerFile in the same directory, but you can also reference any image from a docker repository of your choice.
The devcontainer.json can also be used to run one of many commands after Visual Studio Code has launched. At this point, your git repository contents will also be available.
.devcontainer/DockerFile
The DockerFile is used to select the base image and to optionally install additional tools into your container. By default, it’s a simple pointer to the image you selected when you had Visual Studio Code add the Development Container Configuration Files to your repository.
Your GitHub profile
Additional settings, such as themes, keyboard bindings, snippets and globally installed extensions can be synced with your GitHub profile into your Codespace by turning on Settings Sync.
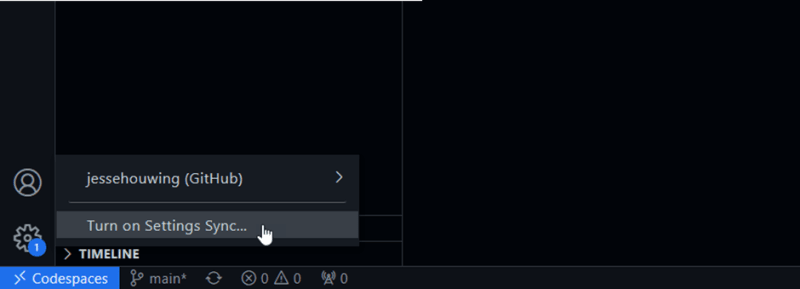
Turn on Settings Sync
Codespaces will ask what settings to synchronize and will ask what to do in case there are conflicting settings:

Merge or replace local settings
Some customizations, like keyboard bindings, can only be configured through Settings Sync or through Visual Studio Code extensions.
Your dotfiles repository
In your personal GitHub settings, you can configure a repository containing your Linux dotfiles. These can be used to configure your default shell, your preferred editor, and many other settings of your Linux user profile.

Configure your dotfiles repository on GitHub
Codespaces Secrets
You may need to access other resources from your Codespace, such as a GitHub Container Registry, Cloud resources etc. To prevent accidentally committing these secrets to your repository it’s recommended to not store these credentials on the filesystem. Instead, store them in Codespaces Secrets. When a Codespace starts, there secrets are made available as environment variables.
Secrets can be stored on multiple levels:
- Repository (most specific)
- User Settings
- Organization Settings (least specific)
The most specific level will be used by your Codespace.
Note: Whenever a secret is updated, you must rebuild your Codespace for these changes to take effect. Unfortunately, there is no indication this is required from inside your Codespace.
Note: You can’t store secrets with a key that starts with GITHUB_. Which is unfortunate since some tools expect that. In that case, you’ll need to copy the value from a different name to the reserved name after the Codespace has started.
There are special secrets to allow access to private docker repositories. These must be named:
***_CONTAINER_REGISTRY_PASSWORD***_CONTAINER_REGISTRY_SERVER***_CONTAINER_REGISTRY_USERNAME
Where *** is a custom label to identify the container registry, e.g. MYGHCR.
Common scenarios
The most common reason to customize your Codespace is probably the need to install additional tools that are required for your development process or changing the set of installed extensions. Every time you make changes, you can immediately test them by rebuilding your Codespace. When you are satisfied with your changes, commit your changes to the repository to persist them and to share them with the world.
Installing additional tools
While the default Codespace container has many things installed, you may need to add something extra to it. Either a custom-built tool, or something that requires a license to run.
You can add these by editing the DockerFile in the .devcontainer folder.
FROM mcr.microsoft.com/vscode/devcontainers/universal:1-focal

USER root
RUN apt-get update

USER Codespace
RUN az extension add --name azure-devops
You can run commands at the container level (USER root) or at the user level (USER Codespace)
Addin g extensions
The list of extensions to install is stored in the .devcontainer.json. You can manually add extensions to the list and then rebuild then your Codespace.

Manually add an extension to the devcontainer.json
But there is an easier way to achieve this. When you’re inside your Codespace, you can add the extension from the Extensions Marketplace:

Add an extension through the Extension Marketplace
Find the extension you need, then add it to the .devcontainer.json from the cogwheel menu.
Caching containers inside the Codespace
One of the great advantages of Codespaces is that you can get started on a project quickly with the click of a button. Once the Codespace has started, you can pull additional images, so they’re cached locally:
{
    "postCreateCommand": "docker pull ghcr.io/jessehouwing/mycustom-cli:latest && ... "
}
To pull the image from a private repository add the previously mentioned ***_CONTAINER_REGISTRY secrets.
Storing the Codespace container in GitHub Container Registry
It may not be desirable to build your container from scratch each time it’s started up and you may not want to store the container in a publicly accessible location. In that case, you can store your container in GitHub Container Registry and grant access to Codespaces.
First build and tag your container image:
> docker build .
[+] Building 0.2s (6/6) FINISHED
 => [internal] load build definition from Dockerfile 0.1s
 => => transferring dockerfile: 162B 0.0s
 => [internal] load .dockerignore 0.1s
 => => transferring context: 2B 0.0s
 => [internal] load metadata for mcr.microsoft.com/vscode/devcontainers/universal:1-linux 0.0s
 => [1/2] FROM mcr.microsoft.com/vscode/devcontainers/universal:1-linux 0.0s
 => CACHED [2/2] RUN az extension add --name azure-devops 0.0s
 => exporting to image 0.1s
 => => exporting layers 0.0s
 => => writing image sha256:aa1d12f58610a60d4ee53b7dfc06b2b5a9581f5e26de19931deb61c3b66b120f 0.0s
Tag and publish the image to GitHub Container Registry:
> docker tag aa1d12f58610a60d4ee53b7dfc06b2b5a9581f5e26de19931deb61c3b66b120f ghcr.io/jessehouwing/Codespaces-demo:latest
> docker push ghcr.io/jessehouwing/Codespaces-demo:latest
The push refers to repository [ghcr.io/jessehouwing/Codespaces-demo]
……
latest: digest: sha256:d928fbe90f267882d4d4de4194015eef06f5c88a045f3d9d4334aae0ea104612 size: 4538
Then navigate to the package settings for the container image you just pushed and grant access to GitHub Codespaces:

Find the newly published Codespace container and open the Package Settings
Grant the repository you want to launch this Codespace image from access to this package:

Manage Codespace access to add the repository
Now update the DockerFile in the repository to use this image:
FROM ghcr.io/jessehouwing/Codespaces-demo:latest
And rebuild your Codespace.
Beyond extending the base image
Your requirements for the Codespace image may go beyond the standard images, maybe you need a different Linux distro, standard libraries, a specific kernel version etc. In that case, you can also build a Codespace from scratch. A nice getting started point could be to take the Codespaces default container and either re-use the elements you need or use them as inspiration for your own image.
To start customizing the image, copy the contents of the .devcontainer folder of one of the standard images and replace the DockerFile with the base.DockerFile. You’ll find all the scripts used to install the different toolsets in the library-scripts folder.
Either commit the .devcontainer folder and its contents directly to your repository or build the container and publish it to a container registry as described above.

Take the full contents of a Codespace image to customize it ever further.
Summary
Codespaces enables teams worldwide to contribute to GitHub. It drastically reduces the time needed for anyone to open a project and contribute their changes.
Even when the standard options won’t fulfill your needs, it’s easy to extend and change what is installed and updates can be rolled out to your team effortlessly.
This article was originally published as part of Xpirit magazine #12.
Get your copy today!
Together we build an Engineering Culture - the title of the latest issue of our XPRT Magazine!
With special thanks to @mickey_gousset who personally reviewed all of the 16 articles. Thank you!
Download the magazine here: https://t.co/HkgsiS6xW0#engineeringculture pic.twitter.com/2cCDaV5kaT
— Xpirit (@Xpiritbv) March 15, 2022


Top comments (0)