This post walks through the steps to creating a simple Ethereum DApp using Web3.js and Truffle and set up monitoring of the API transactions sent to the blockchain. This article also provides explanation of various pieces of technology involved in developing DApps.
Introduction
What is blockchain
Decentralized Applications (or DApps) are applications that do not rely on a centralized backend running in AWS or Azure that power traditional web and mobile applications (outside of hosting the frontend code itself). Instead, the application interacts directly with a blockchain which can be thought of distributed cluster of nodes analogous to applications interacting directly with a “masterless” cluster of Cassandra nodes with full replication on every peer in an untrusted peer-to-peer network.
These blockchain nodes do not require a leader which would defeat the purpose of being truly decentralized. Unlike leader election in various consensus protocols like Raft and Paxos, blockchain transactions are sent to and processed by “random” nodes via Proof of Work or Proof of Stake. These nodes are untrusted nodes running in an arbitrary sized network on various compute devices around the world.
Such technology can enable true decentralized ledgers and systems of records.
DApps are the frontend apps which interact with these blockchain over an API. For Ethereum, this API is a JSON-RPC layer called the Ethereum Web3 API which Moesif supports natively.
What is Ethereum?
Ethereum is an implementation of blockchain technology that can run smart contracts. The Ethereum virtual machine is Turing complete and can run arbitrary computation directly on the blockchain network. Whereas Bitcoin has a limited set of commands, an Ethereum contract allows an application developer to specify exactly what transactions can be performed on a contract. Simple smart contracts can be thought of as aFinite State Machine (FSM) with a set of custom transitions.
What are Smart Contracts?
Smart contracts can enable an blockchain users exchange money and property or perform other actions among a group of users such as voting without any central authority.
For the Ethereum platform, the smart contracts are defined using a language called Solidity .
What is JSON-RPC
JSON-RPCis a stateless, light-weight remote procedure call (RPC) protocol using JSON for payload. Unlike RESTful APIs which are resource-centric, RPC APIs like JSON-RPC are procedural and can be more tightly coupled than RESTful APIs.
Frontend apps communicate with the Ethereum cluster using JSON-RPC. Web3 is the Ethereum compatible API and bindings which is built using the JSON-RPC spec.
Any decentralized app must use a Web3 SDK such as Web3.js for browser based DApps.
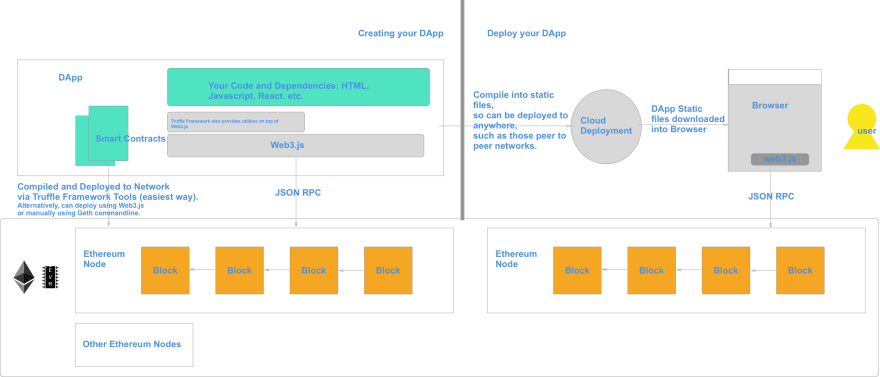
How the Pieces Fit Together
Tutorial for Building an DApp
Now that you have some background on Ethereum DApps, let’s walk through the tutorial.
We’ll use Truffle Framework, which provides a set of tools and boilerplate code for scaffolding DApps for Ethereum. Before we dive in, let’s go through some of the considerations.
- Does the DApp have an UI? Unless your DApp is an automated process. DApps often have a UI component such as a web or mobile app, since often its a way for humans to interact with the smart contracts or the Ethereum network. If your DApp is intended to be run in a browser, then you’ll build your UI in Javascript like any traditional Single Page App. As one of the most popular SPA frameworks, we’ll go with React.
The Truffle framework provides a boilerplate (called boxes), truffle-react, which derived from the create-react-app boilerplate code generator.
-
Have you designed your Smart Contract?_The smart contracts defines the rules and transitions for your DApp and is the piece that runs within the Ethereum virtual machine. Avoid putting unnecessary logic into your Smart Contracts, as the _gas to run its computation can be very expensive. We’ll start with the simple smart contract from truffle, called _SimpleStorage._It stores an unsigned integer
storedDataand provides a setter and getter.
pragma solidity ^0.4.18;

contract SimpleStorage {
  uint storedData;

  function set(uint x) public {
    storedData = x;
  }

  function get() public view returns (uint) {
    return storedData;
  }
}
- What about test environment? Since any write transaction on an Ethereum contract will cost gas you’ll want a test network to avoid this. While Ethereum provides official test networks, Truffle Framework provides a local test environment.
Step by Step Guide
1. Install Truffle Framework
npm install -g truffle
We use -g flag here so that we can keep using the framework for other projects.
2. Generate the boilerplate code
truffle unbox react
Truffle frameworks calls boilerplates boxes. The react boilerplate is based on thecreate-react-app boilerplate from Facebook.
This should generate set of files and folders.
There are few folders to pay attention to.
-
src/folder is where the react code is stored. -
contracts/folder is where the smart contracts written in solidity are stored. Notice theSimpleStorage.solfile we mentioned earlier. -
migrations/are scripts to manage deployment of contracts onto the Ethereum network. - In
public/, theindex.htmlfile is the entry point where the react app gets injected to.
3. Start the development environment
truffle develop
This start two things. First, Ethereum Node emulator at http://127.0.0.1:9545, and creates 10 test accounts seeded each with 100 ether. Second it starts the truffle command line prompt.
4. Compile the contracts
At the truffle development command prompt:
compile
This will compile your solidity contracts into JSON artifacts, including the bytecode called Ethereum Virtual Machine (=EVM) bytecode. You’ll find the compiled contracts in the build/contracts folder.
5. Deploy the contracts
At the truffle development command prompt:
migrate
This will deploy the contracts to the emulated Ethereum network. (Note, you can deploy to real Ethereum network later on by modifying the truffle-config.js file.)
Now, you can add some interactive features into the DApp such as edit the App.js file.
6. Run the DApp
At this point, you could run the DApp in your browser:
npm run start
However, it doesn’t have any interaction with Ethereum yet. So we’ll add some here.
First all, we need to connect to an Ethereum network by getting a handle on the Web3 object and setting the provider.
Note: If you want to see how the DApp connects to the Web3.js, check out the utils/getWeb3.js. Web3 first checks to see if there is a Web3 object injected already in the browser window and uses that. But if no Web3 instance was injected, Web3 tries to connect to the http://127.0.0.1/9545 as the provider of the network. If you are using Mist browseror use Metamask extension, the web3 object would be injected. You would configure the Metamask extension (or the Mist Browser) on which network to connect your DApp to, etc.
7. Modify DApp code
In App.js, we get a reference to the web3 object in the React componentWillMount() life cycle method and store it in the local state. We also instantiate a local version of the contract.
getWeb3
.then(results => {
  this.setState({
    web3: results.web3
  })

  // Instantiate contract once web3 provided.
  this.instantiateContract()
})
.catch(() => {
  console.log('Error finding web3.')
})
Now, we can add a small form:
<form className="pure-form pure-form-stacked">
  <fieldset>
    <label htmlFor="storage">Storage Amount</label>
    <input id="storage" type="number" ref={c => { this.storageAmountInput = c }} />
    <button
      className="pure-button"
      onClick={(e) => {
        e.preventDefault();
        this.addToSimpleStorage()
      }}
    >
      Set Storage
    </button>
  </fieldset>
</form>
This form will let users set a value they want to store in the SimpleStorage contract. The action handler for the button is here:
addToSimpleStorage() {
  if (this.state.simpleStorageInstance && this.state.accounts) {
    const value = this.storageAmountInput.value;
    this.state.simpleStorageInstance.set(value, {from: this.state.accounts[0]})
      .then((result) => {
        return this.state.simpleStorageInstance.get.call(this.state.accounts[0])
      }).then((result) => {
        this.setState(prevState => ({
          ...prevState,
          storageValue: result.c[0]
        }));
      }).catch((err) => {
        console.log('error');
        console.log(err);
      });
  } else {
    this.setState(prevState => ({
      ...prevState,
      error: new Error('simple storage instance not loaded')
    }))
  }
}
In the handler, we get the instantiated contract for SimpleStorage and accounts from the local state. Then, we set the storageValue using the value we obtain from the html form.
That is it, our small simple DApp. Few things to pay attention to:
-
simpleStorageInstance.settriggers the set method of the simpleStorage contract. - For details how this works check out Truffle’s contract library, which is somewhat of wrapper for Web3js.
8. Run our simple DApp
npm run start
You should be able to set a storageValue of a smart contract which in turn is stored on the Ethereum blockchain.
Set up Ethereum Web3 API monitoring.
Since DApp have no centralized servers, when you deploy your DApp in production, there would be no servers to install monitoring tools like Datadog orNew Relic. In order to monitor interactions with the smart contract and Ethereum network, we want to install a monitoring solution that can support DApps.
Moesif is happy to support Ethereum Web3 as a compatible API for monitoring and analytics.
Moesif can capture the API call data directly from the client side with a browser SDK which in turn can be used for debugging and monitoring issues, and alert you of anomalies.
We will use the moesif-browser-jsfor integration available on GitHub.
1. Create a Moesif Account to get an application id.
2. Add the following code snippet into public/index.html
<script src="//unpkg.com/moesif-browser-js@1.2.0/moesif.min.js"></script>
<script type="text/javascript">
var options = {
  applicationId: 'Your Moesif application id'
  // add other option here.
};

// for options see below.
moesif.init(options);

// this starts the capturing of the data.
moesif.start();
</script>
3. Reload your application
Moesif Automatically detects Ethereum Web3 calls and tracks them. You verify the events are captured by logging into Moesif and looking at the event stream.

Closing notes
The source code for this tutorial is available on Github.


Latest comments (1)
Thanks for sharing!