In this tutorial, we'll go through setting up an ESP8266 board, and publish an event to Wia via our CoAP API.
Connecting the board
Note: If your board has a micro USB port, you can probably skip this step.
Connect your board to laptop/desktop via a USB to TTL cable/adapter. Here's a pinout showing the different connections.
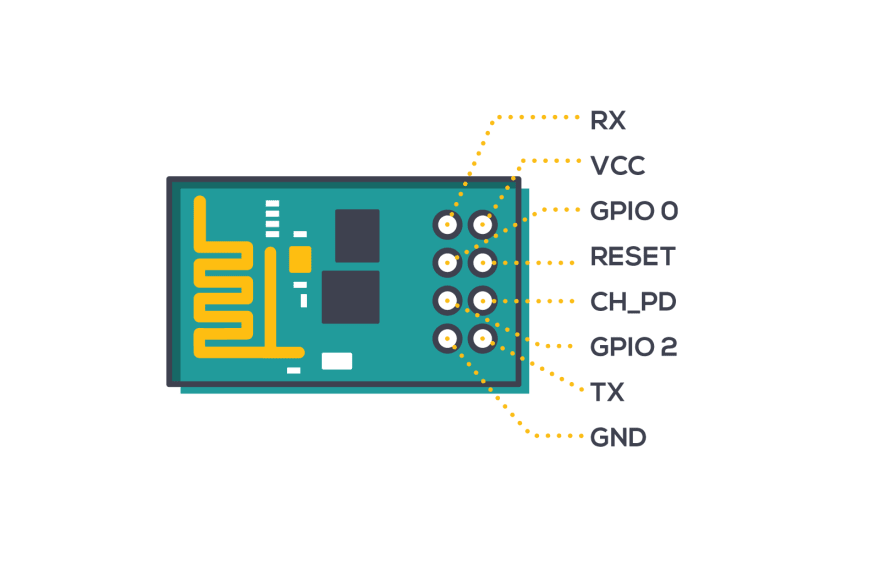
Connections between the ESP and USB TTL are the following:
- ESP8266 <-> USB TTL
- GND <-> GND
- TX <-> RX
- VCC <-> 3.3V(+)
- CH_PD <-> 3.3V(+)
- GPIO0 <-> GND (Only while flashing the board)
Setup Your Environment
- Install the Arduino IDE. You can download it for Mac OS X, Windows and Linux here
- Start the Arduino application and open
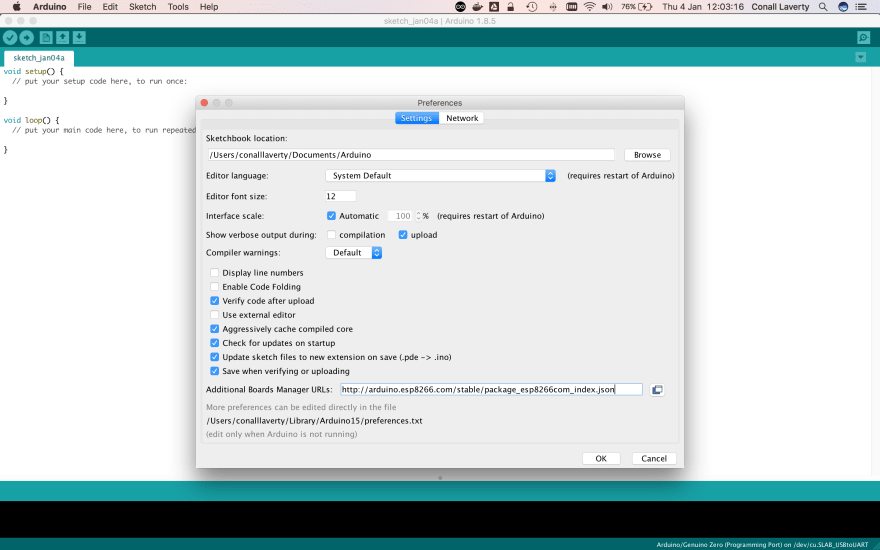
Preferences - Enter
http://arduino.esp8266.com/stable/package_esp8266com_index.jsoninto the Additional Board Manager URLs. If you need more than one, they can be separated with commas
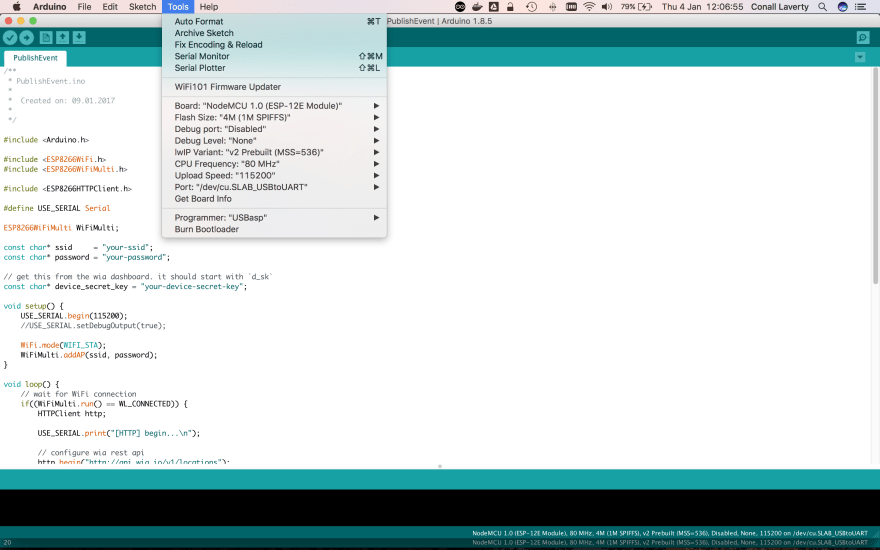
- Go to
Tools > Board > Boards Manager - Search for
esp8266. When found, clickInstall

Select your ESP8266 board type by going to Tools > Board, then choosing your type. For this example I am using NodeMCU 1.0 (ESP-12E Module).
You can get the name of your device's port using one of the following steps:
Linux and Mac OS X
- Download and install the FTDI drivers from here. Select the appropriate version for your operating system and architecture
- Open a terminal window and run the command
ls /dev/tty* - Look for a device with the name that begins with
/dev/ttye.g./dev/tty.usbmodemPy343431on MAC or/dev/ttyUSB0/dev/ttyACM0on Linux
Note:
For Linux, you may need to run the two commands below. Once you've completed that, reboot your computer. This will add permissions that will allow you to upload a sketch to the board.
sudo usermod -a -G tty ${USER}
sudo usermod -a -G dialout ${USER}
Windows
- Download and install the FTDI drivers from here. Select the appropriate version for your operating system and architecture
- Open the Windows start menu and search for Device Manager
- The COM port for the ESP8266 device will be listed as USB Serial Device or something similar
- Keep note of the COM port (e.g. COM4)
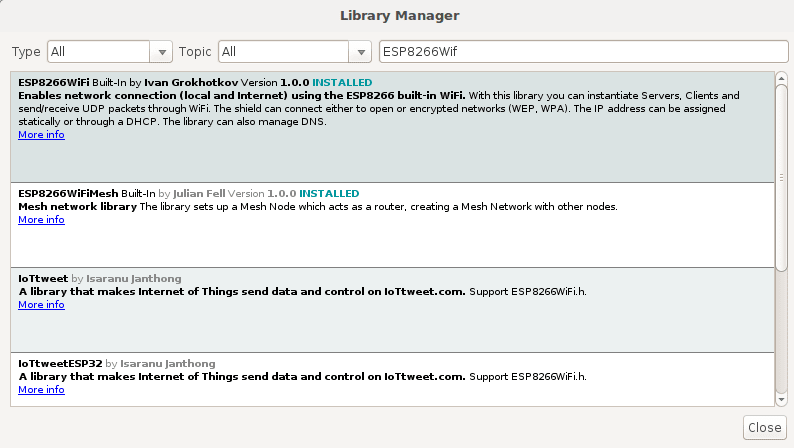
Install the required libraries
In the Arduino IDE, Go to Sketch > Include Libraries > Manage Libraries. Install each of the following libraries by searching for their name in the search bar within the modal. A button will appear in the bottom right of the box that will allow you to install the library.
- ESP8266WiFi
- ArduinoJson
ADDING COAP LIBRARY
To add the CoAP client library, you must manually add it to the libraries folder in your Arduino root folder.
- Download the zip file here
- Find the location of the
Arduinofolder on your operating system - In the
Arduinofolder, click intolibrariessub folder - Extract the zip file
- Restart the Arduino IDE
Add a Device in Wia
If you haven't already, you'll need create a Device in your Wia account. Tutorials can be found here.
Create the Sketch
In the Arduino IDE:
- Click on
File > Newto create a new Sketch - Copy and paste the example code below publishes an Event via CoAP
- The callback contains a placeholder section to write code to do something useful when a Command has been triggered
#include <ESP8266WiFi.h>
#include <ArduinoJson.h>
#include "coap_client.h"

//instance for coapclient
coapClient coap;

//WiFi connection info
const char* ssid = "your-wifi-ssid";
const char* password = "your-wifi-password";
String DEVICE_SECRET_KEY  = "your-device_secret_key";

//ip address and default port of coap server in which your interested in
IPAddress ip(52, 17, 209, 228);
int port = 5683;
char* path = "events";

StaticJsonBuffer<200> jsonBuffer;
JsonObject& root = jsonBuffer.createObject();

// coap client response callback
void callback_response(coapPacket &packet, IPAddress ip, int port) {
  char p[packet.payloadlen + 1];
  memcpy(p, packet.payload, packet.payloadlen);
  p[packet.payloadlen] = NULL;

  //response from coap server
  if (packet.type == 3 && packet.code == 0) {
    Serial.println("ping ok");
  }

  Serial.println(p);
}

void setup() {
  Serial.begin(115200);

  WiFi.begin(ssid, password);
  Serial.println(" ");

  // Connection info to WiFi network
  Serial.println();
  Serial.println();
  Serial.print("Connecting to ");
  Serial.println(ssid);
  WiFi.begin(ssid, password);
  while (WiFi.status() != WL_CONNECTED) {
    yield();
    Serial.print(".");
  }
  Serial.println("");
  Serial.println("WiFi connected");
  // Print the IP address of client
  Serial.println(WiFi.localIP());

  // client response callback.
  // this endpoint is single callback.
  coap.response(callback_response);

  // start coap client
  coap.start();
}

void loop() {
  root["name"] = "temperature";
  root["data"] =  21.5;
  root["accessToken"] =  DEVICE_SECRET_KEY;

  String data;
  root.printTo(data);
  char dataChar[data.length() + 1];
  data.toCharArray(dataChar, data.length() + 1);
  bool state;


  //post request
  //arguments server ip address,default port,resource name, payload,payloadlength
  int msgid = coap.post(ip, port, path, dataChar, data.length());

  state = coap.loop();

  delay(5000);
}
Replace the following values of the following variables:
-
your-wifi-ssid- with your WiFi network name -
your-wifi-password- with your WiFi network password -
your-device_secret_keywith your Device secret key from the Wia Dashboard (the one that begins with d_sk) - Go to
Sketch > Uploadin the Arduino IDE menu to send it to your ESP8266 - Open your Serial Monitor to view the output from your ESP8266 by going to
Tools > Serial Monitor
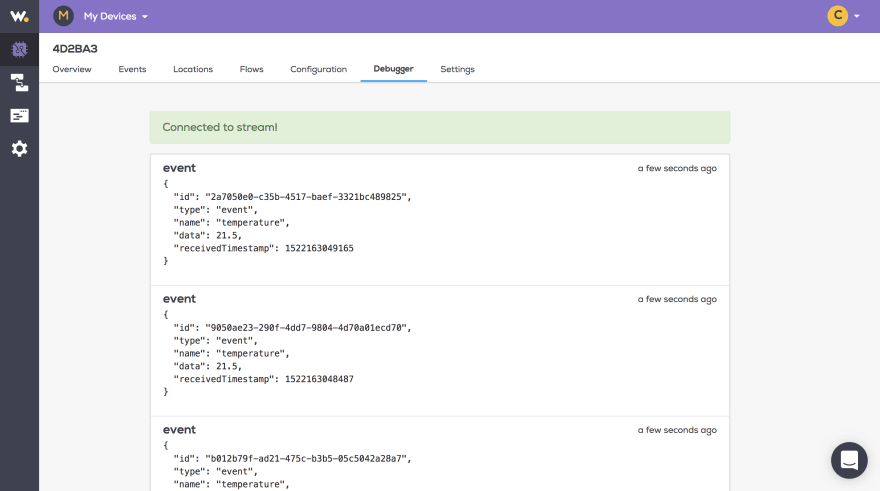
Now go to your device in the Wia dashboard and you should see the data appearing in the debugger.


Latest comments (1)
how to publish multiple topic