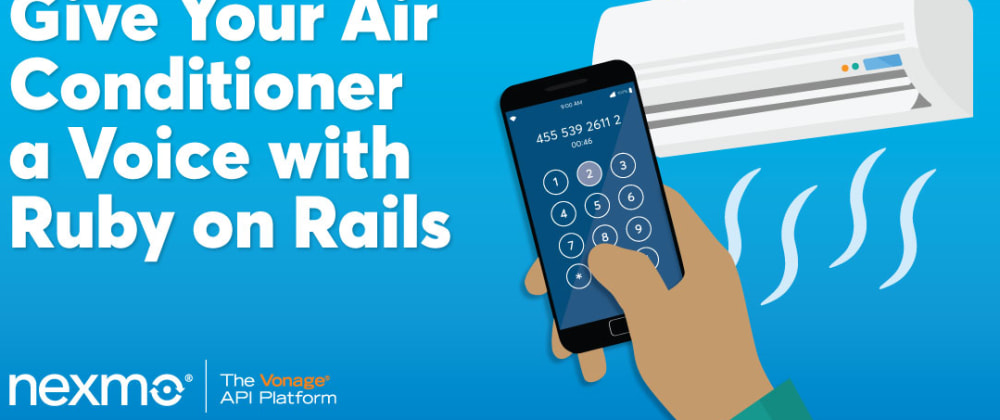
We are surrounded daily by devices that cool and heat our homes, refrigerate our food, illuminate our rooms, and more. Wouldn't it be nice to be able to speak to them? With the Nexmo Voice API, you can give your Internet-connected home devices a phone number and a voice. Why would you want to do this? While most smart devices come with mobile apps and websites, they are not always as accessible for people of differing physical abilities. A phone call still remains one of the most accessible tools available to us.
In this tutorial, we are going to provide a phone number and a voice to our Sensibo powered air conditioner unit. Sensibo connects legacy air conditioner units to the Internet. It is not feasible for many people to replace their entire unit without a smart unit, and for those people, Sensibo provides an alternative. We will be building a Ruby on Rails application, so some basic knowledge of Ruby and Rails is helpful, but not necessary. If you prefer, you can also clone a fully working version of this application from GitHub.
Prerequisities
This application requires you to have the following:
You will need your API credentials from both Nexmo and Sensibo. You will also need an externally accessible URL for Nexmo to communicate with. During development, ngrok is a great resource and has a free tier available. The Nexmo Developer Portal has information on how to set up ngrok with your Nexmo-powered application.
API Credentials
Sensibo API Credentials
Once you create an account within the Sensibo developer portal, you will have the option to create a Sensibo application. You must provide an application name. It can be whatever you would like, but for the purpose of this tutorial we will call ours nexmo_sensibo_app. When you click the Add API Key button after providing your name, you will be given an API Key. We will add that to our application further on.
In addition to your Sensibo API key, you also need the name of your Sensibo device. You can acquire that from your device homepage. Your current air conditioner state is displayed in a gray box. In the right-hand bottom corner of the box is an ellipsis icon. Upon clicking the ellipsis, you will see a menu item called Advanced, which opens a submenu that has an item called Advanced Info. When you click on Advanced Info, a dialog box will open that contains your air conditioner device's UID. Save that UID somewhere, and we will add it to our application along with the API key later on.
Nexmo API Credentials
It is free to create a Nexmo account on the Nexmo Dashboard. Once you create your Nexmo account, you will have access to your Nexmo API key and API secret. Take note of those for use in our application. We also need to create a Nexmo Voice application and link it to a Nexmo provisioned phone number. This is the number we will call when we want to interact with our air conditioner.
To purchase a Nexmo provisioned phone number, click on the Numbers dropdown on the left-hand side of the dashboard and then click on the Buy Numbers link. You will be shown the following options:

Once you click search, you will then be shown a list of possible numbers. Go ahead and pick any of them and purchase them. Now you have successfully rented a Nexmo phone number. At this point, you need to create a Nexmo Voice application and link it to your new phone number. When you click on the Voice dropdown on the left-hand side of the dashboard and then click on the Create an Application link you will be prompted with the menu to create a new application:
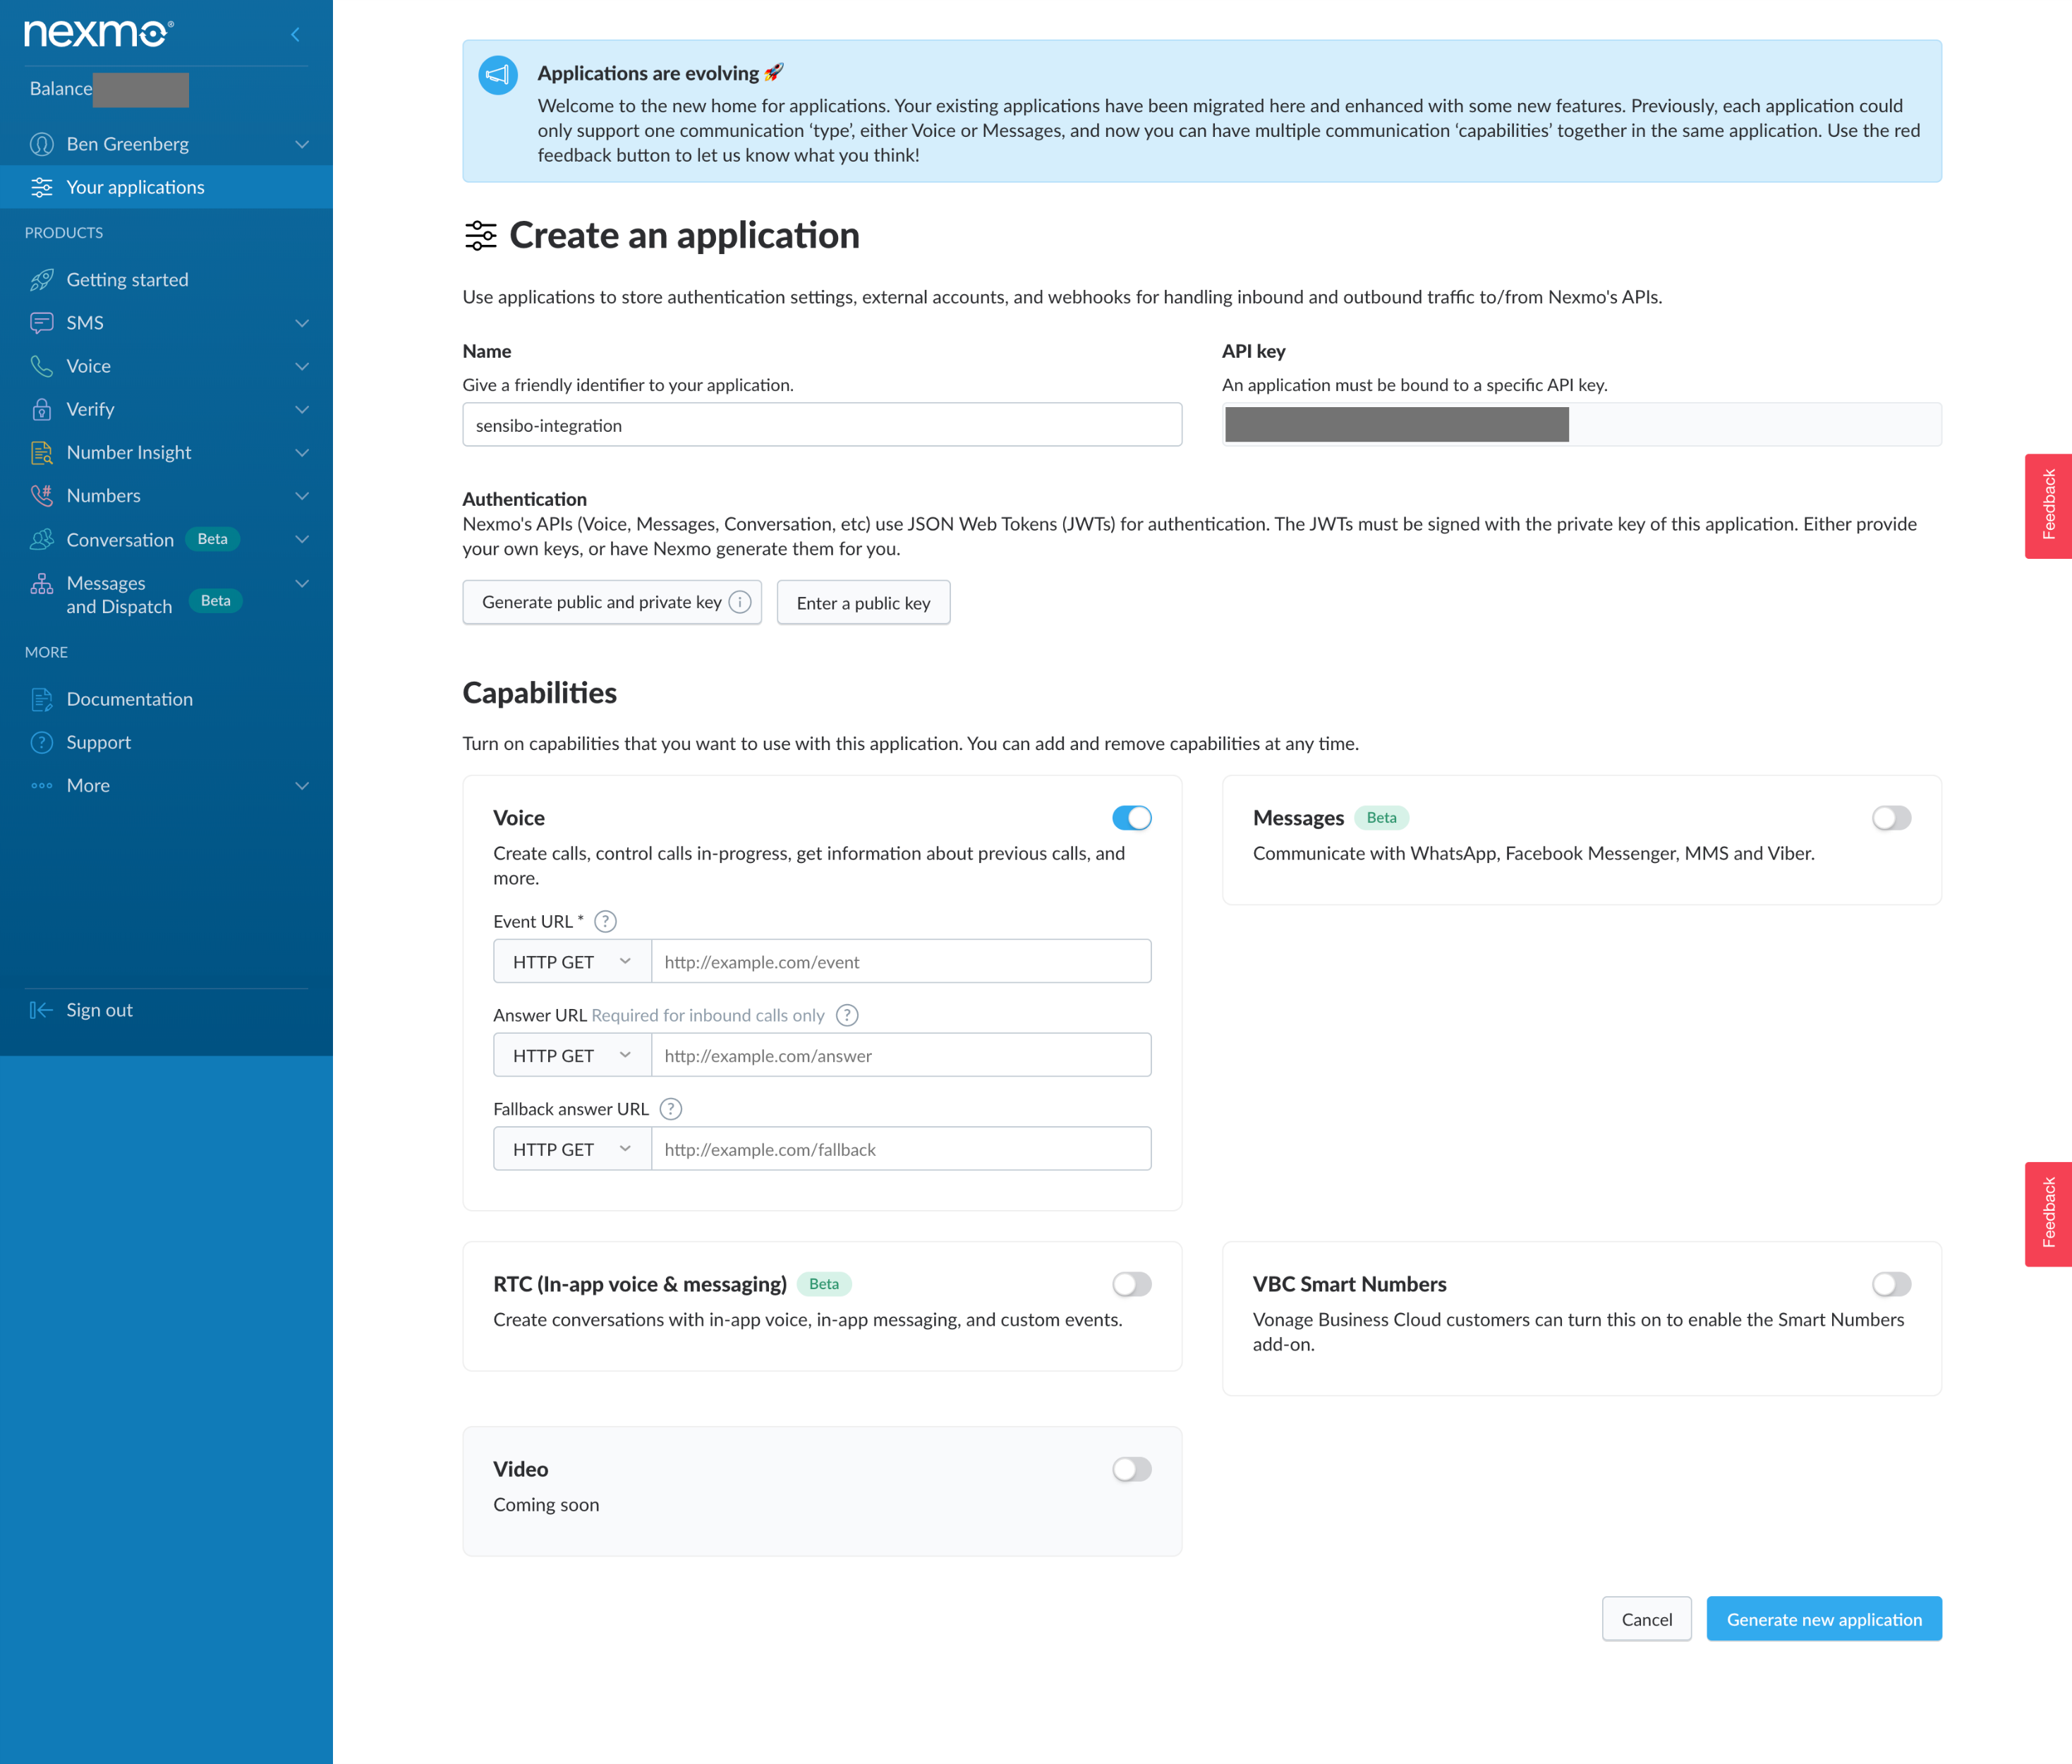
We need to give our application a name. You can name it whatever you like, but for this tutorial, we will call it sensibo-integration. Our Voice application has multiple possible capabilities, but for our purposes, we only need to enable Voice capability. You will see a place to provide your webhook URLs for event and answer endpoints. We will provide these later on and also explain what they are. For now, this is where you must have an externally accessible URL for the API to communicate with your application, and a tool like ngrok during development is a good resource.
Once you have finished filling out the options, you can click on Generate new application, and your Voice application will be created. At this point, we need to link our new application with our Nexmo number. We do that by selecting our application from the list of our applications (there should only be one right now). Once you click on your application, you will see options to edit its settings:
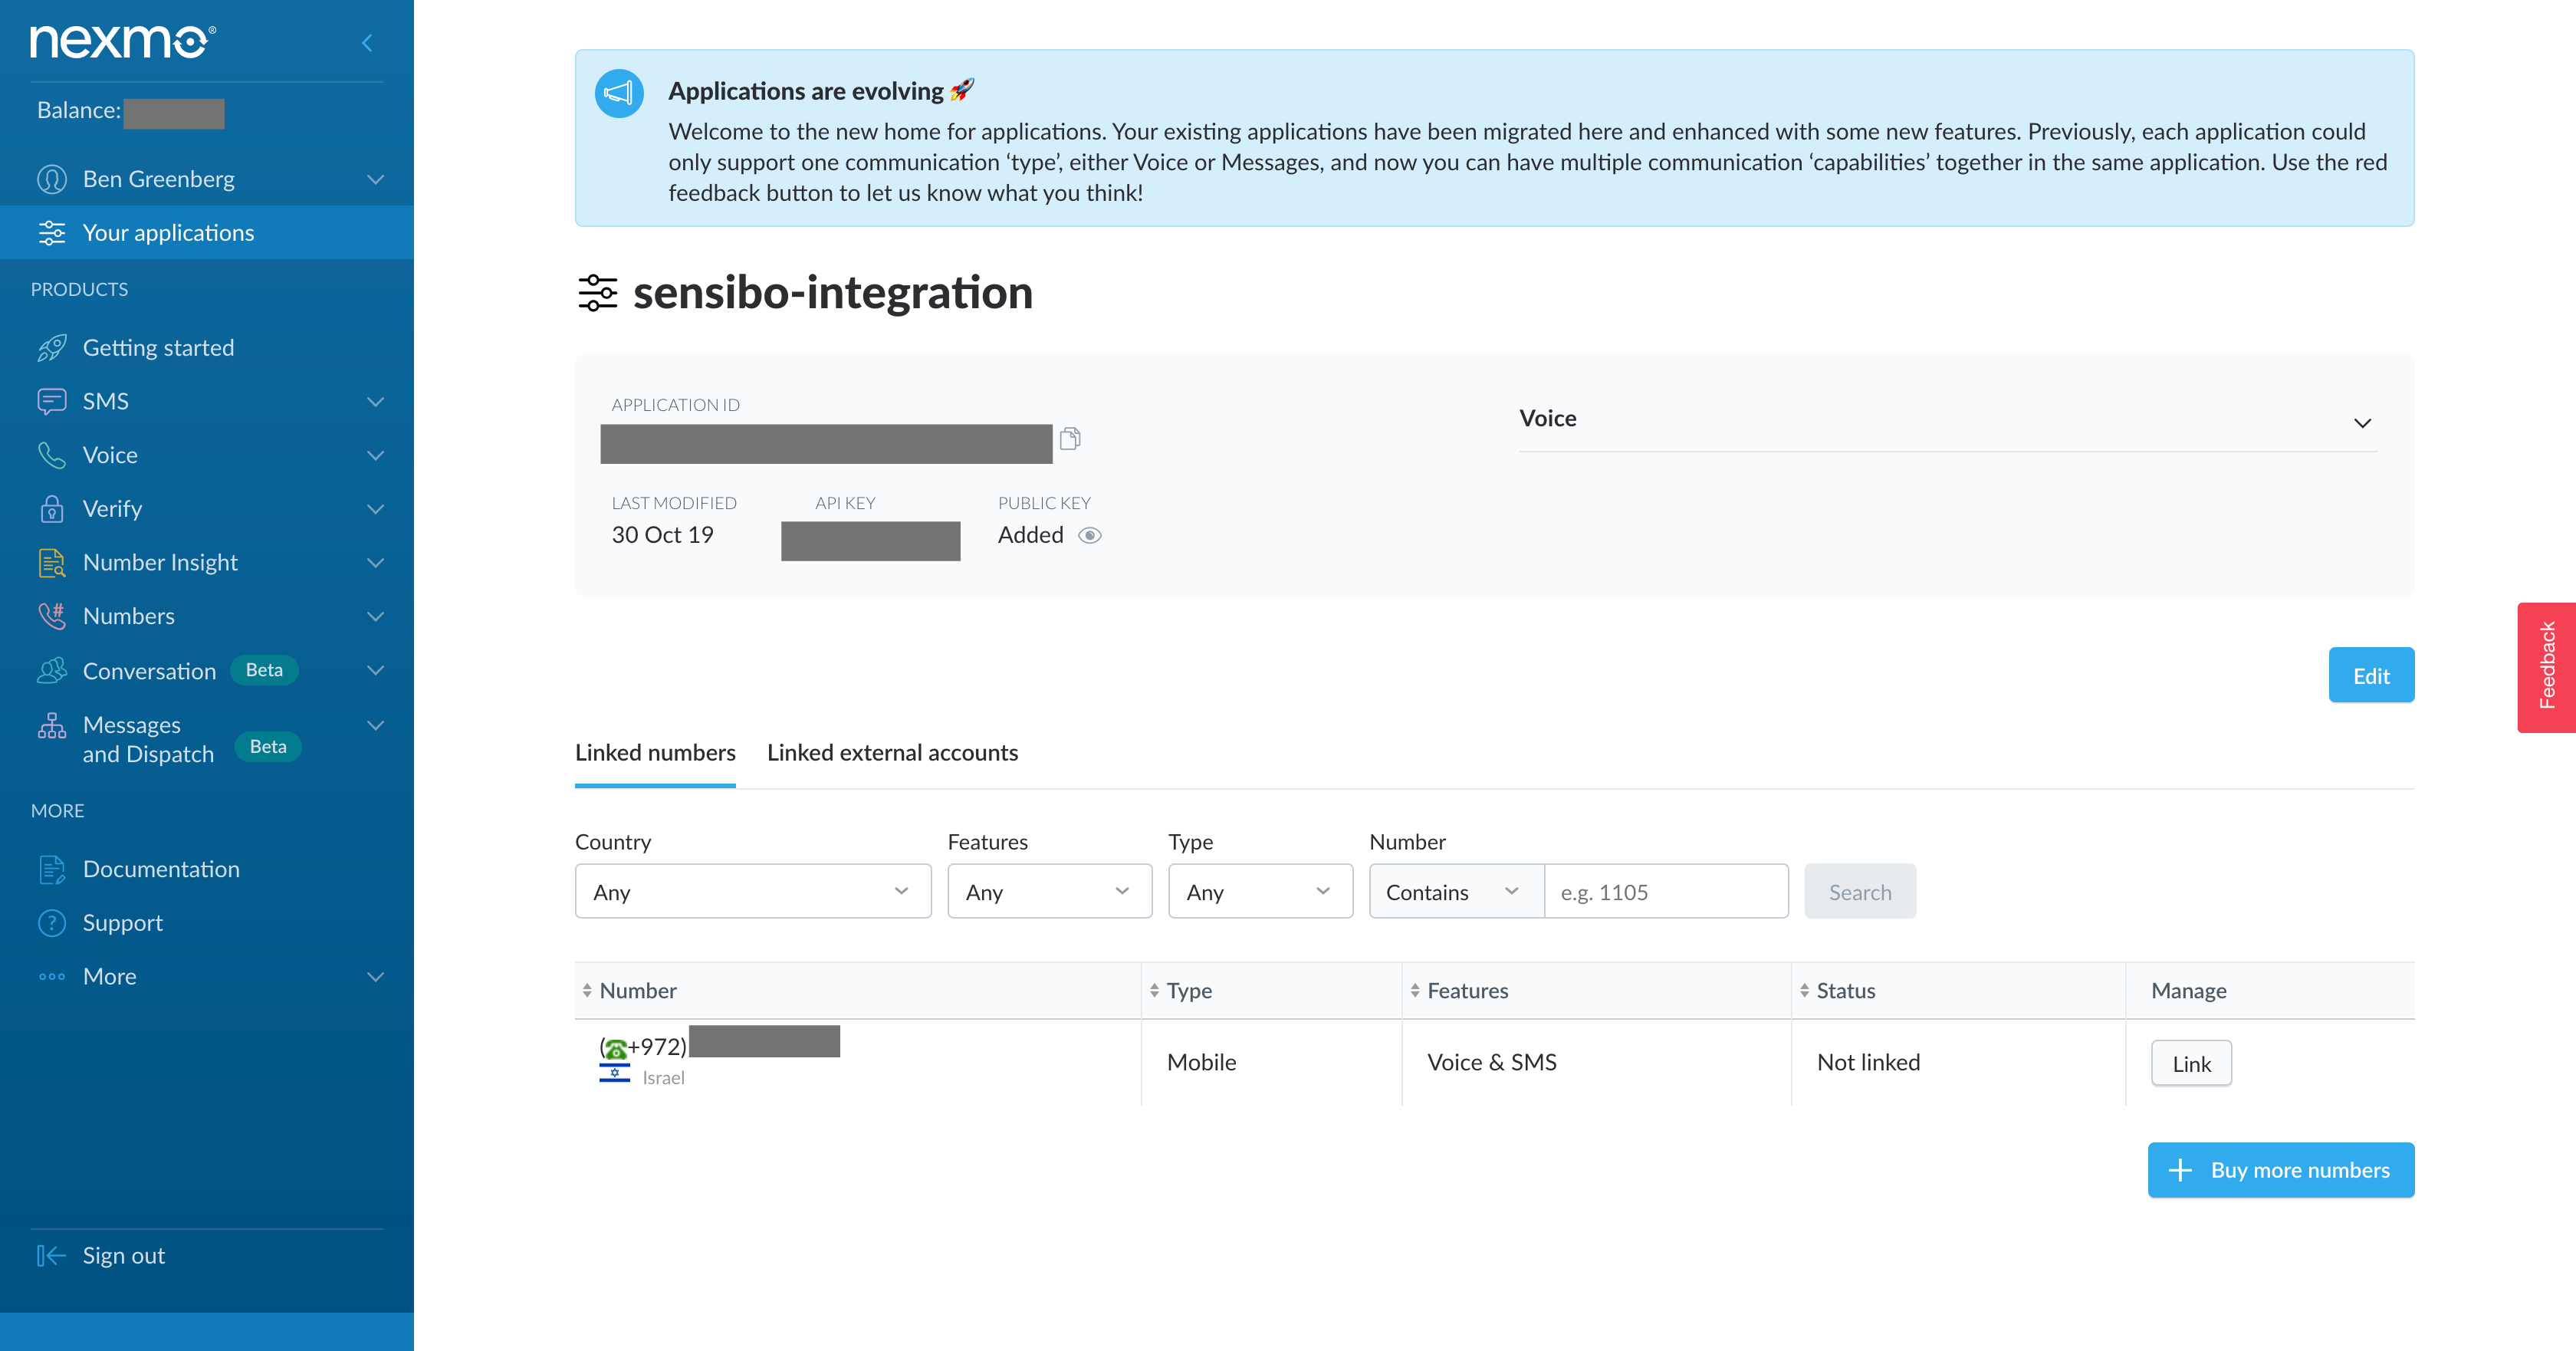
Near the bottom half of the menu is a section called Linked numbers. You will see your Nexmo provisioned phone number in the table and a button called Link in the far right side column. All you need to do is click on it and you are done. Your Nexmo provisioned phone number and your Nexmo Voice application are now linked.
We are now ready to create our application.
Building the application
We will create our new application by running rails new nexmo-sensibo-voice --skip-active-record from the command line. In this tutorial, we are not persisting the data, so we include the --skip-active-record flag in our new application to not create a database. However, if you are planning to persist the data, you can ignore that flag.
With our new application created, we need to create our Model, View, Controller, and Routes. Before all that, though, let's add our credentials to our application.
Environment Variables
We will be using environment variables to store our credentials. You could also use Rails Credentials if you prefer. However, if you do choose to use Rails Credentials, you must update any further references to the credentials in the examples to follow from ENV[...] to Rails.application.credentials.nexmo[...]. As an evergreen reminder, do not store your credentials in any public version control. You can use a gem like dotenv-rails to manage your environment variables and add the .env file to your .gitignore list.
Open up your .env file and add the following variable names:
NEXMO_API_KEY=
NEXMO_API_SECRET=
NEXMO_NUMBER=
NEXMO_APPLICATION_ID=
NEXMO_PRIVATE_KEY=
SENSIBO_APP_NAME=nexmo_sensibo_app
SENSIBO_API_KEY=
SENSIBO_API_URL=https://home.sensibo.com/api/v2/pods
SENSIBO_ID=
BASE_URL=
SECRET_PASSKEY=
Let's walk through each section of those environment variables together.
The Nexmo grouping is all of your pertinent Nexmo API information. This is where you provide your Nexmo API key and secret, along with your Voice application's ID and the path to your private key file that was automatically downloaded to your computer when you generated your new application.
The Sensibo grouping is all of your pertinent Sensibo API information. Your Sensibo app name is the one we created our application with, nexmo_sensibo_app, and your API key is the key that your account dashboard provided you. The SENSIBO_API_URL is the endpoint to access the Sensibo API, and your SENSIBO_ID is the UID of your actual Sensibo device.
The final two variable names are specific to this application. The first one is the externally accessible URL that you are utilizing to make your application available for communication with Nexmo. For example, this might be your ngrok URL. The latter variable name, SECRET_PASSKEY is the method by which we will authenticate ourselves to our application. The value for that is any 6 integers you wish.
With our credentials properly available to our application, we can move on and create the routes of our application.
Defining Routes
Our application will be constructed as a series of voice prompts for the user to navigate. Each voice prompt will lead to another endpoint, which will act upon the data the user provided. As such, we will create the following routes.rb file:
Rails.application.routes.draw do
  post '/webhooks/event', to: 'unit#event'
  post '/webhooks/answer', to: 'unit#answer'
  post '/authenticate', to: 'unit#authenticate'
  post '/menu-choice', to: 'unit#menu'
end
We have created four POST routes, each one connected to another step in the user journey through the application. These routes are pointing to not yet created UnitController methods, so let's go ahead and create those methods.
Controller Methods
Once we have created a file called unit_controller.rb in /app/controllers/ we can open it up and start creating our UnitController. The methods defined below will be referencing an AcUnit Model and class methods defined therein. We will create the AcUnit model and its accompanying methods in the next section.
First, we create a method to handle the initial answer of the phone call by the air conditioner. All of our methods will be using Nexmo Call Control Objects (NCCOs):
def answer
  render json:
  [
    {
      :action => 'talk',
      :text => welcome_text,
      :bargeIn => true
    },
    {
      :action => 'input',
      :eventUrl => ["#{ENV['BASE_URL']}/authenticate"],
      :submitOnHash => true,
      :maxDigits => 6,
    }
  ].to_json
end
Let's also create the method that holds the welcome text referenced in the :text parameter:
private
def welcome_text
  <<~HEREDOC
  Hi! This is your air conditioner.
  Please authenticate before continuing by entering your passkey.
  When you are done please enter the hash key.
  HEREDOC
end
The initial NCCO in #answer provides two actions, a talk and an input. The talk action speaks the welcome_text, while also letting a user "barge in" in the midst of the speech with their passkey and not wait for its completion. The input action defines the next step in the eventUrl and lets the user submit their passkey with the hash key, and it also limits the size of the input to 6 digits.
The second method we will create is an #event method that simply prints out the event data received back from the API into our Rails log output:
def event
  puts params
end
Our next method is one that will handle the authentication with the user's passkey. It will either continue the user on or end the call:
def authenticate
  if params['dtmf'] == ENV['SECRET_PASSKEY']
    render json:
    [
      {
        :action => 'talk',
        :text => AcUnit.menu_options_text,
        :bargeIn => true
      },
      {
        :action => 'input',
        :eventUrl => ["#{ENV['BASE_URL']}/menu-choice"],
        :submitOnHash => true,
        :maxDigits => 1,
      }
    ]
  else
    render json:
    {
      :action => 'talk',
      :text => 'Sorry your passkey did not match. Please call back and try again.'
    }
  end
end
The authentication check is a simple equality check between the passkey provided in the params and the passkey provided in the environment variable you defined earlier. If it is true, the AcUnit model class method #menu_options_text is invoked as part of the talk action, along with another input prompt pointing to /menu-choice in the eventUrl parameter. If it is false, then the user is asked to call back and try again, and the call is terminated.
The #menu method we will define will be where we process the user choice for what to do with the air conditioner. In this walkthrough, we have defined the ability to get the current unit status, turn it on, or to turn it off. The Sensibo API documentation contains other possible endpoints to implement as well.
def menu
  case params['dtmf']
  when '1'
    response = AcUnit.get_status
    render json:
    [
      {
        :action => 'talk',
        :text => AcUnit.ac_info_text(response)
      }
    ]
  when '2'
    response = AcUnit.update_status(true)
    if response['status'] == 'success'
      render json:
      [
        {
          :action => 'talk',
          :text => 'I am now on. Have a cool day!'
        }
      ]
    else
      render json:
      [
        {
          :action => 'talk',
          :text => 'Oops. Something went wrong. Please call back and try again.'
        }
      ]
    end
  when '3'
    response = AcUnit.update_status(false)
    if response['status'] == 'success'
      render json:
      [
        {
          :action => 'talk',
          :text => 'I am now off. Have a warm day!'
        }
      ]
    else
      render json:
      [
        {
          :action => 'talk',
          :text => 'Oops. Something went wrong. Please call back and try again.'
        }
      ]
    end
  else
    render json:
    [
      {
        :action => 'talk',
        :text => "You entered an incorrect choice of #{params['dtmf']}. Expected 1, 2 or 3. Please try again."
      },
      {
        :action => 'connect',
        :eventUrl => "#{ENV['BASE_URL']}/authenticate"
      }
    ]
  end
end
Now that we have created our Controller methods, we can turn to creating our AcUnit model and defining its methods.
Defining the Model
To create our model, let's first create the file that we will be working in. Create a new file called sensibo.rb in /app/models/ and in it define an empty class:
class Sensibo
end
We will need the ability to manipulate JSON and make HTTPS calls in the model so let's include those in the model as well, as such above the class definition add:
require 'net/https'
require 'json'
When we instantiate an instance of our Sensibo class (i.e. our AcUnit in the Controller) we need to provide it with the API key and the device ID. Therefore, we will create an #initialize method that accepts both an api_key and id as arguments. We will also include these in an attr_reader, as we are not setting them only reading them:
class Sensibo
  attr_reader :api_key, _id
  def initialize(api_key, id)
    @api_key = api_key
    @id = id
  end
end
At this point, we are ready to build the model methods we already invoked in the Controller. The first one is #get_status, which will fetch the latest data from the Sensibo unit. We will get that data making a GET request:
def get_status
  begin
      uri = URI("#{ENV['SENSIBO_API_URL']}/#{self.id}?fields=*&apiKey=#{self.api_key}")
      http = Net::HTTP.new(uri.host, uri.port)
      http.use_ssl = true
      req = Net::HTTP::Get.new(uri, {'Content-Type' => 'application/json'})
      res = http.request(req)
      data = JSON.parse(res.body)
  rescue => e
      puts "failed #{e}"
  end
  data
end
Next, we will create a method to update the status of the air conditioner, which will take in an argument of state and create a PATCH request. In the case we are building for the argument is either true for on or false for off. However, you can extend the functionality as you see fit in accordance with the endpoints the Sensibo API exposes.
def update_status(state)
  begin
    uri = URI("#{ENV['SENSIBO_API_URL']}/#{self.id}/acStates/on?apiKey=#{self.api_key}")
    http = Net::HTTP.new(uri.host, uri.port)
    http.use_ssl = true
    req = Net::HTTP::Patch.new(uri, {'Content-Type' => 'application/json'})
    req.body = {"newValue" => state}.to_json
    res = http.request(req)
    data = JSON.parse(res.body)
  rescue => e
    puts "failed #{e}"
  end
  data
end
Lastly, we will create two methods that will build the text output we wish to play for the user in the application. The first one will be the output of the current AC status, while the last one will be the output of the menu options:
def ac_info_text(data)
  <<~HEREDOC
  You requested the current info on your AC unit located at:
  #{data['result']['location']['address'][0]} in #{data['result']['location']['address'][1]}, #{data['result']['location']['address'][2]}.

  The AC unit is currently #{data['result']['acState']['on'] == 'true' ? 'on' : 'off'} and is
  #{data['result']['connectionStatus']['isAlive'] == 'true' ? 'connected' : 'disconnected'}.
  It's target temperature is set to #{data['result']['acState']['targetTemperature']}.
  HEREDOC
end
def menu_options_text
  <<~HEREDOC
  Thank you for authenticating.
  Please choose from the following options:
  Press 1 and the hash key for my current status
  Press 2 and the hash key to turn me on
  Press 3 and the hash key to turn me off
  Or hang up at anytime to end this call
  HEREDOC
end
With the creation of these last two model class methods, we have wrapped up all of our coding for the application. We are ready to run it!
Running the Application
Now that we have built our application, we can go ahead and use it. When we are running this in our development environment, we need to make sure we have both an external URL available and our Rails server running. If you are using ngrok for your external URL, make sure you have updated your API endpoints in the Nexmo dashboard and your BASE_URL environment variable to point to the correct ngrok URL. When you are using the free tier of ngrok, your ngrok URL changes each time you restart it. To start your Rails server locally, you simply need to run rails s from the command line.
At this point, you can call your Nexmo provisioned phone number and start interacting with your air conditioner by phone!


Top comments (3)
Isn't it easier to buy an aircon that already has these features. I bought a new hvac tampa from the internet and it works perfectly. It doesn't support voice commands or gesture control, but I don't think it is mandatory for an aircon to be controlled by gestures. There are many good websites on the internet where you can find a good aircon for you. Check it out by yourself, you won't be disappointed.
At my place, I always have a problem with my husband and children, because they like colder temperatures, but may not always prefer the hotter ones. I’ve seen at my friend’s house the air conditioning service and I thought that it will be the greatest solution for my family’s arguments. My friends are grateful for having air conditioning service because that was the solution for their arguments. They had the same situation as my family. And my family agreed with idea that it will be good to have a solution without arguments like before.
The future is here!