
Do you remember the game of telephone from when you were a kid? Perhaps you played it in the school playground during recess, or while at a sleepaway camp during the summer? I remember a teacher in grade school using the game to illustrate how unreliable communications could be. If you never played it here is a quick recap:
Telephone begins when one person whispers a message to the person next to them. The second person whispers the same message to the next person, who then shares it with the person next to them, and so on and so on. The game continues until the message completes its route through all of the people playing and returns to the original sender. Oftentimes, the final message is quite different than the original.
There are countless essential and critical tasks that modern cloud communications applications can accomplish. However, sometimes it is just entertaining to take a break and make something fun. So, in this walkthrough, we are going to recreate the game of telephone utilizing Ruby on Rails, the Nexmo Voice API, and Google Cloud Platform Speech to Text and Translate APIs.
When we are finished we will have a voice application that will accept an inbound phone call, take an original message, convert it to text, translate it through multiple languages until it at last retranslates it back into English, and plays the final message back to the caller.
You can also clone to your local machine a working copy of this application from GitHub.
Ready? Let's begin!
Prerequisites
To get started you need the following:
Setting Up ngrok
There are several ways to make our local development server externally accessible, but one of the simplest ways is with ngrok. You can read this article for a more detailed explanation of how ngrok works. However, for our purposes, we just need to get it running and copy the URL that it provides us.
In order to start ngrok, open up a new terminal window and execute the following from the command line:
$ ngrok http 3000
You will now see an ngrok logging interface in your terminal window. Near the top of the interface is a line that begins with Forwarding and contains two URLs. The first is the externally accessible ngrok URL, which ends with ngrok.io followed by http://localhost:3000, that being your local development server. Now, when you or Nexmo contacts the ngrok.io URL, it will forward it to your local server.
Make sure to copy the ngrok.io URL down somewhere safe. We will be using it in our next step of setting up our Nexmo account, phone number and Voice application.
Setting Up a Nexmo Account
In order for our voice application to work, we need a Nexmo account, a Nexmo provisioned phone number, a Nexmo application, and, lastly, we need to link our application to our phone number.
You can create a Nexmo account for free, and as an added bonus, your account will be credited with 2 euros to begin using your new application. Navigate to https://dashboard.nexmo.com/sign-up in your web browser and go through the sign up steps. Once you have finished you will be in your Nexmo dashboard.
From the left-hand menu, click on the Voice menu item. You will see the following four options under APPLICATIONS:

Click on the Create an application option and you will be directed to a page where you can set up a new Nexmo application.
Complete the form with the following:
-
Application nametext field enterrails-telephone-game -
Event URLtext field enter your ngrok URL:https://[ngrok url here]/event -
Answer URLtext field enter your ngrok URL again:https://[ngrok url here]/webhooks/answer
Once you have finished, go ahead and click the blue Create Application button.
You now have created a Nexmo Voice application. Our next step is to purchase a Nexmo phone number and link it to this application.
From the Nexmo Dashboard, click on the Numbers menu item on the left-hand menu. You will see three options appear:

Click on the Buy numbers option and you will be directed to a page where you can choose a country, features, type, and four digits you would like the number to have.
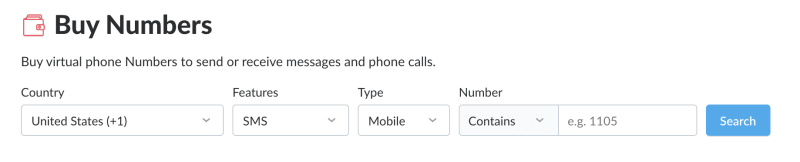
For our purposes: pick the country that you are currently in, so that the call will be a local call for you; pick Voice for features and either mobile or land line for type. You do not need to enter anything for the Number text field. When you click Search, you will see a list of phone numbers available. Pick one by clicking the orange Buy button, and clicking the orange Buy button once more in the confirmation prompt.
Once you own the number, you can now link it to your rails-telephone-game Voice application. To do so, click on the gear icon next to the phone number and you will see the following menu:
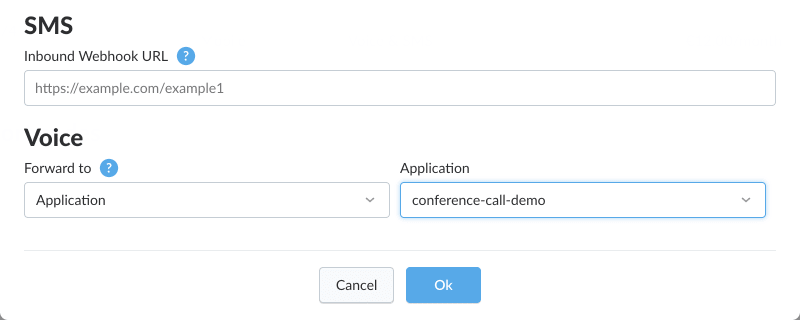
Select the voice-proxy-forwarding-demo Application from the drop down list and click on the blue Ok button. Your Nexmo phone number is now linked to your Voice application and ready to accept and forward inbound phone calls via voice proxy.
Setting Up a Google Cloud Platform Account
The Google Cloud Platform documentation has excellent documentation on getting up and running with a new account.
In short, once you have created an account, you need to create a new application. After creating your new application, you will need to make sure to download your credentials, which will be in a file containing JSON. Save the file somewhere you will remember, we will be using it shortly. We will discuss adding it, along with your Nexmo API credentials, as environment variables in just a bit.
Lastly, within your Google Cloud Platform dashboard make sure you have enabled both the Speech API and the Translate API. We will be using both in our telephone game.
Setting Up a Rails Application
We are now ready to set up our Rails application to play telephone. We will be doing the following:
- Initializing a new application
- Adding our API credentials
- Defining Controller Actions and Routes
Initializing a New Application
To initialize a new application execute the following from the command line:
$ rails new rails-telephone-game --database=postgresql
This will create a new Rails application with PostgreSQL as its default database.
Once that command has finished, go ahead and open up the application in your favorite code editor and edit the Gemfile in the root folder of the application. We are going to add the Nexmo Ruby, dotenv-rails, Google Cloud Platform Translate API, and Google Cloud Platform Speech API gems:
# Gemfile

gem 'nexmo'
gem 'dotenv-rails'
gem 'google-cloud-translate'
gem 'google-cloud-speech'
After you have saved the Gemfile, you can install the gems by running bundle install from the command line.
You will also want to run rake db:migrate at this stage to initialize the database schema. For the purposes of this walkthrough, we are not persisting the data, but you can do so on your own.
Add API Credentials
We need to provide the API credentials for both Nexmo and Google Cloud Platform into our application. In order to securely manage our environment variables, we will be using the functionality of the dotenv-rails gem we installed. First, create a new file called .env in the root folder of your project and add the path to that file to your .gitignore file. Open up the .env file and add the following:
# .env

GOOGLE_APPLICATION_CREDENTIALS=
GOOGLE_PROJECT_ID=
NEXMO_API_KEY=
NEXMO_API_SECRET=
NEXMO_NUMBER=
NEXMO_APPLICATION_ID=
NEXMO_PRIVATE_KEY=
BASE_URL=
The first environment variable, GOOGLE_APPLICATION_CREDENTIALS, points to the path of the JSON file containing your API credentials for Google. Go ahead and move the file you downloaded when you set up your account earler into the root folder of your application and add the path to the right-hand side of the = sign (i.e. GOOGLE_APPLICATION_CREDENTIALS=./my-google-cloud-platform-credentials.json).
The second environment variable, GOOGLE_PROJECT_ID, is the ID of the Google Cloud Platform project you created when you went through the sign-up process (i.e. GOOGLE_PROJECT_ID=rails-telephone-game).
The next five environment variables relate to your Nexmo account. You can find your NEXMO_API_KEY and NEXMO_API_SECRET on the main page of your Nexmo dashboard.
The NEXMO_NUMBER variable value is the phone number you provisioned from Nexmo.
The NEXMO_APPLICATION_ID is found in the list of your applications in the Nexmo dashboard. The NEXMO_PRIVATE_KEY is, like the Google credentials, the path to the private key credentials for your account.When you created your Nexmo voice application you generated a public/private key pair, which automatically downloaded the private key to your computer. Move the private key to the root folder of your application and add the path as the value of this variable, exactly as you did for GOOGLE_APPLICATION_CREDENTIALS.
The last environment variable, is your external ngrok URL, for example: http://my-sample-url.ngrok.io.
Now that your credentials are all added to your application, we are now ready to create our Controller and our Routes.
Defining Controller Actions
First, create a new file in /app/controllers/ called telephone_controller.rb. The initial work we will do inside of it is define credentialed instances of the Nexmo client and the Google Cloud Platform client:
# telephone_controller.rb

class TelephoneController < ApplicationController

    Translator = Google::Cloud::Translate.new(project: ENV['GOOGLE_PROJECT_ID'])
    NexmoClient = Nexmo::Client.new(
        application_id: ENV['NEXMO_APPLICATION_ID'],
        private_key: File.read(ENV['NEXMO_PRIVATE_KEY'])
    )
    Converter = Google::Cloud::Speech.new
We will also take a moment now and define the list of languages we want the Google Cloud Platform Translate API to run through in the game:
# telephone_controller.rb

class TelephoneController < ApplicationController

....

LANGUAGES = [
    'ar',
    'he',
    'hi',
    'ku',
    'ru',
    'tr',
    'yi'
]
For this walkthrough, I chose Arabic, Hebrew, Hindi, Kurdish, Russian, Turkish, and Yiddish. You can, of course, replace or add any language you would like.
We need two actions defined in our Controller: #answer and #event. The #answer method is responsible for answering the phone call, listening and recording the message from the user, and keeping the call open while it is processed. The #event method is responsible for transcribing the recording into text, running it through the translator and returning the newly translated message back to the caller.
The #answer method:
def answer
    puts "Starting Call"
    @@uuid = params[:uuid]
    render json:
    [
        {
            :action => 'talk',
            :text => 'Welcome to the Nexmo Telephone Game. To begin say your message at the beep. To end the recording press the pound key.'
        },
        {
            :action => 'record',
            :eventUrl => ["#{ENV['BASE_URL']}/event"],
            :beepStart => true,
            :format => "wav",
            :endOnKey => "#",
            :timeOut => 30
        },
        {
            :action => 'talk',
            :text => 'Please wait a moment as your message runs through our sophisticated top secret linguistic algorithm...'
        },
        {
            :action => 'conversation',
            :name => 'telephone-game-conversation'
        }
    ].to_json
end
The #answer method is comprised of Nexmo Call Control Object (NCCO) instructions in JSON format. The first instruction sends a welcome message to the caller, the second one records the caller's response and tells Nexmo that the callback URL is /event at your application's ngrok URL. The third one lets the caller know that the message is being processed, while the fourth instruction uses Nexmo's conversation feature to keep the call open while the processing happens.
The #event method is wrapped inside a conditional check to see whether there is an audio recording. The /event endpoint is accessed several times by Nexmo with different status updates, but we are only concerned with the one that contains a recording:
def event
    if params['recording_url']
        # Save Recording
        puts "Saving Audio File"
        NexmoClient.files.save(params['recording_url'], 'recording.wav')

        # Transcribe Recording
        transcribed_text = ''
        file_name = './recording.wav'
        audio_content  = File.binread(file_name)
        bytes_total    = audio_content.size
        bytes_sent     = 0
        chunk_size     = 32000
        streaming_config = {
            config: {
                encoding: :LINEAR16,
                sample_rate_hertz: 16000,
                language_code: "en-US",
                enable_word_time_offsets: true
            },
            interim_results: true
        }
        puts "Converting Speech to Text with GCP Speech API"
        stream = Converter.streaming_recognize(streaming_config)
        # Simulated streaming from a microphone
        # Stream bytes...
        while bytes_sent < bytes_total do
            stream.send audio_content[bytes_sent, chunk_size]
            bytes_sent += chunk_size
            sleep 1
        end
        puts "Stopped passing audio to be transcribed"
        stream.stop
        # Wait until processing is complete...
        stream.wait_until_complete!
        puts "Transcription processing complete"
        results = stream.results
        results.first.alternatives.each do |alternatives|
            transcribed_text = alternatives.transcript
        end

        # Run Transcription Through Translations
        puts "Translating Message"
        translated_text = transcribed_text
        LANGUAGES.each do |language|
            translated_text = (translated_text == transcribed_text) ?
            Translator.translate(translated_text, to: language) : Translator.translate(translated_text.text, to: language)
        end
        final_translation = Translator.translate(translated_text.text, to: 'en')

        # Play Final Text Back To Call
        puts "Playing Translated Audio to Call"
        puts "Transcribed Original Message: #{transcribed_text}"
        puts "Final Message: #{final_translation.text}"
        closing_msg = "Your message was translated through Arabic, Hebrew, Hindi, Kurdish, Russian, Turkish and Yiddish and is returned to you as: #{final_translation.text}"
        NexmoClient.calls.talk.start(@@uuid, text: closing_msg, voice_name: "Kimberly") if transcribed_text != ''
    end
end
There is a lot that is happening in the #event method; let's break it down.
Initially, once the parameters with a recording_url comes back true, we go ahead and save that recording locally. Then we utilize the GCP Speech to Text API to convert the audio recording into transcribed text.
To do so, we define several variables containing the audio configuration. We chose to simulate streaming text to the GCP API for conversion, rather than sending the saved audio file directly.
There is a noticeable positive difference in performance speed with this approach. The result is an array containing of possible transcriptions. We only want the first one, which is what we are doing here:
results.first.alternatives.each do |alternatives|
    transcribed_text = alternatives.transcript
end
The variable transcribed_text now contains the text of the caller's audio message. Our next step in the method is to run it through the languages we defined for translation. We want the text that gets translated each time it runs through the Translator to be the next iteration of translated message. This is what will make our final message even more different than the original message and, hence, more fun!
To do so, we create a new variable called translated_text, which is initially defined by the contents of transcribed_text. After each iteration, translated_text's value changes to that current iteration's translation, which is then used as the text to be translated in the next iteration. Finally, the last translation is run one last time through the translator and returned to English. This is what will be played back to the caller:
# Run Transcription Through Translations
puts "Translating Message"
translated_text = transcribed_text
LANGUAGES.each do |language|
    translated_text = (translated_text == transcribed_text) ?
    Translator.translate(translated_text, to: language) : Translator.translate(translated_text.text, to: language)
end
final_translation = Translator.translate(translated_text.text, to: 'en')
One item to note in the above code is that we employ a ternary operator to check if the value of translated_text is equal to that transcribed_text. We do that because we need to access the text differently if it is a Google Cloud Platform Speech to Text object (i.e. with dot notation) or not.
The last item of business inside the method is to play it back to the caller. We do that by using the @@uuid variable, which holds the conversation ID and injecting the text as text to speech into the present call:
# Play Final Text Back To Call
puts "Playing Translated Audio to Call"
puts "Transcribed Original Message: #{transcribed_text}"
puts "Final Message: #{final_translation.text}"
closing_msg = "Your message was translated through Arabic, Hebrew, Hindi, Kurdish, Russian, Turkish and Yiddish and is returned to you as: #{final_translation.text}"
NexmoClient.calls.talk.instance_variable_set(:@host, 'api-us-1.nexmo.com')
NexmoClient.calls.talk.start(@@uuid, text: closing_msg, voice_name: "Kimberly") if transcribed_text != ''
Once our Controller actions are defined, the final step we need to do before we are ready is to create our application's Routes.
Defining the Routes
Open up the routes.rb file in the /config folder. We are going to add one GET and one POST request:
# routes.rb

get '/answer', to: 'telephone#answer'
post '/event', to: 'telephone#event'
That's it! We have successfully created our application. We are now ready to run it. Make sure that ngrok is running in the background, and go ahead and start your Rails server from the terminal by running: rails s. You can now call your Nexmo phone number and play telephone. Have fun!


Top comments (0)