
Windows Forms is not dead — it’s now more alive than it has been for years now that Microsoft announced they will support it in .NET Core 3.0, and that you will be able toembed “modern” UWP controls in Forms apps.
Besides not being dead, it has other things going for it:
- It’s easy to use from F#, as you’ll see from this post. WPF requires more complex adaptation work (e.g. there is a XAML type provider), while Forms is pretty much straight .NET.
- .NET Native (i.e. the “full” UWP stack) does not work with F# at all, and possibly never will — so it’s probably not going to be relevant to your choices.
- Windows Forms uses the programming pattern familiar from Qt and other UI toolkits, so you can pretty much get going in a day.
- It’s not a particularly good fit for “rich” or customized UI’s, but you are not writing those anyway. When you have someone paying you to do a rich UI for desktop, they are paying to do it on the Web.
- It’s the real Native toolkit for Windows, so the applications can be very small. An application that does something can happen in 20kB (without F# of course, F# adds ca. 3MB of weight).
- Windows Forms, unlike WPF or UWP, has a cross platform story and can be run in Mono under Linux/Mac.
With F# you say?
The problem with GUI programming with F# is that UI design tools are written for C# and VB programmers. The recommended approach has usually been to:
- Create the GUI logic in C#, using the Forms UI Designer.
- Use F# to make libraries and call out to them from the GUI.
The obvious problem with this is that you don’t really want to use C# more than necessary, and want to keep language context switching to the minimum — not to mention that you are limited to constructs that are well supported on C# side on the boundary.
Another approach, probably only appropriate for seasoned Forms developers, is to write everything in F# without using the Designer. This is outlined at least in the (excellent) “Expert F#” book, if you are curious how to do it.
The alternative approach I’m proposing here is to also write all the GUI logic in F#, only dropping to the C# side when you want to move things around in the Forms Designer. Your main entry point is the F# application, which then instantiates the main form (and subsequent forms). The forms register all their UI components with a “behind” class, which then binds the event handlers and implements all that hairy GUI logic in a language that is more aesthetically pleasing (that’s F#, if you are new here).
I’ll take a shortcut and use a Scaffer template to create the app skeleton:
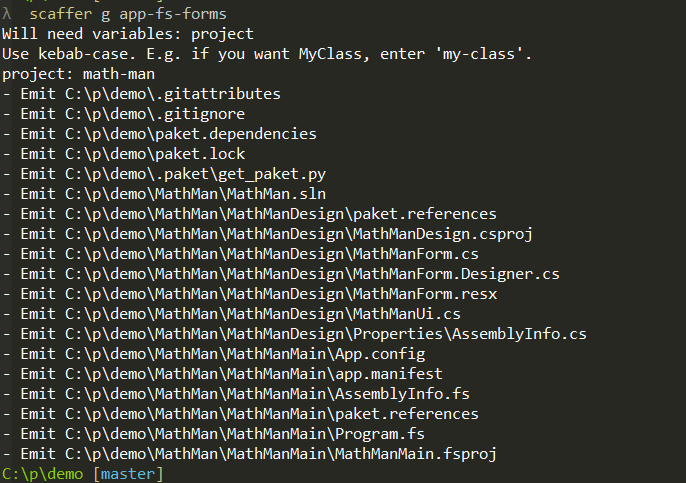
Yikes! That was a lot of stuff. Fear, not, you only ever need to care about few of them. If you click through the files, you’ll notice that:
- MathManDesign is a project (DLL) written in C#. That’s the one you’ll open in VS and click around the Designer.
- MathManMain is the “main” application (“EXE”). It contains the entry point which bootstraps Windows Forms, instantiates the MathManForm and hooks up the “behind” class. It takes a project reference to MathManDesign project, but MathManDesign does not have any kind of reference to MathManMain. Therefore, you can go wild in using F# constructs that have usability issues when exposed to C# (e.g. DU’s). This dependency “inversion” is done by TrivialBehinds, a micro-DI-library available in nuget.
When you build and launch the application, you’ll see the minimal default functionality in action:

(to verify the behavior, I recommend clicking the button a few times and observing how the number after “Lorem ipsum“ in the label increments on each click).
It looks like this in the designer (double-click on MathManForm.cs to see the Design view):

And press f7 to get to the code:
After editing the form in the designer, you’ll add the new controls that it created in the MathManUi class. This is the only C# code you’ll need to keep up to date (of course it needs to be added for every Form you create). You can copy-paste the control declaration from MathManForm.Designer.cs.
Update: you can replace this boilerplate by CreateComponentBehind, if you want to expose the whole MathManForm instead of of MathManUi. In that case you need to make the controls public:
Now, let’s take a peek at the F# code running it all:
That’s it!
The first lines of main are standard Windows Forms bootstrap code. Then we instantiate the Form and start the application. The instantiation of the form instantiates the “behind” we registered in registerBehinds() function.
Doing it from scratch
Warning: stop reading if you are already bored.
I “cheated” a bit by using a template — because some boring work went into getting it working. For the posterity, here’s what was needed to get that F# application off the ground:
- Create a solution
- Create the F# application as “Console application” and reference Windows.Forms and System.Drawing from there.
- Set the application type of the F# application to WinExe (otherwise you’ll get that empty terminal when running the application)
- Create the Design project, in VS 2017 “new project wizard” it’s “Windows Forms Control Library (.NET Framework)”.
- The .NET Framework to use should be .NET Framework 4.7.2, because font rendering will be fuzzy on Windows 10 on 4.6 series and older.
- In order to fix font rendering, I had to modify App.config (check the link above), and create a manifest in the F# application. To do that, I just did “Add manifest” on the Design project and copied it over to F# application side.
- Since you’ll have multiple projects, it’s good idea to migrate to Paket.
- Add a nuget dependency to TrivialBehinds to both projects. You can probably get similar behavior with “actual” DI libraries (get class X that supports handling data package Y), but I couldn’t be bothered to add one of those heavy injectors here.
The skeleton code is at https://github.com/vivainio/FSharpFormsSkeleton — I’ll probably keep it up to date and modify the template if/when needs arise. If you are using that instead of Scaffer, you need to do some IDE legwork to rename those classes.


Oldest comments (0)