
Introduction
Often, when working as web developer, we need to integrate templates. They can be from Photoshop or other software. In this article, we will have a look at the basics of Photoshop for a web developer.
This content was initially written for a workshop for DAMDigital London.
Adobe Photoshop is a raster graphics editor software, meaning it is a program that allows users to create and edit images.
It was released in 1988 and have grown since then, as the industry standard for graphics software.
You can download a free trial version of Photoshop on the Adobe website.
Workspace
Photoshop's workspace is modular, you can adapt it depending on the work you are doing. Some default workspaces are already set up in Photoshop. In this article, I'm using the Graphic and Web one. To change to this one go into Window/workspace/Graphic and Web
Let's have a look at our workspace

- A - Menu bar: It is where you get most of photoshop options.
- B - Options bar: This bar will give you all the options of the currently selected tool.
- C - Toolbox: This panel contains all the available tools from photoshop. Related tools are grouped together, long click on one of them to see all the tools.
-
D - Panels: It is the area where you have your basic panels open, such as
Layers,History, etc. To open a panel just go intoWindow/(Panel that you want to open)
Create a new file
When creating a new file in Photoshop, you need to know first, for what support is my design going to be used for? Meaning, is it going to be used for a screen? (Web, film and video) or for print?
Depending on the answer to this question, you will need to change the PPI (Pixels Per Inch) value.
Pixels per inch (PPI) is a measurement used to define the resolution of a computer display. This metric evaluates the picture/image quality that a particular computing or output display device is able to display. Pixels per inch is also known as pixel density. Techopedia
For print, you normally will need 300PPI, but that will actually depend on the printer and the size of the print document. You should change your colour to CMYK as well, but that will again depend on how you will print your document. If you want to learn more about RGB and CMYK colour check out this article.
For screens and web 😃, you will need 72PPI and RGB colour. Then you will need to specify your screen size. I would recommend designing first for mobile, then tablet and desktop 😉.
As a web developer, you might not need to create a new file. Chances are that you will need to work with a design provided by web designers.
We are now going to look at an existing .psd template and work with this one to have a look around Photoshop.
You can download and open this PSD template from Luis Costa.
Layers
One of the core features of Photoshop is layers. Layers are like a stack of sheets, you can see through transparent areas or area with low opacity (partially transparent).
You can open the layer panel in Window/Layers.

The top layer, in this panel, will be over all the other ones under. Layers can be organized as well in folders. It is important to correctly name layers and folders. That will help during the integration.
Next to each folder and layers, you have an eye icon, it allows you to toggle the visibility of these ones.
Your PSD might have a lot of layers and documents. One way to quickly find a layer is to select the move tool (v). Right click on the canvas, where you want to find your layer. You will get all the layers in the area where you have right clicked. By clicking on one, it will select this layer in your layer panel.

Toolbox
Photoshop comes with a load of tools. I'm going to show you a few useful ones that will help you 😉.
First, if you just install Photoshop CC 2018 you will need to restore all tools go to Edit > Toolbar and click on Restore Defaults button.

We are going to see some of the most useful tools, to integrate a template:
A - Selection tools
- Move: Allows the user to move a layer around the canvas. As we saw earlier it can be used as well to find a layer if you right click on your canvas.
-
Rectangular Marquee: This tool is used to select an area of the canvas, to copy and paste, fill it in etc. It can be used as well to measure. When your selection is done you can find the size of the selected area in
Window/Info. You might need to change the default unit in photoshopEdit/preferences/general/Unit & Rulersthen set your units to pixels.

B - Crop and Slice tools
- Crop: This tool can... crop an image 🤟. In the tool settings (Options Bar), you can set an aspect ratio that you want to keep.
C - Measuring tools
-
Eyedropper: The eyedropper allows you to quickly get a colour reference in your design. Just click where you want the colour. Then at the bottom of your toolbox, the foreground colour will change to the selected colour. If you click on the foreground colour, it will open the
color picker windowfrom here you can get the value of your colour. -
Color Sampler: When integrating your design you might need to select multiple colours. We are going to use the info window again
Window/Info. this tool allows us to create a colour sampler. Just click on the area of the image you want to get the colours from. You will get each colour in the info panel. You can change the colour type to web by clicking on the Eyedropper icon under the number.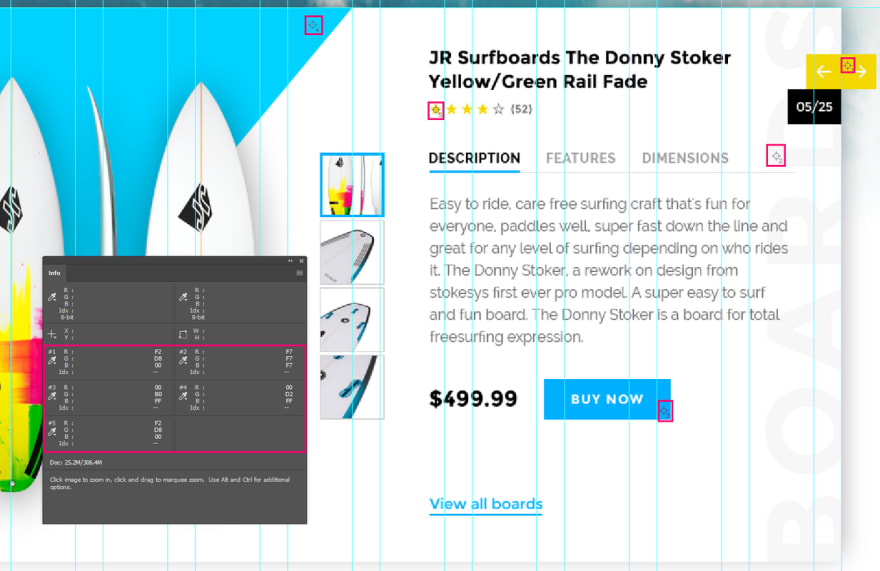
-
Ruler: helps you to measure your template. All the info will appear in your info window. Maintain
Shiftwhen measuring, so your ruler stays straight. You can get angles also.
G - Navigation tool
- Hand: This tool helps you to get around the canvas, you can access this tool as well at any time by holding the spacebar and dragging it with your mouse.
-
Zoom: Allows to zoom in and out, you can you
Ctrl++, orCtrl+-too.
Guides
As you might have noticed when opening our PSD file, we have some green lines on our template. They are guides, they are basically helpers that will help you build or measure things around your canvas.
You can move existing guides using the move tool(v)
To create new guides, you will need to open your ruler. View/Ruler or Ctrl + R. The ruler will appear in your workspace. Then from the ruler, you can drag in your canvas, a new guide.
To remove a guide, use the move tool(v) and put back the guide in the ruler.
To hide and show all your guide you can just use Ctrl + H, or go to View/Extras.
Smart objects
What are smart objects?
Smart Objects are layers that contain image data from raster or vector images, such as Photoshop or Illustrator files. Smart Objects preserve an image’s source content with all its original characteristics, enabling you to perform nondestructive editing to the layer. Adobe
Smart objects can be recognized in your layers when they have the following icon in their thumbnails:

Smart object is really handy if you work with vector type images (SVG, EPS, AI), but as well as other complex raster files.
Let's try to import a smart object in our PSD. Download an SVG file from flaticon. To import our SVG in our canvas, just drag the file into the canvas. We can now edit our SVG in illustrator, or another vector software by double-clicking on the thumbnail or our smart object. Changes will appear in our PSD.
Smart object can do way more than that, if you want to learn more about them, check out 10 Things You Need to Know About Smart Objects in Photoshop.
Export assets
First, just a reminder that photoshop is a raster software. Not a vector software. Meaning we "can't" export SVG files from photoshop. To do so you will need to export this kind of files from Illustrator or Inkscape, for example.
In the web, we want to have light image files, for a photography, we would use a compress .jpg file. If you need to use transparency (Alpha channel) we will use .png file. For an animated image, we would use a .gif. If you need a vector image (icons for example) the best is to export your file as .svg. If you want to have more information about all the files available in Photoshop you can check out "file formats" in the Adobe's website.
Export our canvas
To export the canvas just follow these steps:
- Go to
File/Export/Save for Web - Pick file format
- Pick image size
- Pick quality
- Save
Export only an asset from the canvas
You will probably, need to export some assets of your template.
Let's export the left arrow in the product carousel:

Using the move tool we are going to find our layer. Right click on the arrow and select the layer Arrow Left. Now just right click on this layer in the layer panel. Select export as. Just select the type of file you need.
We can as well export folders.
Actions
What's an action in Photoshop?
An action is a series of tasks that you playback on a single file or a batch of files—menu commands, panel options, tool actions, and so on. For example, you can create an action that changes the size of an image, applies an effect to the image, and then saves the file in the desired format. Adobe
This feature is really convenient if you want to resize a batch of images for the web!
Let's create a new action to crop an image and export this one:
- Download a bunch of images from https://unsplash.com/
- Open one of our images
- Open the
Actionspanel,Window/Actions, - Create a new action by clicking on the icon Create a new action (The one on the left to the bin icon) and let's name this action Export for web - client name
- We are now recording our action, the record button is in red, you can stop to record by clicking on the stop icon (square icon on the left)
- Select the crop icon and set the ratio to 1x1 and crop the image
- Now we want to export our image,
File/Export/Save for Web, selectJPG, quality 50% and width 500px - Click save and pick your destination folder
- Close your image without saving
- Stop recording, click on the stop icon (square icon on the left)
We now have our action, we can open an image and just "play" our action by clicking on the play button.
If we want to apply our action to a batch of images just follow this steps:
- Go to
File/Automate/Batch - Select the
Sourcefolder. - Select our action
- Click on
Ok
And voila 😉. All your images are in the export folder.
I hope you enjoyed this small Photoshop 101 introduction for web developer 😃. If you want to have a 102 version, let me know what you would like to know or to hear about 😉.


Oldest comments (2)
Hey @vinceumo , this is excellent. I've been using Photoshop off/on for years, and a bit more consistently for the past six months or so. I definitely had a few realizations from this 101 introduction. A few moments of:"Ah, that's what that does" or "That's why it's set up that way."
Thanks for sharing!
Thanks Peter 😀, really glad that you found this article helpful.