- Deploy a Static Website to S3
- Distribute your S3 Bucket with Cloudfront and add a Domain
- Micro Services using Lambda, DynamoDB & API Gateway
In this part, we're creating a DynamoDB. Then we create a Lambda for creating, reading, updating, and deleting entries in that database. And last we create an API Gateway to trigger those Lambdas.
DynamoDB
First, open the service DynamoDB.
DynamoDB is a NoSQL database. NoSQL databases are purpose-built for specific data models and have flexible schemas.

Then click Create Table and specify the name and the primary key of your table. I will call mine posts with the primary key id. This primary key has to be unique for all your items in the table.
You could also specify a sort key to provide more querying flexibility. I will skip this for simplicity.


Now you should see the overview of your freshly created table. You can go to Items to be able to see all items in your table. You can also manually add them here.

To access this table we will create a Lambda function. AWS Lambda is a computing service that lets you run code without managing servers. AWS Lambda executes your code only when needed and scales automatically.
Adding a Lambda IAM role
For a lambda function to be able to access a DynamoDB it needs the permissions to do so. Thus we need to head to the IAM service and create a new role.

Go to roles on the left menu and click Create role.

Now you have to select the service, which will use the role. Click on Lambda and then Next: Permissions.

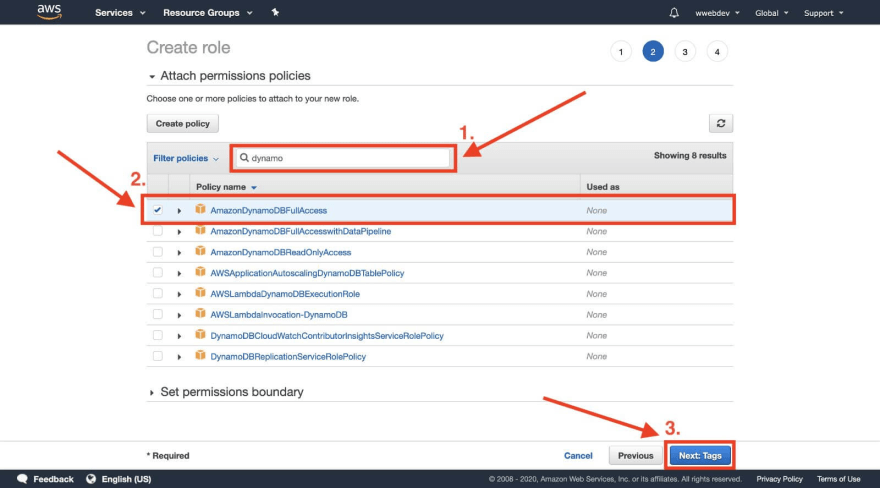
In this step, we need to specify the permissions our lambda will get. We want our lambda to be able to access the DynamoDB. So type dynamo and select AmazonDynamoDBFullAccess.
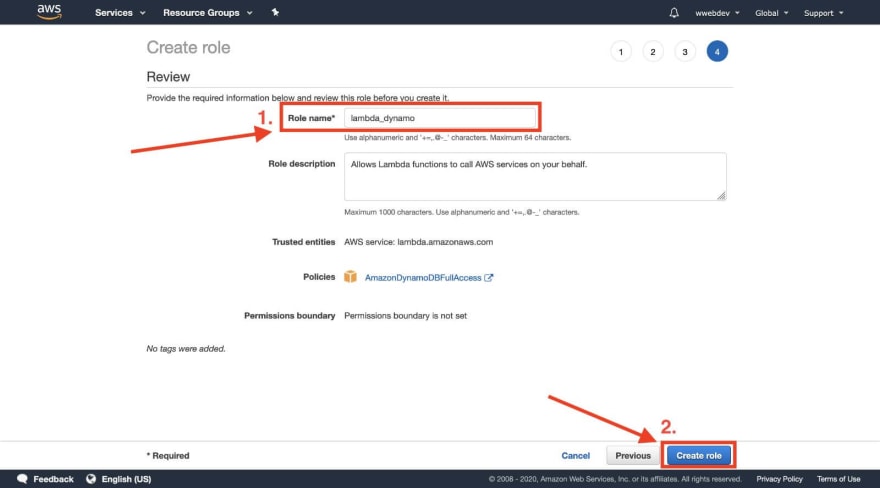
Skip the step of setting tags. On the last step choose a name for the new role. I'll call it lambda_dynamo. Then click Create role.
Creating the Lambda function
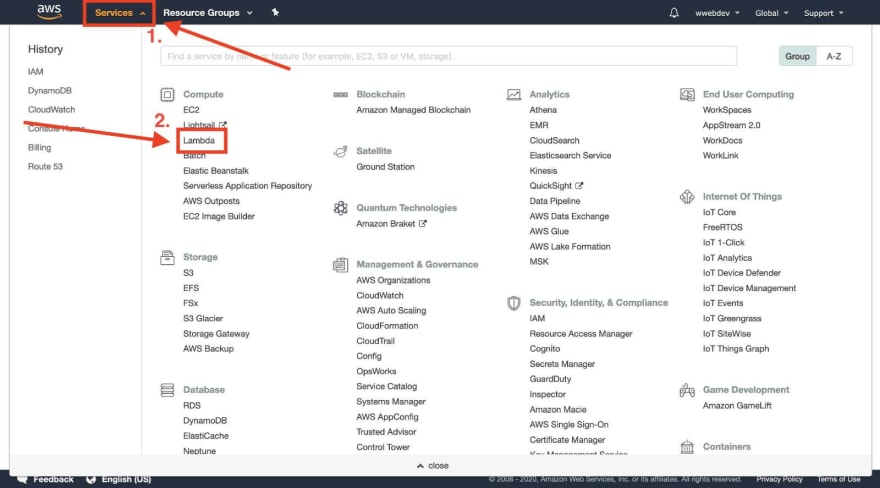
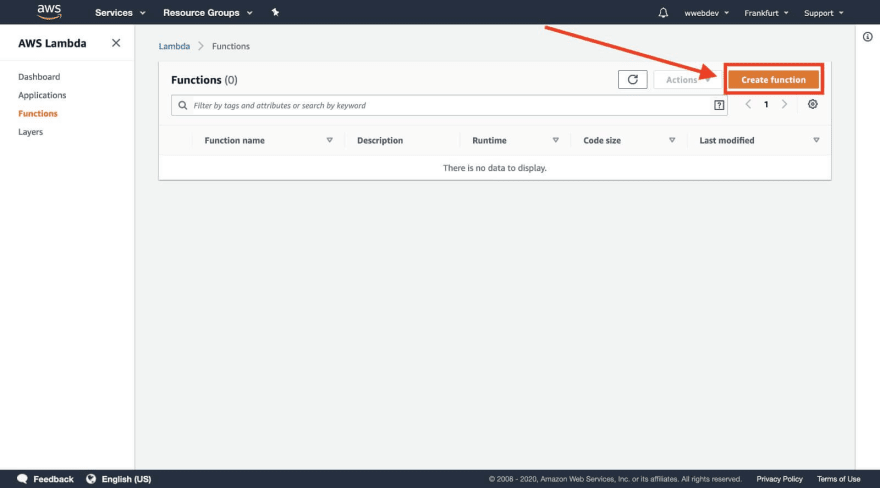
Now we're ready to create the lambda function. Go to the Lambda service and click on Create Function.
I create the lambda for creating DynamoDB entries first. I'll call the function createPost. Then on the bottom click Choose or create an execution role and select the IAM role we just created. Afterward, click Create function.

In the function view, scroll down to get to the editor.
The code for adding an item to the DynamoDB looks like this:
const AWS = require("aws-sdk");
const crypto = require("crypto");

// Initialising DynamoDB SDK
const documentClient = new AWS.DynamoDB.DocumentClient();

exports.handler = async body => {
  const params = {
    TableName: "posts", // name of your DynamoDB table
    Item: { // Creating an Item with a unique id, the created date and the passed title
      id: crypto.randomBytes(16).toString("hex"),
      created_at: new Date().toISOString(),
      title: body.title,
    }
  };
  try {
    // https://docs.aws.amazon.com/amazondynamodb/latest/developerguide/GettingStarted.NodeJs.03.html#GettingStarted.NodeJs.03.01
    const data = await documentClient.put(params).promise();
    return {
      statusCode: 201
    };
  } catch (e) {
    return {
      statusCode: 500,
      body: JSON.stringify(e)
    };
  }
};
Afterward, click Test, to check if your function is working.

Because we haven't specified any tests yet, a modal will open.
On this test modal, we need to specify a test name and the body, which is passed to the function. In my case it is only expecting a title. Thus, I'll enter following JSON.
{
  "title": "my awesome post"
}

Now you can click Test again, to execute the test call.
If everything worked correctly, you should see a success message with the status code 201.
You can also go back to your DynamoDB to verify that the Item was created successfully.
Deploy a Lambda from your local machinge
Deploying from your machine makes sense if you want to extend this function in the future. This section is optional and you can skip it if you're not interested in deploying from your machine.
So open up an empty workspace in your preferred code editor. Then create a new file called index.js. In this file add the following content.
const AWS = require("aws-sdk");
const { v4: uuidv4 } = require('uuid');

// Initialising the DynamoDB SDK
const documentClient = new AWS.DynamoDB.DocumentClient();

exports.handler = async body => {
  const params = {
    TableName: "posts", // name of your DynamoDB table
    Item: { // create item with a unique id, the created date and the passed title
      id: uuidv4(),
      created_at: new Date().toISOString(),
      title: body.title,
    }
  };
  try {
    // https://docs.aws.amazon.com/amazondynamodb/latest/developerguide/GettingStarted.NodeJs.03.html
    const data = await documentClient.put(params).promise();
    return  {
      statusCode: 201
    };
  } catch (e) {
    return {
      statusCode: 500,
      body: JSON.stringify(e)
    };
  }
};
This is almost the same function we used before for our Lambda. The only difference is, that I used the package uuid for generating a unique id.
This is because I also want to go through the process of adding node modules to our Lambda. So open up the terminal and navigate to your workspace. Then type:
npm i --save uuid
To be able to deploy our function to AWS, we need to zip it first.
zip -r function.zip .
This will create a new .zip file in our project root with all the content of the workspace.
Now our function is ready to be deployed. For that, you need to have the aws-shell setup. If you haven't done this yet, you can head back to Part 1 of this series and search for aws-shell.
For deploying to AWS enter following command:
aws lambda update-function-code --function-name yourFunctionName --zip-file fileb://function.zip
You have to replace yourFunctionName with the name of your Lambda function.
If you didn't specify a region on aws configure you need to append the region to your command with --region yourRegion. You can find your region on the top right of the AWS management console.
Now you can go back to the AWS management console and check if the code was updated. Also, feel free to run the test again to see if everything is still working.
Create an API for your Lambda
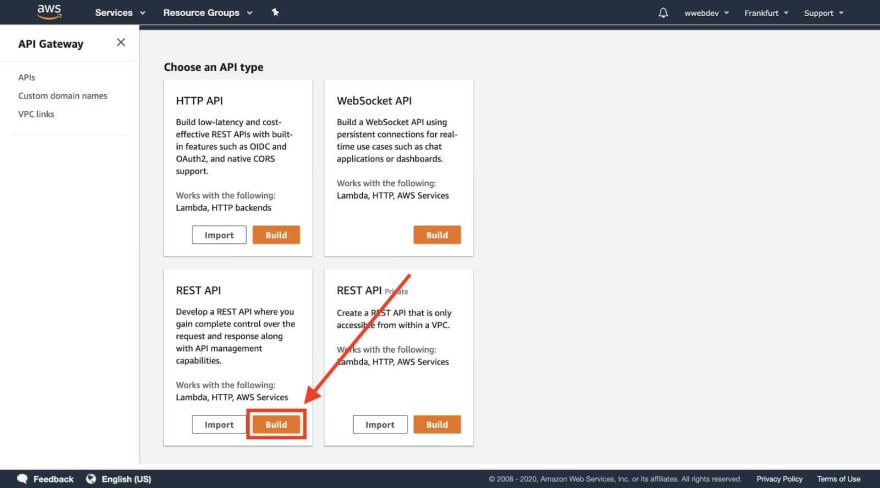
To be able to call your Lambda, go to the service API Gateway. Then scroll down and click on Build of the card REST API.

Then select New API and enter a name for yours. To keep it simple, use the type Regional. Then hit Create API.

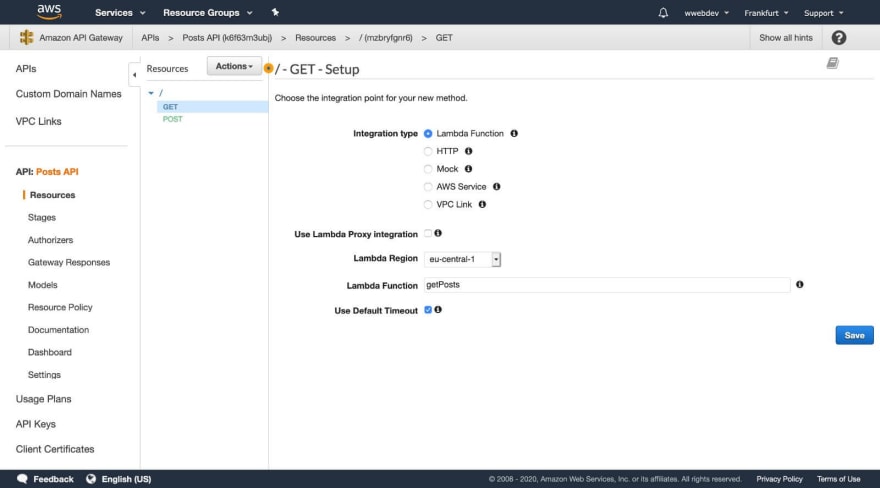
Then click on Actions and Create Method. Now choose your Lambda function, which is in my case postLambda, and click Save.


You should see a modal, which is asking you to give permissions for your API Gateway. Click OK to allow your API Gateway to access your Lambda function.

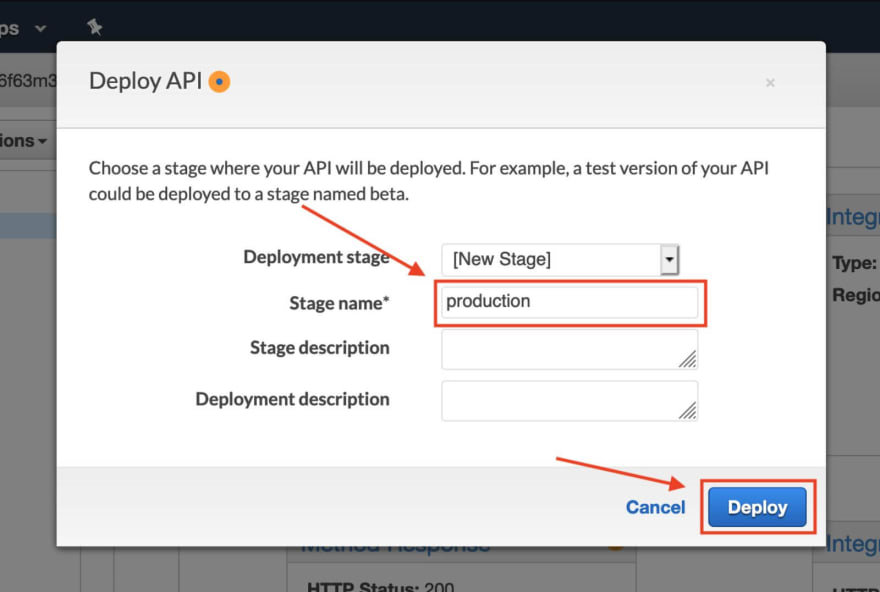
To be able to call our API, we need to deploy it first. So go into Actions and click Deploy API. Then create a new Stage. I'll call mine production, but this can be anything.

On top of the page, you will see the Invoke URL. If you click on it you will get a Missing Authentication Token error. Don't get confused by this. This is because we haven't specified a GET endpoint yet. You should be able to call the POST endpoint of this URL. On Postman, it would look like this.

Or you can also call this endpoint from your terminal with curl
curl --location --request POST 'https://your-invoke-url' --header 'Content-Type: text/plain' --data-raw '{ "title": "post from API" }'
As the next step, create the Lambdas for reading, updating and deleting entries in the DynamoDB.
It is also possible to do this all in one lambda function. (See here). This has its own advantages and disadvantages.
But I will go for the approach of having separate lambdas for separate endpoints.
Read, Update and Delete Lambdas
Head back to the Lambda service and create the other four Lambdas with the same steps as described earlier in this post. Don't forget to use the lambda-dynamo role.
Use the following code for the Lambdas
const AWS = require("aws-sdk");
const documentClient = new AWS.DynamoDB.DocumentClient();

exports.handler = async () => {
  const params = {
    TableName: "posts" // name of your DynamoDB table
  };
  try {
    // use the scan method to get all items in the table
    const data = await documentClient.scan(params).promise();
    const response = {
      statusCode: 200,
      body: JSON.stringify(data.Items)
    };
    return response;
  } catch (e) {
    return {
      statusCode: 500
    };
  }
};
const AWS = require("aws-sdk");
const documentClient = new AWS.DynamoDB.DocumentClient();

exports.handler = async event => {
  const {
    pathParameters: { id }
  } = event; // Extracting the id from the request path
  const params = {
    TableName: "posts", // name of your DynamoDB table
    Key: { id } // key of the item you want to find.
  };
  try {
    // use the get method to fetch an indvidual item
    const data = await documentClient.get(params).promise();
    const response = {
      statusCode: 200,
      body: JSON.stringify(data.Item)
    };
    return response;
  } catch (e) {
    return {
      statusCode: 500
    };
  }
};
const AWS = require("aws-sdk");
const documentClient = new AWS.DynamoDB.DocumentClient();

exports.handler = async event => {
  const {
    pathParameters: { id }
  } = event; // get id from path
  const { title } = JSON.parse(event.body);
  const params = {
    TableName: "posts",
    Item: {
      id: id,
      title: title
    }
  };
  try {
    // use put method to find and update
    const data = await documentClient.put(params).promise();
    const response = {
      statusCode: 200
    };
    return response;
  } catch (e) {
    return {
      statusCode: 500
    };
  }
};
const AWS = require("aws-sdk");
const documentClient = new AWS.DynamoDB.DocumentClient();

exports.handler = async event => {
  const {
    pathParameters: { id }
  } = event; // get id from path
  const params = {
    TableName: "posts",
    Key: { id }
  };
  try {
    // use delete method the remove item
    const data = await documentClient.delete(params).promise();
    const response = {
      statusCode: 200
    };
    return response;
  } catch (e) {
    return {
      statusCode: 500
    };
  }
};
Updating the API Gateway
After you've created all those lambdas, go to the API Gateway service. Open your before created API.

Create an endpoint for getting all posts in the table.
For getting, updating, or deleting a single item, we're getting the id of the element from the URI. To provide that id, create a new resource.
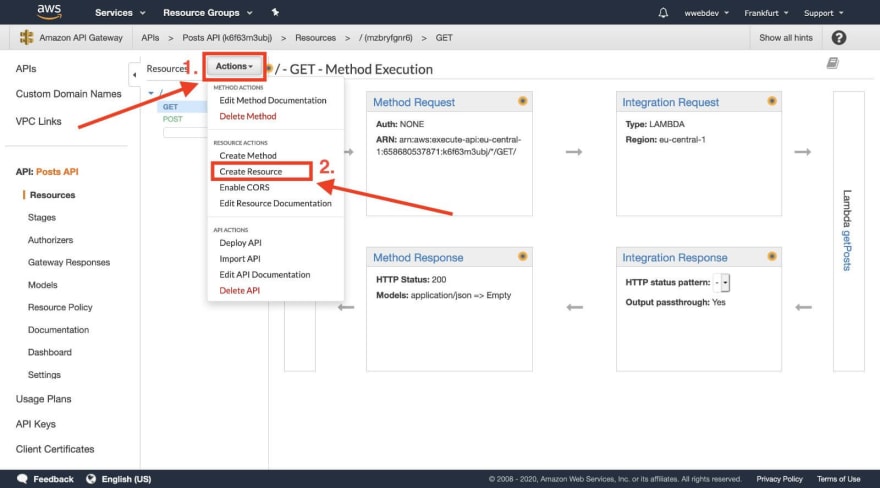

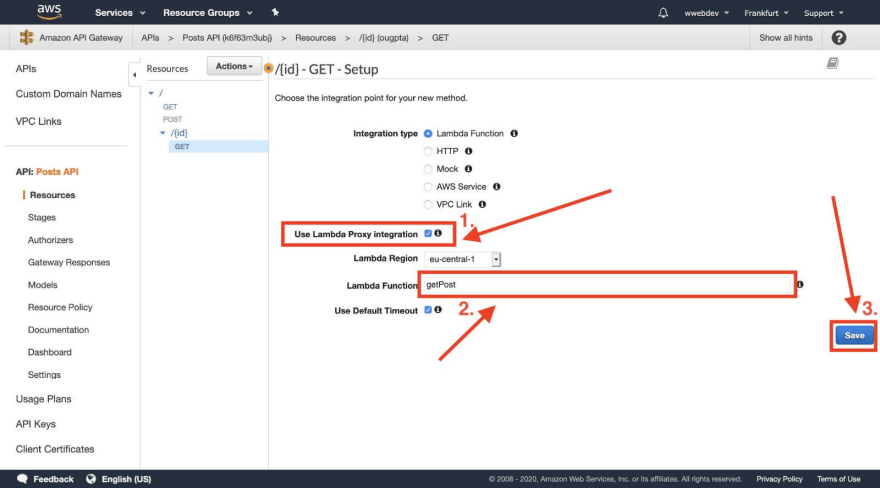
Afterward, add a GET, a PUT, and a DELETE method to this sub-path. For those, you need to enable Use Lambda Proxy integration to be able to access the id from the URL.
When you're done creating the endpoints, your API should look like this:

As a last step deploy your API again by clicking Actions and then Deploy API. Select the same stage to overwrite it with the new state.

Congratulations. Your REST API is now up and running. Here are the calls for your shell to call those endpoints:
Get all
curl --location --request GET 'https://your-invoke-url'
Get by ID
curl --location --request GET 'https://your-invoke-url/some-id'
Update by ID
curl --location --request PUT 'https://your-invoke-url/some-id' --header 'Content-Type: text/plain' --data-raw '{ "title": "updated title from API" }'
Delete by ID
curl --location --request DELETE 'https://your-invoke-url/some-id
Thanks for reading this tutorial :)
If you had problems following along at some point, please let me know.


Top comments (0)