
I been utilizing AWS to host my personal blog for almost 3 years now. Originally my blog was hosted in WordPress and then i migrated to ghost. Its been 2 years now in ghost and I thought of exploring new hosting option which should be free, supports custom domain name and free SSL.
Jekyll is a ruby based static blog generator and it has an advantage of free hosting in GitHub. The letsencrypt SSL certificate is also provided by GitHub for my custom domain so i don’t have to worry about managing it.
I also created a separate website to showcase my open-source tools and i can use the same AWS instance for hosting it. It is a Django application which uses more memory/CPU, so i can run it in a dedicated instance instead of running the ghost and Django together.
One of the challenge in Django application is hosting your static content. Django recommends to use a proxy server like Nginx to server its static content.
I use my nginx proxy to serve the static content. But due to performance reason , i started to explore the free CDN to serve my static content
Below is the nginx configuration snippet for mapping static content.
location /static/ {
        root /tools.vikki.in/static;
    }
After doing some research I chose to utilize unpkg or jsdelivr for my site.
unpkg and jsdeliver are global CDN and they can be used to deliver any pacakges hosted in NPM
unpkg and jsdelivr both provides CDN for the content hosted in NPM.
So first we should have the static content published in NPM.
NPM Pacakage creation
1. Create the directory for adding packages for NPM
mkdir npm
mkdir npm/dist
cd npm
2. Create a package.json file for your pacakage
npm init
This utility will walk you through creating a package.json file.
It only covers the most common items, and tries to guess sensible defaults.

See `npm help json` for definitive documentation on these fields
and exactly what they do.

Use `npm install <pkg>` afterwards to install a package and
save it as a dependency in the package.json file.

Press ^C at any time to quit.
package name: (npm) vikki-tools
version: (1.0.0) 1.0.7
description: Libraries for https://tools.vikki.in
entry point: (index.js) dist/index.js
test command:
git repository: https://github.com/vignesh88/tools.git
keywords: vikki, tools
author: Vignesh Ragupathy
license: (ISC)
About to write to /home/vikki/npm/package.json:
{
  "name": "vikki-tools",
  "version": "1.0.7",
  "description": "Libraries for https://tools.vikki.in",
  "main": "dist/index.js",
  "scripts": {
    "test": "echo \"Error: no test specified\" && exit 1"
  },
  "repository": {
    "type": "git",
    "url": "git+https://github.com/vignesh88/tools.git"
  },
  "keywords": [
    "vikki",
    "tools"
  ],
  "author": "Vignesh Ragupathy",
  "license": "ISC",
  "bugs": {
    "url": "https://github.com/vignesh88/tools/issues"
  },
  "homepage": "https://github.com/vignesh88/tools#readme"
}
Is this OK? (yes) yes
3. Create a index.js
I added a javascript function that will be used to copy text to clipboard.
vim dist/index.js
function copyToClipboard(x,y) {
    if( document.getElementById(x).value) {
        data_2_copy = document.getElementById(x).value;
    } else {
        data_2_copy = document.getElementById(x).innerText;
    }

    var e = document.createElement("textarea");
    e.style.opacity = "0", e.style.position = "fixed", e.textContent = data_2_copy;
    var t = document.getElementsByTagName("body")[0];
    t.appendChild(e), e.select(), document.execCommand("copy"), t.removeChild(e), $(y).show(), setTimeout((function () {
        $(y).hide()
    }), 1e3)
}
4. Copy all your static content to dist directory
Now lets copy all our static content to the dist directory.
I have various css,images,javascript that will be used in various app inside my django application.
Below are the files which i copied.
vikki@vikki-ericsson-210319:/mnt/vikki/github/tools/npm$ tree .
.
├── dist
│   ├── admin
│   │   ├── css
│   │   │   ├── autocomplete.css
│   │   │   ├── base.css
│   ├── geoip
│   │   ├── css
│   │   │   ├── geoip_dark.css
│   │   │   └── geoip_light.css
│   │   └── js
│   │       └── geoip.js
│   ├── index.js
│   └── password_generator
│       ├── css
│       │   ├── password_generator_dark.css
│       │   └── password_generator_light.css
│       ├── img
│       │   ├── copy-full.svg
│       │   └── regenerate.svg
│       └── js
│           └── password_generator.js
├── package.json
└── README.md
5. Publish you static content as package in NPM
Now we are all set, lets connect to NPM and publish our package.
You should already have an account in NPM to publish.
vikki@vikki-ericsson-210319:~npm$ npm publish
npm notice
npm notice package: vikki-tools@1.0.7
npm notice === Tarball Contents ===
npm notice 1.1kB   dist/admin/img/LICENSE
npm notice 8.4kB   dist/admin/css/autocomplete.css
npm notice 16.4kB  dist/admin/css/base.css
npm notice 698B    dist/base64/css/base64_dark.css
npm notice 159B    dist/base64/css/base64_light.css
npm notice 85.9kB  dist/admin/fonts/Roboto-Regular-webfont.woff
npm notice === Tarball Details ===
npm notice name:          vikki-tools
npm notice version:       1.0.7
npm notice package size:  1.1 MB
npm notice unpacked size: 3.9 MB
npm notice shasum:        a9153c3a9bb68bc34d5040d2088a5b95a256e4cc
npm notice integrity:     sha512-zynWl1/pL0Wvk[...]k3yhkCzBz7+0A==
npm notice total files:   188
npm notice
+ vikki-tools@1.0.7
That's it. Now we have the package published in NPM.
Unpkg and Jsdelivr provides CDN for NPM packages without any configuration.
6. Verify published package in NPM
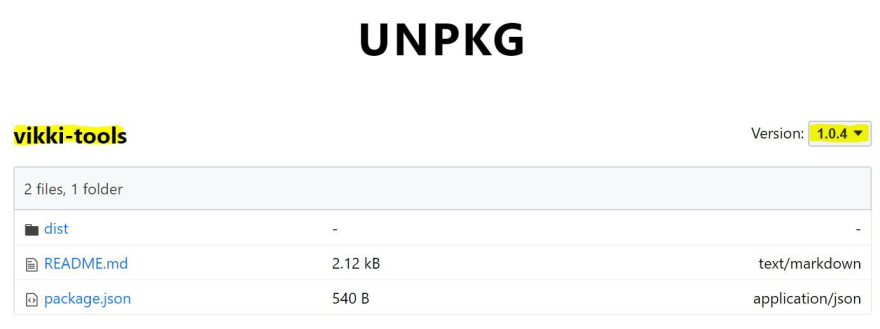
Lets try to access it using unpkg. Open your browser and enter the url in the below format.
For using specific version https://unpkg.com/package@version/:file
My package name is vikki-tools so the format will be https://unpkg.com/vikki-tools/.
The leading / at the end of the URL is important.
Screenshot from browser
Using Unpkg to serve static content in website
We can now load the static content from NPM in our website.
<script src="https://unpkg.com/vikki-tools@1.0.3/dist/index.js"></script>
<link href="https://unpkg.com/vikki-tools@1.0.3/dist/base64/css/base64_dark.css" rel="stylesheet">
Using Jsdelivr to serve static content in website
We can also use Jsdelivr instead of unpkg.
<script src="https://cdn.jsdelivr.net/npm/vikki-tools@1.0.3/dist/index.js"></script>
<link href="https://cdn.jsdelivr.net/npm/vikki-tools@1.0.3/dist/base64/css/base64_dark.css" rel="stylesheet">
Auto minified version from jsdelivr
Jsdelivr also provide the auto minified version of the CSS and Javascript from NPM.
If you want to use minified version css and js, just add .min extension to the filename
<script src="https://cdn.jsdelivr.net/npm/vikki-tools@1.0.3/dist/index.min.js"></script>
<link href="https://cdn.jsdelivr.net/npm/vikki-tools@1.0.3/dist/base64/css/base64_dark.min.css" rel="stylesheet">
Script to automatically update the static and CDN URL in Django
For ease, i created a script to automatically update all static content in your template directory in Django application.
The code is available in the Github URL
Demo video
Original content: https://www.vikki.in/publish-package-in-npm-and-serve-the-static-content-from-cdn/


Top comments (0)