In this tutorial, we will learn the fundamentals of WebRTC to build a React Native video calling application that can be implemented on iOS & Android.
Video conferencing is an important part of today's environment. However, due to its complexity, most developers(me too 😅) have difficulty implementing it.
WebRTC React Native are great frameworks for creating video conferencing applications. we will take a deep dive into these frameworks and develope one application.
If you are impatient to see the results, here is the whole react-native-webrtc-app repo for your project.
What Is React Native?
React Native is a JavaScript framework for creating natively rendered mobile apps for iOS and Android. It's built on React, Facebook's JavaScript toolkit for creating user interfaces, but instead of being aimed at browsers, it's aimed for mobile platforms. In other words, web developers can now create mobile applications that look and feel fully "native," all while using a JavaScript framework they are already familiar with. Furthermore, because much of the code you create can be shared between platforms, React Native makes it simple to build for both Android and iOS at the same time.
What is WebRTC ?
WebRTC (Web Real-Time Communications) is an open source P2P protocols that allows web browsers and devices to communicate in real time via voice, text, and video. WebRTC delivers application programming interfaces (APIs) defined in JavaScript to software developers.
P2P simply implies that two peers (for example, your device and mine) communicate directly with one another, without the need for a server in the middle.
WebRTC employs a number of technologies to enable real-time peer-to-peer communication across browsers.
- SDP (Session Description Protocol)
- ICE (Interactivity Connection Establishment)
- RTP (Real Time Protocol)
Another component that is required to run WebRTC is a Signaling Server. However, there is no standard for implementing a signalling server and its implementation can vary from developer to developer. More information on Signaling Server will be provided later in this section.
Let's quickly go through some of the technology mentioned above.
SDP (Session Description Protocol)
- SDP is a simple protocol that is used to determine which codecs are supported by browsers. Assume there are two peers (Client A and Client B) that will be connected over WebRTC.
- Clients A and B generate SDP strings that specify which codecs they support. Client A, for example, may support H264, VP8 and VP9 video codecs, as well as Opus and PCM audio codecs. Client B may only support H264 for video and the Opus codec for audio.
- In this scenario, the codecs that will be used between Client A and Client B are H264 and Opus. Peer-to-peer communication cannot be established if there are no shared codecs.
You may have a query regarding how these SDP strings communicate with one another. This is where we will use Signaling Server.
ICE (Interactivity Connection Establishment)
ICE is the magic that connects peers even if they are separated by NAT.
- Client A uses the STUN server to determine their local and public Internet addresses, which they then relay to Client B via the Signaling Server. Each address received from the STUN server is referred to as an ICE candidate.

- There are two servers in the image above. One of them is the STUN server, and the other is the TURN server.
STUN (Session Traversal Utilities for NAT)
- The STUN server is used to allow Client A to discover all of its addresses.
- STUN servers reveal their peers Public and Local IP addresses. By the way, google offers a free STUN server (stun.l.google.com:19302).
TURN (Traversal Using Relays around NAT)
- When peer-to-peer connections cannot be formed, TURN Server is used. TURN server simply relays data between peers.
RTP (Real Time Protocol)
- RTP is a well-established standard for transmitting real-time data. It is built on UDP. In WebRTC, audio and video are transferred using RTP.
WebRTC Signalling
- WebRTC can function without servers, but it requires a server to create the connection. The server serves as a channel for exchanging information necessary to build a peer-to-peer connection.
- The data that must be transferred is
Offer,Answer, andinformation about the Network Connection.
Lets understand it with example.
- Client A, who will be the connection's initiator, will create an Offer. This offer will then be sent to Client B via the Signaling server. Client B will get the Offer and respond accordingly. This information will subsequently be relayed to Client A over the signal channel by Client B.
- Once the offer and response have been completed, the connection between the to peer established. An ICE candidate provides the protocols and routing required for WebRTC to communicate with a remote device for that peer exchange RTCIceCandidate. Each peer suggests their top candidates, from best to worst. The link is then formed after they agree to use it only once.
Building the Node js WebRTC Signaling Server
- Now that we've covered the fundamentals of WebRTC, let's use it to build a Video Calling application that uses SocketIO as a signalling channel.
- As previously said, we will use WebRTC Node js SocketIO to communicate information between clients.
Now we'll make a WebRTC Node js Express project, and our directory structure will look somewhat like this.
server
    └── index.js
    └── socket.js
    └── package.json
Step 1:index.js file will look like this.
const path = require('path');
const { createServer } = require('http');

const express = require('express');
const { getIO, initIO } = require('./socket');

const app = express();

app.use('/', express.static(path.join(__dirname, 'static')));

const httpServer = createServer(app);

let port = process.env.PORT || 3500;

initIO(httpServer);

httpServer.listen(port)
console.log("Server started on ", port);

getIO();
Step 2: socket.js file will look like this.
const { Server } = require("socket.io");
let IO;

module.exports.initIO = (httpServer) => {
  IO = new Server(httpServer);

  IO.use((socket, next) => {
    if (socket.handshake.query) {
      let callerId = socket.handshake.query.callerId;
      socket.user = callerId;
      next();
    }
  });

  IO.on("connection", (socket) => {
    console.log(socket.user, "Connected");
    socket.join(socket.user);

    socket.on("call", (data) => {
      let calleeId = data.calleeId;
      let rtcMessage = data.rtcMessage;

      socket.to(calleeId).emit("newCall", {
        callerId: socket.user,
        rtcMessage: rtcMessage,
      });
    });

    socket.on("answerCall", (data) => {
      let callerId = data.callerId;
      rtcMessage = data.rtcMessage;

      socket.to(callerId).emit("callAnswered", {
        callee: socket.user,
        rtcMessage: rtcMessage,
      });
    });

    socket.on("ICEcandidate", (data) => {
      console.log("ICEcandidate data.calleeId", data.calleeId);
      let calleeId = data.calleeId;
      let rtcMessage = data.rtcMessage;

      socket.to(calleeId).emit("ICEcandidate", {
        sender: socket.user,
        rtcMessage: rtcMessage,
      });
    });
  });
};

module.exports.getIO = () => {
  if (!IO) {
    throw Error("IO not initilized.");
  } else {
    return IO;
  }
};
As previously stated, we require a server to pass three pieces of information: Offer, Answer and ICECandidate. The call event sends the caller's offer to the callee, whereas the answerCall event sends the callee's answer to the caller. The ICEcandidate event, exchange the data.
This is the most basic form of the signalling server that we require.
-
package.jsonfile will look like this.
Step 3: package.json file will look like this.
{
  "name": "WebRTC",
  "version": "1.0.0",
  "description": "",
  "main": "index.js",
  "scripts": {
    "test": "echo \"Error: no test specified\" && exit 1",
    "start": "node index.js"
  },
  "keywords": [],
  "author": "",
  "license": "ISC",
  "dependencies": {
    "express": "^4.17.1",
    "socket.io": "^4.0.2" // Socket dependency
  }
}
We are almost finished with the server side programming. Let's create a client-side app with React Native and WebRTC.
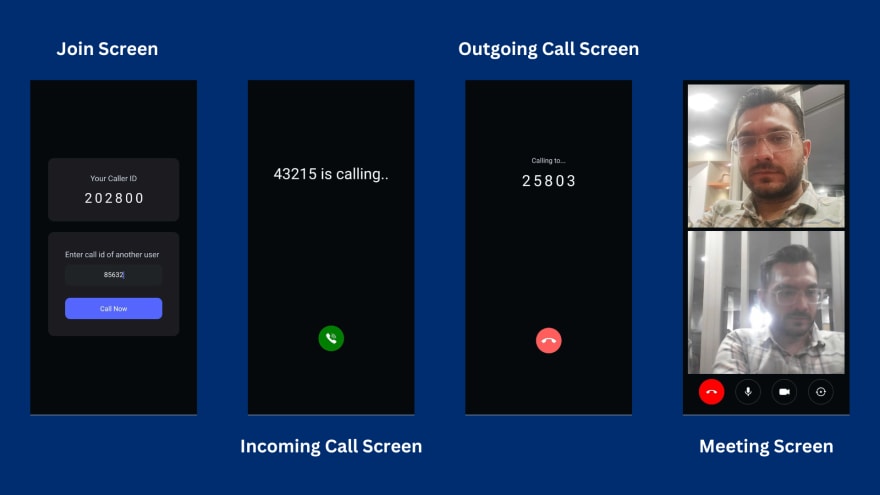
Before we begin development, lets first grasp the app's flow. We will offer CallerId whenever user opens the app (5 digit random number).
For example, John and Michel have CallerId, 12345 for John and 67890 for Michel, so John initiate the call to Michel with his CallerId. Now John will receive Outgoing call screen while Michel will see an Incoming call screen with an Accept button. After accepting call, John and Michel will join the meeting.
Develope React Native WebRTC App
Step 1: Setup a react native project using react-native-cli
You can follow this official guide — https://reactnative.dev/docs/environment-setup
Step 2:After Successfully running your demo application we will install some React Native lib
Here is my package.json dependencies you also need to install.
"dependencies": {
    "react": "17.0.2",
    "react-native": "0.68.2",
    "react-native-svg": "^13.7.0",
    "react-native-webrtc": "^1.94.2",
    "socket.io-client": "^4.5.4"
  }
Step 3: Android Setup for react-native-webrtc Pacakge
Starting with React Native 0.60 due to a new auto linking feature you no longer need to follow manual linking steps but you will need to follow the other steps below if you plan on releasing your app to production.
3.1 Declaring Permissions
In android/app/main/AndroidManifest.xml add the following permissions before the <application> section.
<uses-feature android:name="android.hardware.camera" />
<uses-feature android:name="android.hardware.camera.autofocus" />
<uses-feature android:name="android.hardware.audio.output" />
<uses-feature android:name="android.hardware.microphone" />

<uses-permission android:name="android.permission.CAMERA" />
<uses-permission android:name="android.permission.RECORD_AUDIO" />
<uses-permission android:name="android.permission.ACCESS_NETWORK_STATE" />
<uses-permission android:name="android.permission.CHANGE_NETWORK_STATE" />
<uses-permission android:name="android.permission.MODIFY_AUDIO_SETTINGS" />
<uses-permission android:name="android.permission.INTERNET" />
<uses-permission android:name="android.permission.WAKE_LOCK" />
3.2 Enable Java 8 Support
In android/app/build.gradle add the following inside the android section.
compileOptions {
    sourceCompatibility JavaVersion.VERSION_1_8
    targetCompatibility JavaVersion.VERSION_1_8
}
3.3 R8/ProGuard Support
In android/app/proguard-rules.pro add the following on a new line.
-keep class org.webrtc.** { *; }
3.4 Fatal Exception: java.lang.UnsatisfiedLinkError
Fatal Exception: java.lang.UnsatisfiedLinkError: No implementation found for void org.webrtc.PeerConnectionFactory.nativeInitializeAndroidGlobals() (tried Java_org_webrtc_PeerConnectionFactory_nativeInitializeAndroidGlobals and Java_org_webrtc_PeerConnectionFactory_nativeInitializeAndroidGlobals__)
If you're experiencing the error above then in android/gradle.properties add the following.
android.enableDexingArtifactTransform.desugaring=false
Step 4: IOS Setup for react-native-webrtc Pacakge
4.1 Adjusting the supported platform version
IMPORTANT: Make sure you are using CocoaPods 1.10 or higher.
You may have to change the platform field in your podfile.
react-native-webrtc doesn't support iOS < 12 Set it to '12.0' or above or you'll get an error when running pod install.
platform :ios, '12.0'
4.2 Declaring Permissions
Navigate to <ProjectFolder>/ios/<ProjectName>/ and edit Info.plist, add the following lines.
<key>NSCameraUsageDescription</key>
<string>Camera permission description</string>
<key>NSMicrophoneUsageDescription</key>
<string>Microphone permission description</string>
Step 5:Develop UI Screens
Our directory structure for client side project will look somewhat like this.
client
    └── android
    └── asset
    └── ios
    └── index.js
    └── App.js
    └── components
    └── package.json
Now, we will develop JoinScreen , IncomingCallScreen and OutgoingCallScreen.
We will use App.js file throughout the development process.
JoinScreen
import React, {useEffect, useState, useRef} from 'react';
import {
  Platform,
  KeyboardAvoidingView,
  TouchableWithoutFeedback,
  Keyboard,
  View,
  Text,
  TouchableOpacity,
} from 'react-native';
import TextInputContainer from './src/components/TextInputContainer';

export default function App({}) {

  const [type, setType] = useState('JOIN');

  const [callerId] = useState(
    Math.floor(100000 + Math.random() * 900000).toString(),
  );

  const otherUserId = useRef(null);


  const JoinScreen = () => {
    return (
      <KeyboardAvoidingView
        behavior={Platform.OS === 'ios' ? 'padding' : 'height'}
        style={{
          flex: 1,
          backgroundColor: '#050A0E',
          justifyContent: 'center',
          paddingHorizontal: 42,
        }}>
        <TouchableWithoutFeedback onPress={Keyboard.dismiss}>
          <>
            <View
              style={{
                padding: 35,
                backgroundColor: '#1A1C22',
                justifyContent: 'center',
                alignItems: 'center',
                borderRadius: 14,
              }}>
              <Text
                style={{
                  fontSize: 18,
                  color: '#D0D4DD',
                }}>
                Your Caller ID
              </Text>
              <View
                style={{
                  flexDirection: 'row',
                  marginTop: 12,
                  alignItems: 'center',
                }}>
                <Text
                  style={{
                    fontSize: 32,
                    color: '#ffff',
                    letterSpacing: 6,
                  }}>
                  {callerId}
                </Text>
              </View>
            </View>

            <View
              style={{
                backgroundColor: '#1A1C22',
                padding: 40,
                marginTop: 25,
                justifyContent: 'center',
                borderRadius: 14,
              }}>
              <Text
                style={{
                  fontSize: 18,
                  color: '#D0D4DD',
                }}>
                Enter call id of another user
              </Text>
              <TextInputContainer
                placeholder={'Enter Caller ID'}
                value={otherUserId.current}
                setValue={text => {
                  otherUserId.current = text;
                }}
                keyboardType={'number-pad'}
              />
              <TouchableOpacity
                onPress={() => {
                  setType('OUTGOING_CALL');
                }}
                style={{
                  height: 50,
                  backgroundColor: '#5568FE',
                  justifyContent: 'center',
                  alignItems: 'center',
                  borderRadius: 12,
                  marginTop: 16,
                }}>
                <Text
                  style={{
                    fontSize: 16,
                    color: '#FFFFFF',
                  }}>
                  Call Now
                </Text>
              </TouchableOpacity>
            </View>
          </>
        </TouchableWithoutFeedback>
      </KeyboardAvoidingView>
    );
  };

  const OutgoingCallScreen = () => {
    return null
  };

  const IncomingCallScreen = () => {
    return null
  };

  switch (type) {
    case 'JOIN':
      return JoinScreen();
    case 'INCOMING_CALL':
      return IncomingCallScreen();
    case 'OUTGOING_CALL':
      return OutgoingCallScreen();
    default:
      return null;
  }
}
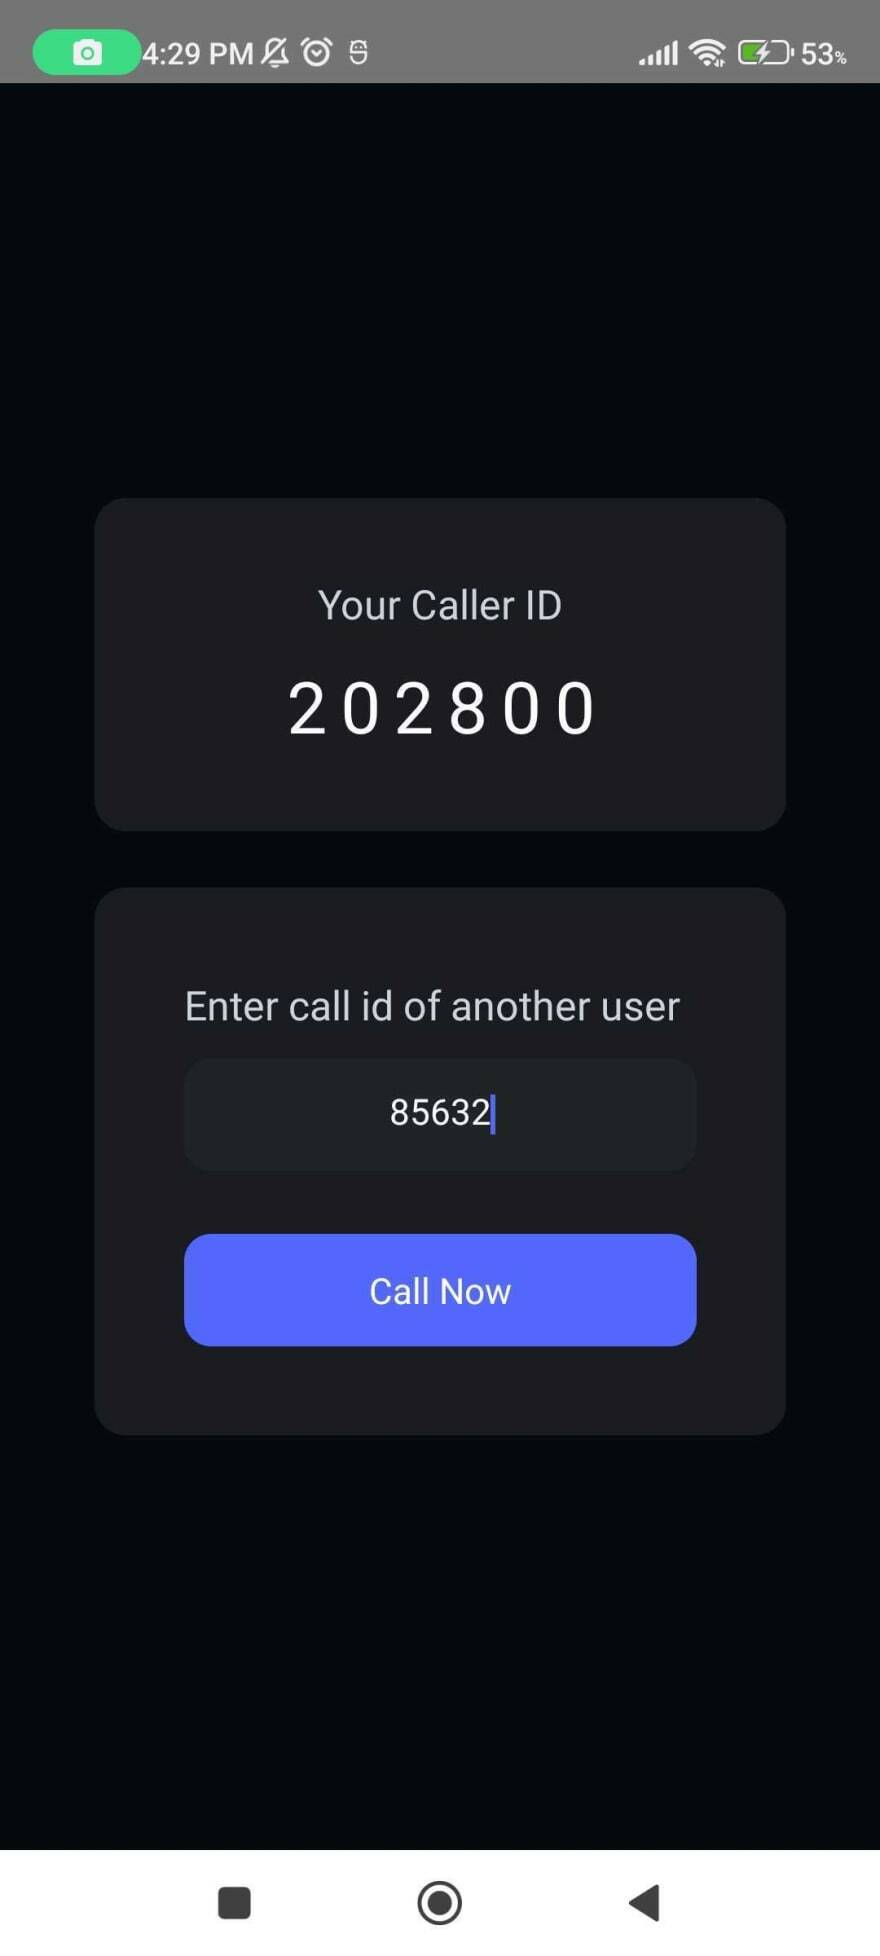
Here in the above file we are just storing a 5 digit Random CallerId which will represent this user, and can be referred by another connected user.
TextInputContainer.js component code file.
import React from 'react';
import {View, TextInput} from 'react-native';
const TextInputContainer = ({placeholder, value, setValue, keyboardType}) => {
  return (
    <View
      style={{
        height: 50,
        justifyContent: 'center',
        alignItems: 'center',
        backgroundColor: '#202427',
        borderRadius: 12,
        marginVertical: 12,
      }}>
      <TextInput
        style={{
          margin: 8,
          padding: 8,
          width: '90%',
          textAlign: 'center',
          fontSize: 16,
          color: '#FFFFFF',
        }}
        multiline={true}
        numberOfLines={1}
        cursorColor={'#5568FE'}
        placeholder={placeholder}
        placeholderTextColor={'#9A9FA5'}
        onChangeText={text => {
          setValue(text);
        }}
        value={value}
        keyboardType={keyboardType}
      />
    </View>
  );
};

export default TextInputContainer;
Our Screen will look like this.
IncomingCallScreen
import CallAnswer from './asset/CallAnswer';

export default function App({}) {
    //
  const IncomingCallScreen = () => {
    return (
      <View
        style={{
          flex: 1,
          justifyContent: 'space-around',
          backgroundColor: '#050A0E',
        }}>
        <View
          style={{
            padding: 35,
            justifyContent: 'center',
            alignItems: 'center',
            borderRadius: 14,
          }}>
          <Text
            style={{
              fontSize: 36,
              marginTop: 12,
              color: '#ffff',
            }}>
            {otherUserId.current} is calling..
          </Text>
        </View>
        <View
          style={{
            justifyContent: 'center',
            alignItems: 'center',
          }}>
          <TouchableOpacity
            onPress={() => {
              setType('WEBRTC_ROOM');
            }}
            style={{
              backgroundColor: 'green',
              borderRadius: 30,
              height: 60,
              aspectRatio: 1,
              justifyContent: 'center',
              alignItems: 'center',
            }}>
            <CallAnswer height={28} fill={'#fff'} />
          </TouchableOpacity>
        </View>
      </View>
    );
  };
    //
  }
You may get the SVG of the CallAnswer Icon here Assets.
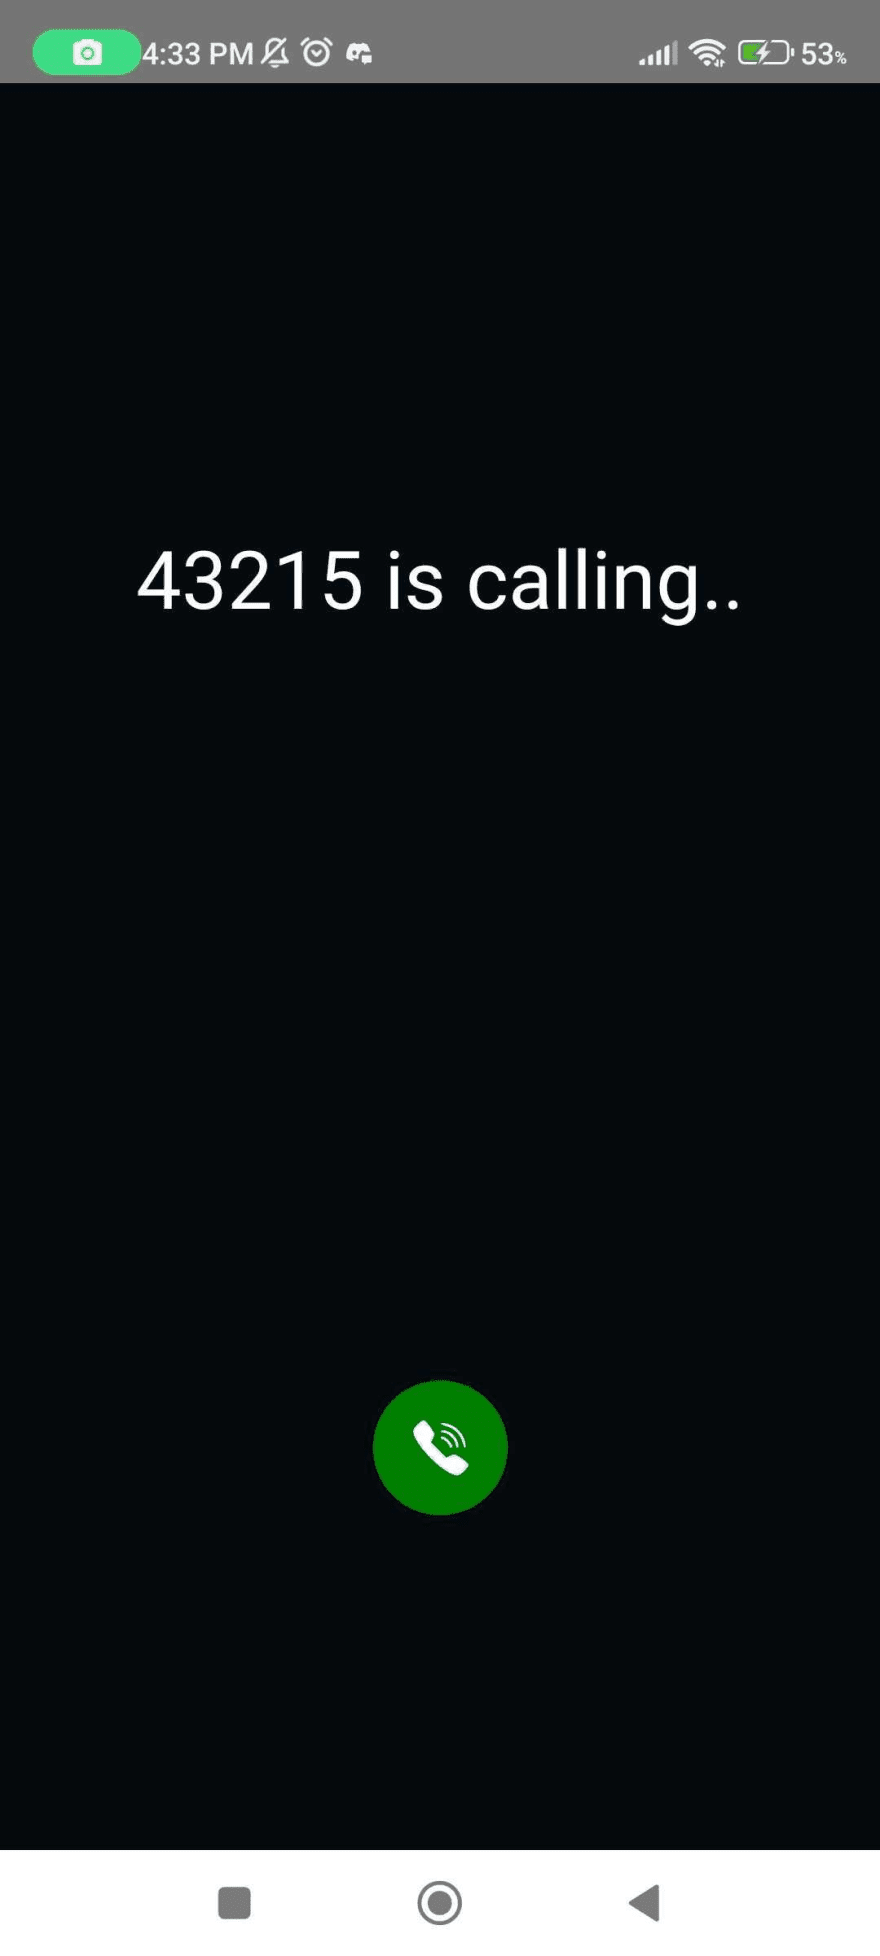
Our Screen will look like this.
OutgoingCallScreen
import CallEnd from './asset/CallEnd';

export default function App({}) {
    //
const OutgoingCallScreen = () => {
    return (
      <View
        style={{
          flex: 1,
          justifyContent: 'space-around',
          backgroundColor: '#050A0E',
        }}>
        <View
          style={{
            padding: 35,
            justifyContent: 'center',
            alignItems: 'center',
            borderRadius: 14,
          }}>
          <Text
            style={{
              fontSize: 16,
              color: '#D0D4DD',
            }}>
            Calling to...
          </Text>

          <Text
            style={{
              fontSize: 36,
              marginTop: 12,
              color: '#ffff',
              letterSpacing: 6,
            }}>
            {otherUserId.current}
          </Text>
        </View>
        <View
          style={{
            justifyContent: 'center',
            alignItems: 'center',
          }}>
          <TouchableOpacity
            onPress={() => {
              setType('JOIN');
              otherUserId.current = null;
            }}
            style={{
              backgroundColor: '#FF5D5D',
              borderRadius: 30,
              height: 60,
              aspectRatio: 1,
              justifyContent: 'center',
              alignItems: 'center',
            }}>
            <CallEnd width={50} height={12} />
          </TouchableOpacity>
        </View>
      </View>
    );
  };
    //
  }
You may get the SVG of the CallEnd Icon here Assets.
Our Screen will look like this.

Step 6: Setup WebSocket and WebRTC
After creating the UI, let's setup a Socket and WebRTC Peer Connection in the same file (App.js)
import SocketIOClient from 'socket.io-client'; // import socket io
// import WebRTC
import {
  mediaDevices,
  RTCPeerConnection,
  RTCView,
  RTCIceCandidate,
  RTCSessionDescription,
} from 'react-native-webrtc';

export default function App({}) {

// Stream of local user
const [localStream, setlocalStream] = useState(null);

/* When a call is connected, the video stream from the receiver is appended to this state in the stream*/
const [remoteStream, setRemoteStream] = useState(null);

// This establishes your WebSocket connection
const socket = SocketIOClient('http://192.168.1.10:3500', {
    transports: ['websocket'],
    query: {
        callerId,
    /* We have generated this `callerId` in `JoinScreen` implementation */
    },
  });

 /* This creates an WebRTC Peer Connection, which will be used to set local/remote descriptions and offers. */
 const peerConnection = useRef(
    new RTCPeerConnection({
      iceServers: [
        {
          urls: 'stun:stun.l.google.com:19302',
        },
        {
          urls: 'stun:stun1.l.google.com:19302',
        },
        {
          urls: 'stun:stun2.l.google.com:19302',
        },
      ],
    }),
  );

    useEffect(() => {
    socket.on('newCall', data => {
     /* This event occurs whenever any peer wishes to establish a call with you. */
    });

    socket.on('callAnswered', data => {
      /* This event occurs whenever remote peer accept the call. */
    });

    socket.on('ICEcandidate', data => {
      /* This event is for exchangin Candidates. */

    });

    let isFront = false;

/*The MediaDevices interface allows you to access connected media inputs such as cameras and microphones. We ask the user for permission to access those media inputs by invoking the mediaDevices.getUserMedia() method. */
    mediaDevices.enumerateDevices().then(sourceInfos => {
      let videoSourceId;
      for (let i = 0; i < sourceInfos.length; i++) {
        const sourceInfo = sourceInfos[i];
        if (
          sourceInfo.kind == 'videoinput' &&
          sourceInfo.facing == (isFront ? 'user' : 'environment')
        ) {
          videoSourceId = sourceInfo.deviceId;
        }
      }


      mediaDevices
        .getUserMedia({
          audio: true,
          video: {
            mandatory: {
              minWidth: 500, // Provide your own width, height and frame rate here
              minHeight: 300,
              minFrameRate: 30,
            },
            facingMode: isFront ? 'user' : 'environment',
            optional: videoSourceId ? [{sourceId: videoSourceId}] : [],
          },
        })
        .then(stream => {
          // Get local stream!
          setlocalStream(stream);

          // setup stream listening
          peerConnection.current.addStream(stream);
        })
        .catch(error => {
          // Log error
        });
    });

    peerConnection.current.onaddstream = event => {
      setRemoteStream(event.stream);
    };

    // Setup ice handling
    peerConnection.current.onicecandidate = event => {

    };

    return () => {
      socket.off('newCall');
      socket.off('callAnswered');
      socket.off('ICEcandidate');
    };
  }, []);

}
Step 7: Establish WebRTC Call
This phase will explain how WebRTC call are established between peers.
let remoteRTCMessage = useRef(null);

useEffect(() => {
  socket.on("newCall", (data) => {
    remoteRTCMessage.current = data.rtcMessage;
    otherUserId.current = data.callerId;
    setType("INCOMING_CALL");
  });

  socket.on("callAnswered", (data) => {
    // 7. When Alice gets Bob's session description, she sets that as the remote description with `setRemoteDescription` method.

    remoteRTCMessage.current = data.rtcMessage;
    peerConnection.current.setRemoteDescription(
      new RTCSessionDescription(remoteRTCMessage.current)
    );
    setType("WEBRTC_ROOM");
  });

  socket.on("ICEcandidate", (data) => {
    let message = data.rtcMessage;

    // When Bob gets a candidate message from Alice, he calls `addIceCandidate` to add the candidate to the remote peer description.

    if (peerConnection.current) {
      peerConnection?.current
        .addIceCandidate(new RTCIceCandidate(message.candidate))
        .then((data) => {
          console.log("SUCCESS");
        })
        .catch((err) => {
          console.log("Error", err);
        });
    }
  });

  // Alice creates an RTCPeerConnection object with an `onicecandidate` handler, which runs when network candidates become available.
  peerConnection.current.onicecandidate = (event) => {
    if (event.candidate) {
      // Alice sends serialized candidate data to Bob using Socket
      sendICEcandidate({
        calleeId: otherUserId.current,
        rtcMessage: {
          label: event.candidate.sdpMLineIndex,
          id: event.candidate.sdpMid,
          candidate: event.candidate.candidate,
        },
      });
    } else {
      console.log("End of candidates.");
    }
  };
}, []);

async function processCall() {
  // 1. Alice runs the `createOffer` method for getting SDP.
  const sessionDescription = await peerConnection.current.createOffer();

  // 2. Alice sets the local description using `setLocalDescription`.
  await peerConnection.current.setLocalDescription(sessionDescription);

  // 3. Send this session description to Bob uisng socket
  sendCall({
    calleeId: otherUserId.current,
    rtcMessage: sessionDescription,
  });
}

async function processAccept() {
  // 4. Bob sets the description, Alice sent him as the remote description using `setRemoteDescription()`
  peerConnection.current.setRemoteDescription(
    new RTCSessionDescription(remoteRTCMessage.current)
  );

  // 5. Bob runs the `createAnswer` method
  const sessionDescription = await peerConnection.current.createAnswer();

  // 6. Bob sets that as the local description and sends it to Alice
  await peerConnection.current.setLocalDescription(sessionDescription);
  answerCall({
    callerId: otherUserId.current,
    rtcMessage: sessionDescription,
  });
}

function answerCall(data) {
  socket.emit("answerCall", data);
}

function sendCall(data) {
  socket.emit("call", data);
}

const JoinScreen = () => {
  return (
    /*
      ...
      ...
      ...
      */
    <TouchableOpacity
      onPress={() => {
        processCall();
        setType("OUTGOING_CALL");
      }}
      style={{
        height: 50,
        backgroundColor: "#5568FE",
        justifyContent: "center",
        alignItems: "center",
        borderRadius: 12,
        marginTop: 16,
      }}
    >
      <Text
        style={{
          fontSize: 16,
          color: "#FFFFFF",
        }}
      >
        Call Now
      </Text>
    </TouchableOpacity>
    /*
      ...
      ...
      ...
      */
  );
};

const IncomingCallScreen = () => {
    return (
      /*
      ...
      ...
      ...
      */
      <TouchableOpacity
        onPress={() => {
          processAccept();
          setType('WEBRTC_ROOM');
        }}
        style={{
          backgroundColor: 'green',
          borderRadius: 30,
          height: 60,
          aspectRatio: 1,
          justifyContent: 'center',
          alignItems: 'center',
        }}>
        <CallAnswer height={28} fill={'#fff'} />
      </TouchableOpacity>
      /*
      ...
      ...
      ...
      */
    );
  };
Step 8: Render Local and Remote MediaStream
import MicOn from "./asset/MicOn";
import MicOff from "./asset/MicOff";
import VideoOn from "./asset/VideoOn";
import VideoOff from "./asset/VideoOff";
import CameraSwitch from "./asset/CameraSwitch";
import IconContainer from "./src/components/IconContainer";

export default function App({}) {
  // Handling Mic status
  const [localMicOn, setlocalMicOn] = useState(true);

  // Handling Camera status
  const [localWebcamOn, setlocalWebcamOn] = useState(true);

  // Switch Camera
  function switchCamera() {
    localStream.getVideoTracks().forEach((track) => {
      track._switchCamera();
    });
  }

  // Enable/Disable Camera
  function toggleCamera() {
    localWebcamOn ? setlocalWebcamOn(false) : setlocalWebcamOn(true);
    localStream.getVideoTracks().forEach((track) => {
      localWebcamOn ? (track.enabled = false) : (track.enabled = true);
    });
  }

  // Enable/Disable Mic
  function toggleMic() {
    localMicOn ? setlocalMicOn(false) : setlocalMicOn(true);
    localStream.getAudioTracks().forEach((track) => {
      localMicOn ? (track.enabled = false) : (track.enabled = true);
    });
  }

  // Destroy WebRTC Connection
  function leave() {
    peerConnection.current.close();
    setlocalStream(null);
    setType("JOIN");
  }

  const WebrtcRoomScreen = () => {
    return (
      <View
        style={{
          flex: 1,
          backgroundColor: "#050A0E",
          paddingHorizontal: 12,
          paddingVertical: 12,
        }}
      >
        {localStream ? (
          <RTCView
            objectFit={"cover"}
            style={{ flex: 1, backgroundColor: "#050A0E" }}
            streamURL={localStream.toURL()}
          />
        ) : null}
        {remoteStream ? (
          <RTCView
            objectFit={"cover"}
            style={{
              flex: 1,
              backgroundColor: "#050A0E",
              marginTop: 8,
            }}
            streamURL={remoteStream.toURL()}
          />
        ) : null}
        <View
          style={{
            marginVertical: 12,
            flexDirection: "row",
            justifyContent: "space-evenly",
          }}
        >
          <IconContainer
            backgroundColor={"red"}
            onPress={() => {
              leave();
              setlocalStream(null);
            }}
            Icon={() => {
              return <CallEnd height={26} width={26} fill="#FFF" />;
            }}
          />
          <IconContainer
            style={{
              borderWidth: 1.5,
              borderColor: "#2B3034",
            }}
            backgroundColor={!localMicOn ? "#fff" : "transparent"}
            onPress={() => {
              toggleMic();
            }}
            Icon={() => {
              return localMicOn ? (
                <MicOn height={24} width={24} fill="#FFF" />
              ) : (
                <MicOff height={28} width={28} fill="#1D2939" />
              );
            }}
          />
          <IconContainer
            style={{
              borderWidth: 1.5,
              borderColor: "#2B3034",
            }}
            backgroundColor={!localWebcamOn ? "#fff" : "transparent"}
            onPress={() => {
              toggleCamera();
            }}
            Icon={() => {
              return localWebcamOn ? (
                <VideoOn height={24} width={24} fill="#FFF" />
              ) : (
                <VideoOff height={36} width={36} fill="#1D2939" />
              );
            }}
          />
          <IconContainer
            style={{
              borderWidth: 1.5,
              borderColor: "#2B3034",
            }}
            backgroundColor={"transparent"}
            onPress={() => {
              switchCamera();
            }}
            Icon={() => {
              return <CameraSwitch height={24} width={24} fill="#FFF" />;
            }}
          />
        </View>
      </View>
    );
  };
}
You may get the SVG of the CameraSwitch, VideoOn and MicOn Icon here Assets.
IconContainer.js component code file.
import React from 'react';
import {TouchableOpacity} from 'react-native';

const buttonStyle = {
  height: 50,
  aspectRatio: 1,
  justifyContent: 'center',
  alignItems: 'center',
};
const IconContainer = ({backgroundColor, onPress, Icon, style}) => {
  return (
    <TouchableOpacity
      onPress={onPress}
      style={{
        ...style,
        backgroundColor: backgroundColor ? backgroundColor : 'transparent',
        borderRadius: 30,
        height: 60,
        aspectRatio: 1,
        justifyContent: 'center',
        alignItems: 'center',
      }}>
      <Icon />
    </TouchableOpacity>
  );
};
export default IconContainer;
Wohoo!! Finally we did it.
Step 9: Handle Audio Routing in WebRTC
We will use the third-party lib React Native Incall-Manager (https://github.com/react-native-webrtc/react-native-incall-manager) to handle all audio-related edge cases during video conferencing.
 useEffect(() => {
    InCallManager.start();
    InCallManager.setKeepScreenOn(true);
    InCallManager.setForceSpeakerphoneOn(true);

    return () => {
      InCallManager.stop();
    };
  }, []);
You can get complete source code here.we created a WebRTC app with a signalling server with the help of this blog. We can use peer-to-peer communication with 2-3 people in one room/meeting.
Integrate WebRTC with React Native using Video SDK
Video SDK is the most developer-friendly platform for live video and audio SDKs. Video SDK makes integrating live video and audio into your React Native project considerably easier and faster. You can have a branded, customised, and programmable call up and running in no time with only a few lines of code.
In addition, Video SDK provides best-in-class modifications, providing you total control over layout and rights. Plugins may be used to improve the experience, and end-to-end call logs and quality data can be accessed directly from your Video SDK dashboard or via REST APIs. This amount of data enables developers to debug any issues that arise during a conversation and improve their integrations for the best customer experience possible.
Alternatively, you could follow this quickstart guide to Create a Demo React Native Project with the Video SDK. or start with Code Sample.


Oldest comments (4)
Hi , can you please provide the repository ? It will be very very helpful.
hi kindly please share git repo with us
Hi.
I tried mine but after answering the call the device from whence I initiated the call does not join the WebRTCRoom.
I have also being using a media server called Ant Media which provide me an easy way of building a SFU and MCU type conference they also have very easy to integrate SDKs for Flutter ,IOS, Android ,React Native as well.