
Hey there, welcome to the second tutorial in the series. Refer to the first tutorial here. If you will like to skip setup, clone the repo and checkout to the getting-started branch.
Authentication for APIs
Securing APIs can be done in a number of ways. From API keys to JSON Web Token (JWT). AdonisJS is so awesome that it comes configured with several authentication methods. We will be using JWT to secure our APIs. Refer to AdonisJS authentication documentation for more info.
The first step is to change the authenticator value in auth.js from session to jwt.
 - authenticator: 'session',
 - authenticator: 'jwt',
Now, in the routes.js file, add routes for registration and login.
  Route.post("register", "UserController.register").middleware("guest");
  Route.post("login", "UserController.login").middleware("guest");
CSRF Protection
According to OWAPS
Cross-Site Request Forgery (CSRF) is an attack that forces an end user to execute unwanted actions on a web application in which they’re currently authenticated.
CSRF attacks mainly apply to web forms (POST, PATCH, DELETE) and pages (GET). Here's a StackOverflow answer further explaining this. Learn more about CSRF from this video.
%[https://www.youtube.com/watch?v=eWEgUcHPle0]
Since we are purely building APIs we won't have to worry about CSRF, so we can safely disable it. In shield.js, set the enable key of the csrf field to false.
  // shield.js
  csrf: {
    - enable: true,
    + enable: false,
    methods: ['POST', 'PUT', 'DELETE'],
    filterUris: [],
    cookieOptions: {
      httpOnly: false,
      sameSite: true,
      path: '/',
      maxAge: 7200
    }
  }
Auth routes
We will start API versioning right from the start. Create an auth group with two POST requests.
Route.group(() => {
  Route.post("register", "UserController.register").middleware("guest");
  Route.post("login", "UserController.login").middleware("guest");
}).prefix("api/v1");
These routes have a middleware("guest") attached to them. This means only requests without valid JWT will work. In essence, these routes are publicly exposed. Note the use of UserController. This means these routes will be handled by the register and login methods of the user controller which we will create in a bit.
User controller
Create the user controller by running. Select HTTP requests when prompted.
adonis make:controller User

# > Select controller type
# ‣ For HTTP requests
#  For Websocket channel

# output
# ✔ create  app/Controllers/Http/UserController.js
You can shorten this to
adonis make:controller User --type=http
We will add the register, login and other methods concerning the User model here.
Models and tables
Adonis has a database provider called Lucid. Lucid is used for CRUD operations on tables. If you look into the app/Models directory, you will find two files: User.js and Token.js. These models represent database tables. Analysing the User model shows that this model extends the Model class which is from Lucid.
/** @type {typeof import('@adonisjs/lucid/src/Lucid/Model')} */
const Model = use("Model");

class User extends Model { ... }
Ideally, each table you create should be created from a model. We execute business logic in controllers using models to simplify CRUD operations.
User registration
First, import the User Lucid model using this syntax.
const User = use("App/Models/User");
Add this method to the UserController.js file. Notice the auth, request and response destructured objects on the method. Unlike in ExpressJS, the auth method is available to all controller methods.
  async register({ auth, request, response }) {
    try {
      const { email, password } = request.all();

      const user = await User.create({
        email,
        password,
      });

      const authedUser = await auth.withRefreshToken().attempt(email, password);
      return response.status(201).send(authedUser);
    } catch (error) {
      console.log(error);
      return response.status(500).send(error);
    }
  }
A user is created with User.create and is authenticated using their email and password.
User login
Add this method below the register method
  async login({ auth, request, response }) {
    try {
      const { email, password } = request.all();

      const authedUser = await auth.withRefreshToken().attempt(email, password);

      return response.status(200).send(authedUser);
    } catch (error) {
      return response.status(404).send(error);
    }
  }
Notice how insecure the API is? If a user loses their password, an attacker can perform malicious activities on the user's account. We can solve this by adding 2FA using email or adopting OAuth.
Validating request data
Installing @adonisjs/validator
AdonisJS offers a first part package called indicative for handling validation. We can include it in our project using the @adonisjs/validator package. Run this command to include it
adonis install @adonisjs/validator

# Output
# [1/1] 📦  Dependencies installed [@adonisjs/validator]
Notice the use of adonis install. It uses npm under the hood and runs some setup instructions within the package like opening setup instructions within in your browser. Now, add @adonisjs/validator/providers/ValidatorProvider to the providers array in start/app.js. Refer to the validator docs for more info.
Setting up validation in UserContoller
The validateAll method helps us validate all fields before resolving. Require validateAll in UserController.js.
const { validateAll } = use("Validator");
Here are three steps for handling validation. Add them to the register() method:
- Define rules
      const rules = {
        email: "required|email|unique:users,email",
        password: "required|min:8"
      };
- Validate request data
const validation = await validateAll(request.all(), rules);
- Return validation errors if any
      if (validation.fails()) {
        return response.status(400).send(validation.messages());
      }
Ensure you do all these above the user creation.
      const user = await User.create({
        email,
        password,
      });
Follow the same steps for login method but use these rules instead.
      const rules = {
        email: "required|email",
        password: "required",
      };
Testing what we have so far
Ensure your server is running. Test the /register and /login routes using your favourite API testing app.
Here's what a successful registration will return

And here' a registration attempt with error messages should look like

Notice how the errors are returned as JSON. It is up to you to either modify these error messages to suit the API consumer or return them as is.
Getting a user's profile (where auth comes into play)
To get a user's profile, we first add the GET route in routes.js
Route.get("/users/profile", "UserController.show").middleware(["auth"]);
Notice that this route has the auth middleware attached. An error will be thrown for requests without a valid JWT token. Add this show method to UserController.js.
  async show({ auth, response }) {
    try {
      const user = await auth.user;
      return response.status(200).send(user);
    } catch (error) {
      return response.status(500).send(error);
    }
  }
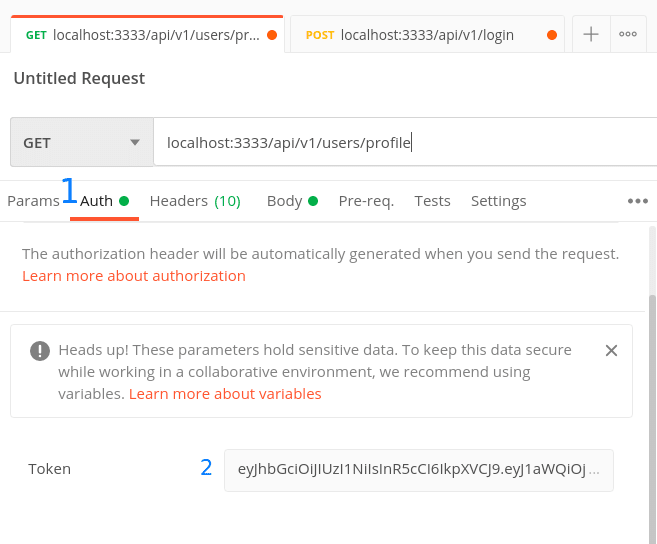
To test the GET /users/profile route, we add the JWT obtained from registration or login to the Authorization request header. In postman, we do this in the Auth tab.
Handling profile update
A user must be authenticated to update their profile. We have several routes handling profile updates.
- /users/profile
- /users/email
- /users/password
I'll handle the first and second. You can attempt the third on your own. You can always check what I did in the authentication branch of this repo for the complete code.
First things first, add these routes to your routes.js file.
  Route.patch("/users/profile", "UserController.updateProfile").middleware([
    "auth",
  ]);
  Route.patch("/users/email", "UserController.updateEmail").middleware([
    "auth",
  ]);
  Route.patch("/users/password", "UserController.updatePassword").middleware([
    "auth",
  ]);
Profile update
We will use the method below to update a user's profile.
  async updateProfile({ auth, request, response }) {
    try {
      const { firstName, lastName } = request.all();
      const rules = {
        firstName: "required",
        lastName: "required",
      };
      const validation = await validateAll(request.all(), rules);

      if (validation.fails()) {
        return response.status(400).send(validation.messages());
      }

      const user = await auth.user;
      user.firstName = firstName;
      user.lastName = lastName;

      await user.save();
      return response.status(200).send(user);
    } catch (error) {
      return response.status(500).send(error);
    }
  }
Profile here refers to firstName and lastName. We can always more fields later using migrations. Notice how we used user.save() to persist the changed values to the DB. Adonis figures if it's going to create a new row or update an existing one.
On successful update, you should have a response similar to.

Notice the password, created_at and updated_at fields. These fields are unnecessary, especially the password field. We exclude these fields from being returned by adding a hidden getter to the User model.
  static get hidden() {
    return ["password", "created_at", "updated_at", "id"];
  }
You may want to exclude the id also.
Email update
To update email, we follow the same steps as above. Only diff here are the rules
      const rules = {
        email: "required|email|unique:users,email",
      };
and the save logic
      const user = await auth.user;
      user.email = email;

      await user.save();
Password update
You can handle the logic for new password however you wish. Here's a snippet for verifying that the current password matches the new one.
      const passwordsMatch = await Hash.verify(currentPassword, user.password)

      if (!passwordsMatch) {
        return response.status(400).send("Supplied password is wrong");
      }
Hash is part of built-in Adonis helpers. Ensure you require Hash using.
const Hash = use("Hash");
This brings us to the end of the authentication tutorial. Checkout to the authentication branch on this github repo if you need the complete code. Let's recap what we've learned so far.
Recap
- How to set up JWT authentication in AdonisJS
- What CSRF is
- How to set up controllers in AdonisJS
- How to handle validation in controller methods
Please provide feedback in the comment section if you run into any problem. Give a few likes, I appreciate that. Thanks for following along. Adios ✌🏾🧡.


Latest comments (0)