
Originally posted on my website on September 8th 2019
Introduction
In the previous article i showed you how to register the Metatags plugin with WordPress using Oop Php. In this article we will continue by adding a folder structure and a Webpack asset bundler using Laravel Mix to process the Css and React Javascript needed for the Gutenberg editor.
I'm gonna quickly show you how to set up a Package.json file and Laravel Mix to bundle our assets. If you are unfamiliar with Laravel Mix, Please read my "Laravel Mix, Sass and ES6 Modules in theme development" article first.
Folder sturcture.
We first need to add some structure and folders to our project. At this point we only have a metatags.php in our plugin directory, and if you created the test files in the previous article there should be a dist/css/metatags.css and a dist/js/metatags.js file.
Because we are going to use an asset bundler we are going to need a src/ directory where our working files will live, and a dist/ directory where the bundled files will be generated. Below is a screenshot of the finished projects files.
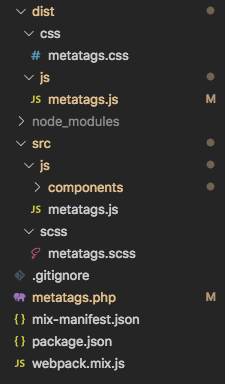
Source directory
Lets start by adding a src/ directory to our project. In this directory we will put our working files. Meaning that we will be writing our code in this directory.
Within the src/ directory create the following files.
- src/scss/metatags.scss This file will hold the styles for this project.
- src/js/metatags.js This will be our main Javascript file.
Distribution directory
This directory will hold the files that will be generated by our asset bundler, and that will be used to run the plugin. Meaning that these files will be the ones we enqueue with the Metatags class..
If you created the test files earlier, you should already have this directory set up. If not create the following files.
- dist/css/metatags.css The main stylesheet for the plugin.
- dist/js/metatags.js The main Javascript file for the plugin.
.gitignore
If you want to use Git to version the plugin you should add a .gitignore file with the following content.
This will make sure that the node_modules folder and the package-lock.json file won't be added to your repository.
Package.json file
To install the Laravel Mix asset bundler, we are gonna need Npm in our project. To setup Npm create a file called package.json in the root of the plugin and add the following content.
Here we provide some basic info about the project. And add some scripts that will serve as our Npm commands for Laravel Mix later.
Install Laravel Mix
To create a Gutenberg plugin with React we are going to need an asset bundler. In this case we are going to use Webpack, but since Webpack is a bit cumbersome to configure, we will use Laravel Mix which is a wrapper Api making configuring Webpack a breeze.
To install Laravel Mix into our project Move your terminal into the root of our plugin, and run the following command.
$ npm install laravel-mix sass sass-loader --save-dev
With this command we add Laravel Mix and the needed Sass packages to our project.
Webpack.mix.js
Now that we have Laravel Mix installed we need to provide it with a configuration file. Please create a file called webpack.mix.js in the root of our plugin and add the following code.
You can check out the official docs, or check out my article to learn more about configuring Laravel Mix.
With this config we tell Laravel Mix to take our two entry point files in the src/ directory and process/output them into the dist/ directory.
Next we add a webpackConfig object. All this does is let Webpack know that the React and ReactDom packages will be provided by another bundle. Since Gutenberg already contains copies of these packages we don't need to include these in our own bundle. But if we don't tell Webpack about this it will think that the packages are missing, exit with an error and it won't bundle our files.
Laravel Mix Npm commands
Now that we have Laravel Mix installed we can run it by using the script commands we added to the package.json file earlier. We have three commands at our disposal namely:
$ npm run dev
This command will process and bundle our plugin files for development use.
$ npm run watch
This command will do the same as npm run dev but will keep running and watch for file changes. If any of our files change it will automatically process and rebundle our files.
NOTE: To stop the npm run watch process you can type ctrl + c in your terminal window.
$ npm run production
This command will process, bundle and minify our files for use in distribution a.k.a your plugin on the WordPRess plugin directory.
Testing our setup.
To check if everything is working like we want it to we need to add some content to our files in the src/ directory and see if this gets processed to the fies in the dist/ directory.
Add the following content to the src/js/metatags.js file.
And the following content to the src/scss/metatags.scss file.
Save both files and in your terminal run the command below.
$ npm run dev
If all goes well your should see a output like shown below.

If you now go to any Gutenberg edit screen in your WordPress admin you should have some funky looking blue borders accros the screen, and get a alert showing the "Content of metatags.js in scr/ is been copied to the dist/ directory." message.
If you don't get this result. Please check this Github Repositorie of the finished project to check if you missed something along the way..
Moving forward
That's it for now setting up the folder structure and assets bundling. In the next article we will start adding Javascript code, and register our plugin with Gutenberg.
Follow me on twitter @Vanaf1979 or here on Dev.to @Vanaf1979 to be notified about the next article in this series, and other WordPress related stuff.
IIf you have any questions, want to leave a comment or want to point out a mistake i made please drop you comment here so i can get back to you.
Thanx for reading.


Top comments (0)